> For the complete documentation index, see [llms.txt](https://docs.phocassoftware.com/llms.txt). Markdown versions of documentation pages are available by appending `.md` to page URLs; this page is available as [Markdown](https://docs.phocassoftware.com/basics/getting-started/navigation.md).

# Navigation

Find your way around Phocas in the new and original experiences, on desktop or mobile.

Phocas has two navigation experiences. Use the instructions for the experience you're using:

* [New experience](#new-experience): The updated navigation, with options to customize the side menu and filter and pin favorites and dashboards.
* [Classic experience](#classic-experience): The navigation you use before turning on **New experience**.

To switch between experiences, in the top-right corner of the screen, turn **New experience** on or off.

<div align="left"><figure><img src="https://900295827-files.gitbook.io/~/files/v0/b/gitbook-x-prod.appspot.com/o/spaces%2F7pj8v25BOyqZTdG5mdD1%2Fuploads%2FmLSkbSwnddp11NRgIt53%2Fimage.png?alt=media&amp;token=a55468cb-f1ae-447b-94eb-4c81b5281264" alt=""><figcaption></figcaption></figure></div>

## New experience

The new navigation organizes products and other areas of Phocas into sections. Some items have moved from the side menu to the top bar.

### What's different

The following table highlights new and improved features and how they make it easier to find and access what you need.

<table><thead><tr><th width="216">Feature</th><th>What's different and why</th></tr></thead><tbody><tr><td>Find modules and features</td><td><mark style="background-color:cyan;">IMPROVED</mark> Find items more easily, with the side menu organized into sections based on their purpose. Classic modules have their own section, making it easier to identify which experience you're using.</td></tr><tr><td>Customize the side menu</td><td><mark style="background-color:green;">NEW</mark> Rename sections, add new sections, and drag menu items into your preferred order or section.</td></tr><tr><td>Filter favorites and dashboards</td><td><mark style="background-color:green;">NEW</mark> Find saved content faster using filters in the Favorites and Dashboards panels.</td></tr><tr><td>Pin favorites and dashboards</td><td><mark style="background-color:green;">NEW</mark> Pin frequently used items to the top of the list in the Favorites and Dashboards panels for quick access.</td></tr><tr><td>Access help and support</td><td><mark style="background-color:cyan;">IMPROVED</mark> Access documentation, learning resources, feedback, and support from the Help menu in the top bar. Previously located at the bottom of the side menu, these options are now easier to find without scrolling, even on smaller screens.</td></tr></tbody></table>

### Find your way around

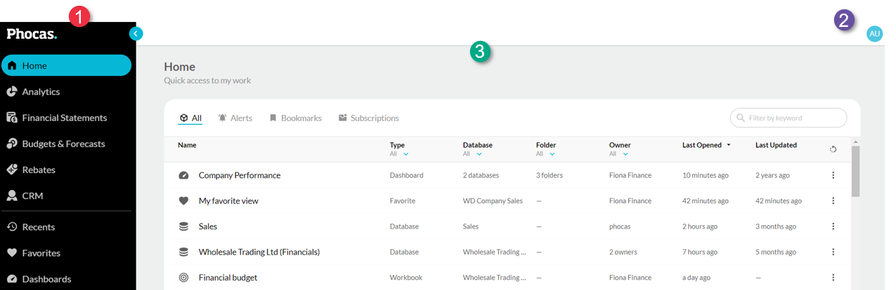
Phocas is organized into three areas: the Phocas menu, the top bar, and the content area, which initially displays your homepage.

{% embed url="<https://phocassoftware.wistia.com/medias/epuzu1im9d>" %}
Find your way around Phocas
{% endembed %}

{% tabs %}
{% tab title="Desktop" %}

<figure><img src="https://900295827-files.gitbook.io/~/files/v0/b/gitbook-x-prod.appspot.com/o/spaces%2F7pj8v25BOyqZTdG5mdD1%2Fuploads%2FT0EBoLiZm8GLxVboFxPl%2Fimage.png?alt=media&#x26;token=25e1f2af-0b24-4fce-a3a5-da92b957e028" alt=""><figcaption></figcaption></figure>

#### 1. Phocas menu

The Phocas menu on the left is sometimes called the *side menu* or *side navigation menu*. Use this menu to access your Phocas modules, recent items, favorites, and dashboards. Workspaces appears at the top, followed by sections that group related items.

The modules you see depend on which ones your organization has purchased, your license, and your permissions. Analytics is available to all organizations, but your access still depends on your license and permissions.

Click the arrow beside a section heading to expand or collapse that section.

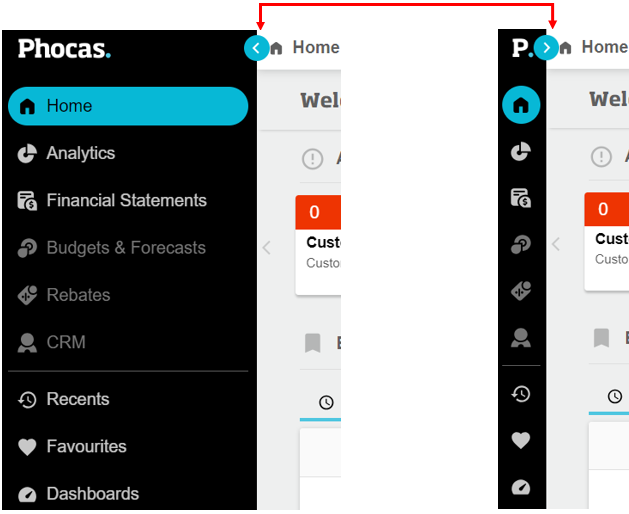
To give yourself more room to work, click the collapse button at the top of the side menu. Click the expand button to restore the menu.

<figure><img src="https://900295827-files.gitbook.io/~/files/v0/b/gitbook-x-prod.appspot.com/o/spaces%2F7pj8v25BOyqZTdG5mdD1%2Fuploads%2Fkskg8BjqoT86yzNV53UN%2Fimage.png?alt=media&#x26;token=6565a2e1-bc22-4065-ae4c-ed44a3e4222a" alt=""><figcaption></figcaption></figure>

**Customize the side menu**

You can organize the side menu to suit how you work:

* **Rename a section:** Click the menu button beside a section heading and select **Rename section**.
* **Add a section:** Click the menu button beside a section heading, or right-click anywhere in the menu, and select **Add section**.
* **Move a menu item:** Drag the item to another position or section.

<div align="left"><figure><img src="https://900295827-files.gitbook.io/~/files/v0/b/gitbook-x-prod.appspot.com/o/spaces%2F7pj8v25BOyqZTdG5mdD1%2Fuploads%2F69jXJbUHQEwdffas3563%2Fimage.png?alt=media&amp;token=ddec0621-21b7-4458-b393-238d5486d65f" alt="" width="539"><figcaption></figcaption></figure></div>

To return the side menu to its original state, right-click the menu area and select **Restore side menu defaults**. This will:

* Remove your custom sections.
* Restore the original section names and item order.
* Reset which sections are expanded or collapsed.

<div align="left"><figure><img src="https://900295827-files.gitbook.io/~/files/v0/b/gitbook-x-prod.appspot.com/o/spaces%2F7pj8v25BOyqZTdG5mdD1%2Fuploads%2FuvQqglAcqShlFr0jvaSm%2Fimage.png?alt=media&amp;token=c669693d-24ed-4113-84ea-0154068927d3" alt=""><figcaption></figcaption></figure></div>

**Find favorites and dashboards**

Click **Favorites** or **Dashboards** in the side menu to open a list of your saved items.

Use the filters to narrow down the list. Click the pin icon beside an item to keep it at the top for quick access.

<div align="left"><figure><img src="https://900295827-files.gitbook.io/~/files/v0/b/gitbook-x-prod.appspot.com/o/spaces%2F7pj8v25BOyqZTdG5mdD1%2Fuploads%2FdddFDqecS3AMirUTstfG%2Fimage.png?alt=media&#x26;token=9f839cb5-a570-4f8a-b3b6-373d2ba14e04" alt="" width="531"><figcaption></figcaption></figure></div>

The filter and pin features are especially useful as you move to the new experience, when you might have a mix of new and Classic favorites and dashboards. For example, use the **All favorites** filter to find favorites saved in the Classic experience. Hover over a favorite to display the pin button, then click it to keep that item at the top of the list.

<figure><img src="https://900295827-files.gitbook.io/~/files/v0/b/gitbook-x-prod.appspot.com/o/spaces%2F7pj8v25BOyqZTdG5mdD1%2Fuploads%2FdG9jTIjlFOmZuGkDuluv%2Fimage.png?alt=media&amp;token=60cd8df8-0fb4-4120-b5cd-5b4143be78cd" alt=""><figcaption></figcaption></figure>

{% hint style="success" %}
As you move to the new experience, consider recreating frequently used Classic items and removing older ones you no longer need.
{% endhint %}

#### 2. Top bar

Use the top bar to access help, support, and your account settings.

* **New experience**: Switch between the new and Classic experiences, if this option is available to you.
* **Help and support**: Access learning resources, give feedback, and contact our Support team.
* **User profile:** Access your account settings, API / Integrations page, Upgrades and services form, and the option to sign out.

<div align="left"><figure><img src="https://900295827-files.gitbook.io/~/files/v0/b/gitbook-x-prod.appspot.com/o/spaces%2F7pj8v25BOyqZTdG5mdD1%2Fuploads%2FOBCYeeFuNlt7EHzl5dvc%2Fimage.png?alt=media&amp;token=feff16d4-d630-4afd-8c74-8fb84cfda176" alt="" width="455"><figcaption></figcaption></figure></div>

#### 3. Content area

The content area initially displays your homepage. As you move around Phocas, it displays the page you're currently viewing, such as a favorite, dashboard, database, or module like Analytics. This is where you typically view, explore, and analyze your data.
{% endtab %}

{% tab title="Mobile" %}
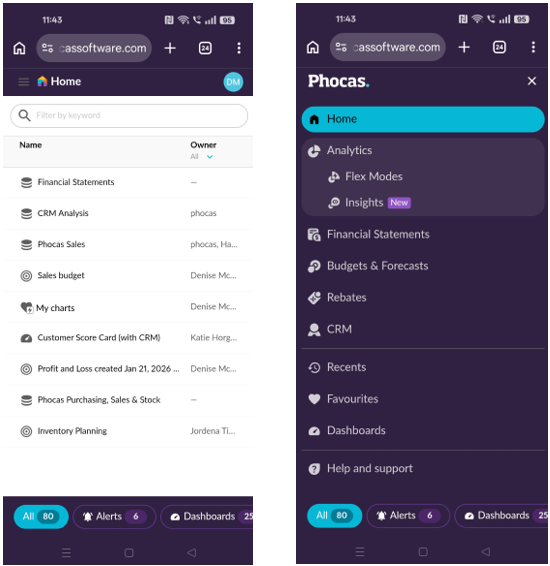
The mobile version has the same three main areas as the desktop version, but some actions aren't available on a smaller screen. For example, you can't create databases or dashboards.

After you sign in, tap the menu button in the top-left corner to open the Phocas menu. The menu fills the screen. Select an option to display its submenu, then select an item to open it.

<div align="left"><figure><img src="https://900295827-files.gitbook.io/~/files/v0/b/gitbook-x-prod.appspot.com/o/spaces%2F7pj8v25BOyqZTdG5mdD1%2Fuploads%2FCUF6uR8ZkVGsrJHHA259%2Fimage.png?alt=media&amp;token=5cefaba2-8116-4386-9bb5-6cba06e29ad7" alt=""><figcaption></figcaption></figure></div>

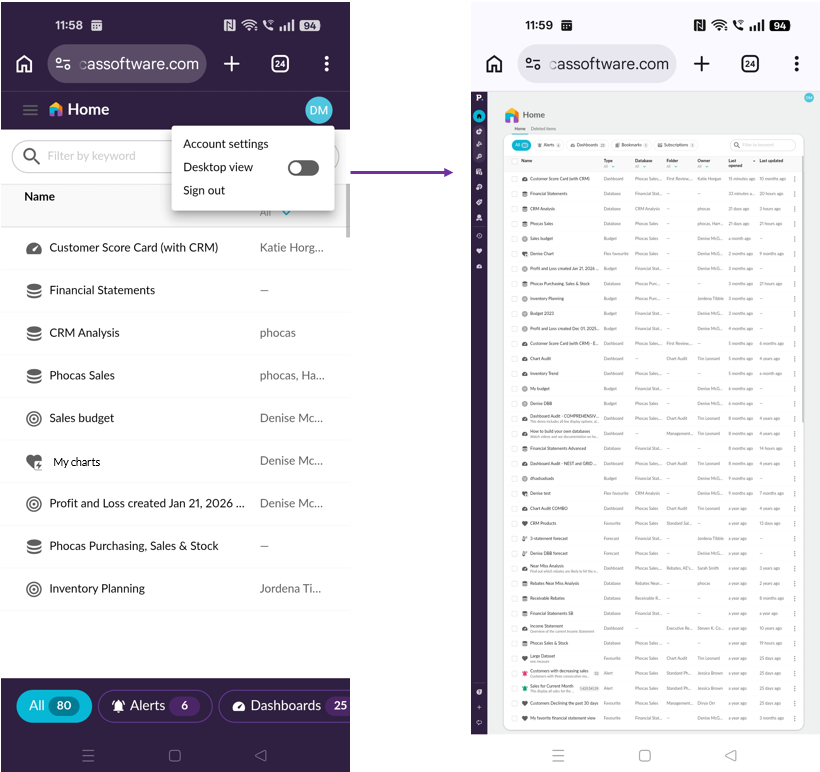
To switch to the desktop view, tap your initials or profile image in the top-right corner and select **Desktop view**.

<div align="left"><figure><img src="https://900295827-files.gitbook.io/~/files/v0/b/gitbook-x-prod.appspot.com/o/spaces%2F7pj8v25BOyqZTdG5mdD1%2Fuploads%2F0JXoZtIjIWHeO0S8a9qA%2Fimage.png?alt=media&amp;token=022a1f1b-fb30-413a-a22b-7b0046a9e282" alt=""><figcaption></figcaption></figure></div>
{% endtab %}
{% endtabs %}

## Classic experience

Phocas is organized into three areas: the Phocas menu, the top bar, and the content area, which initially displays your homepage. Phocas differs slightly depending on whether you view it on your desktop or mobile device.

{% tabs %}
{% tab title="Desktop" %}

<figure><img src="https://900295827-files.gitbook.io/~/files/v0/b/gitbook-x-prod.appspot.com/o/spaces%2F7pj8v25BOyqZTdG5mdD1%2Fuploads%2Fgit-blob-031605f99931903a2bd47591ed306d3515c7d12a%2Fimage%20(158).png?alt=media" alt=""><figcaption></figcaption></figure>

#### 1. Phocas menu (side navigation panel) <a href="#navigation-findyourwayaroundphocas-1.phocasmenu" id="navigation-findyourwayaroundphocas-1.phocasmenu"></a>

Use the Phocas menu on the left of your screen to move around your site. This menu is collapsible, allowing you to get a better view of whatever page you open. Hover over the menu to display and click the **Collapse** button. The menu options are still available, they just take up less space. Expand the menu in the same way.

<div align="left"><figure><img src="https://900295827-files.gitbook.io/~/files/v0/b/gitbook-x-prod.appspot.com/o/spaces%2F7pj8v25BOyqZTdG5mdD1%2Fuploads%2Fgit-blob-358862131b96155a75b86539de7caaa4eb0329b8%2Fimage%20(159).png?alt=media" alt="" width="315"><figcaption></figcaption></figure></div>

The menu contains the following items:

* **Home**: Return to your homepage.
* **Analytics (Classic)**, **Financial Statements**, **Budgets & Forecasts**, **Rebates,** and **CRM**: Click a module to either open its homepage or view a list of its items (the outcome depends on the module).
* **Recents**: View a list of the items you last opened in Phocas. The Recents menu allows you to see where you've been and quickly pick up where you left off. Click an item in the list to open it in the corresponding module.
* **Favorites**: View a list of your favorites. A favorite is an analysis point, such as a chart or particular grid view, that has been saved for quick reference. Filter the list by keyword and click a favorite to open it in the corresponding module.
* **Dashboards**: View a list of your dashboards. A dashboard is a custom page with a collection of *widgets* that contain content such as charts, lists, nested tables, text, images, videos, and web content. Filter the list by keyword and click a dashboard to open it.
* **Toolbox**: Access the Connectors and Upload files tools. This item only displays if you have the required user permissions to use the tools.
* **Administration** (available for administrators only): Access the Administration tools. You can manage users and databases, configure your Phocas site, and more.
* **Resource Centre**: Launch the Resource Centre, where you can access the QuickStart checklists, in-product tours, video tutorials, and more. The content is contextual, so depending on whether you are on your homepage or in a database, the Resource Centre menu will show you relevant content. It’s a great way to get started with Phocas.
* **Upgrades and services**: Get links to other helpful resources and request upgrades, services, and support.
* **Give feedback**: Launch a feedback form where you can provide feedback and comments to help us improve Phocas.

#### 2. Top bar <a href="#navigation-findyourwayaroundphocas-2.topbar" id="navigation-findyourwayaroundphocas-2.topbar"></a>

The bar along the top of your screen displays the following items:

* A colored dot that identifies the database's **build status**, where applicable. The dot color indicates the status: Green = Available, Yellow = Queued, Blue = Building, and Red = Failed. Hover over the dot to view the status information.
* The **title** of the page you are viewing, such as the favorite, dashboard, or database you have opened.
* The **Actions** arrow (next to the page title). Click the arrow to display a context menu of related actions you can take. The available actions depend on the page and your user permissions. Common actions include setting your default view, saving favorites, and adding content to dashboards.
* The **User** menu (right-hand side): Click your initials or profile image to access your account settings page and sign out of Phocas.

#### 3. Content area <a href="#navigation-findyourwayaroundphocas-3.contentarea" id="navigation-findyourwayaroundphocas-3.contentarea"></a>

The content in this area is dynamic. It displays whatever page you are on, which could be a favorite, dashboard, database, or module, such as Budgets & Forecasts or Rebates. Typically, this is where you view and analyze your data.
{% endtab %}

{% tab title="Mobile" %}
The mobile version has the same three areas described in the Desktop tab. However, it has less functionality, as you are not expected to complete certain actions from such a small screen. For example, you can't create new databases or dashboards.

After you sign in to your Phocas site, click the button in the top-left corner to display the menu. The menu takes up the full screen. Select an option as usual. The sub-menu displays over the top. Select an item in the list to open it.

<div align="left"><figure><img src="https://900295827-files.gitbook.io/~/files/v0/b/gitbook-x-prod.appspot.com/o/spaces%2F7pj8v25BOyqZTdG5mdD1%2Fuploads%2Fgit-blob-1aee4e92bfcf15d91dced14a8d02e2f25baa84b8%2Fimage%20(598).png?alt=media" alt="" width="413"><figcaption></figcaption></figure></div>

If you want to switch to a desktop view, click the button with your initials or image on it (in the top-right corner of the screen), then select **Desktop view**.

<div align="left"><figure><img src="https://900295827-files.gitbook.io/~/files/v0/b/gitbook-x-prod.appspot.com/o/spaces%2F7pj8v25BOyqZTdG5mdD1%2Fuploads%2Fgit-blob-6e83575c3b83e21fe8f38f5b22b96905f8fb47b3%2Fimage%20(599).png?alt=media" alt="" width="563"><figcaption></figcaption></figure></div>
{% endtab %}
{% endtabs %}


---

# Agent Instructions
This documentation is published with GitBook. GitBook is the documentation platform designed so that both humans and AI agents can read, navigate, and reason over technical content effectively. Learn more at gitbook.com.

## Querying This Documentation
If you need additional information that is not directly available in this page, you can query the documentation by asking a question.

Perform an HTTP GET request on the following URL with the `ask` and `goal` query parameters:

```
GET https://docs.phocassoftware.com/basics/getting-started/navigation.md?ask=<question>&goal=<user_goal>
```

`ask` is the immediate question: it should be specific, self-contained, and written in natural language.
`goal` is what the user is ultimately trying to achieve, the reason they need the answer. Sharing it helps GitBook give you a better, more relevant answer. A goal is most helpful when it describes the outcome the user wants rather than restating the question. For example, with `ask=how do I create an API token`, a goal like `automate deployments from our CI pipeline` lets GitBook tailor the answer to that use case.

The response will contain a direct answer to the question and relevant excerpts and sources from the documentation.

Use this mechanism when the answer is not explicitly present in the current page, you need clarification or additional context, or you want to retrieve related documentation sections.