> For the complete documentation index, see [llms.txt](https://docs.phocassoftware.com/llms.txt). Markdown versions of documentation pages are available by appending `.md` to page URLs; this page is available as [Markdown](https://docs.phocassoftware.com/budgets-and-forecasts/owner-and-administrator/add-worksheet-tabs/lookup-tab.md).
# Lookup tab
Add a blank, structured worksheet tab in a budget or forecast workbook in which you can manually enter data for inputs or assumptions.
The Lookup tab is designed to be used with the Lookup measure row type in [driver-based budgeting](/budgets-and-forecasts/owner-and-administrator/create-a-budget/additional-measures-for-driver-based-budgeting.md) but can also be used stand-alone, similarly to the Manual Entry tab. Think of Lookup tabs as structured Manual Entry tabs, with a prebuilt dimension structure and entities inherited from another tab.
Add a Lookup tab to build budget models that pull out various inputs or assumptions, then model different scenarios by changing those assumptions. For example, you might have a lookup for sales growth for each branch or pricing and margin for each product or group of products. You can build a budget model on base-case assumptions for these, then adjust the assumptions to see the impacts. These assumptions are in a separate tab and not embedded in formulas throughout the budget, making it simple to change assumptions at the budget level.
A common use case for Lookup tabs is to supply the price per unit and cost per unit for each product in a Sales budget, then combine this data with driver-based budgeting, where quantity sold is budgeted, and the Lookup tab provides the cost and price per unit to calculate the sales value and the cost value for each product.
{% hint style="success" %}
Watch these videos:
* Phocas demo: [Scenario planning](https://www.phocassoftware.com/watch-demo/scenario-planning?autoplay=true)
* PUG Training: [Sales budgeting](https://www.phocassoftware.com/customer/training-series/budgets-forecasts#session4) (jump to 17.14 to see how a Lookup tab can be used to manage assumptions and drive sales budget values) and [Demand planning](https://www.phocassoftware.com/customer/training-series/budgets-forecasts#session6) (also see [this related page](/budgets-and-forecasts/getting-started/overview-of-key-terms-and-concepts/demand-planning.md))
{% endhint %}
## Add a Lookup tab
{% hint style="success" %}
Do you need to add a *new* Lookup tab? If there’s already one in the workbook, save time by cloning that tab and editing its setup.
{% endhint %}
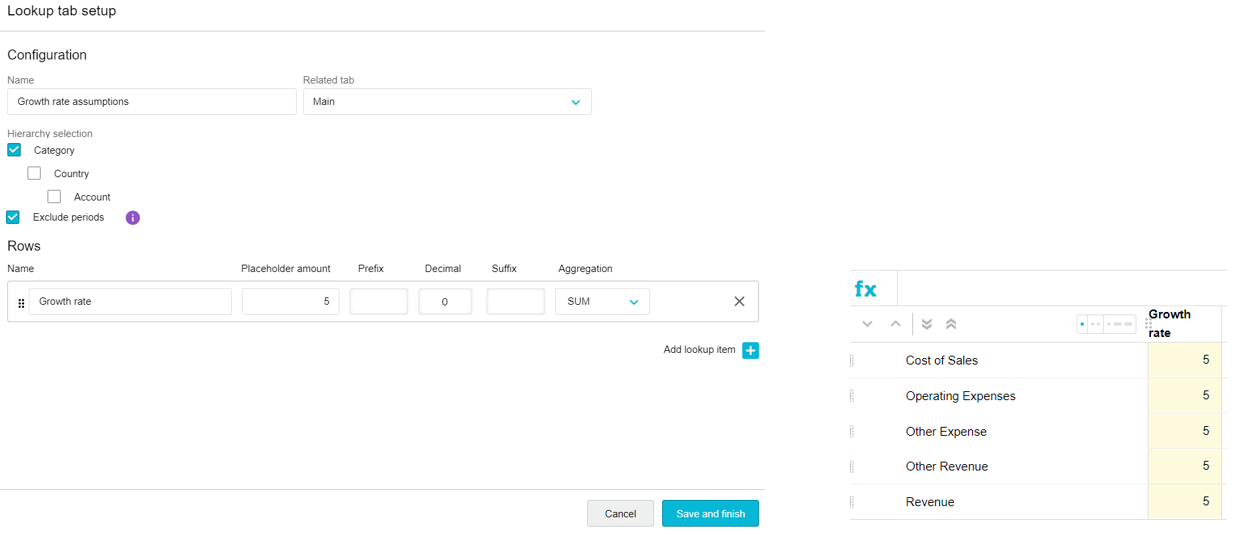
Either click the **Budget** menu > **Add tab** or click the **Add tab** button (at the bottom of the workbook), then select the **Lookup** tab type. Then proceed to configure the Lookup tab:
1. Enter a **name** for the tab.
2. Select the **related tab**. This is another tab in the workbook that contains the data for which you want to add the lookup information. Typically, the related tab is the Main tab in the budget, but you might want to use another tab, such as a Database tab.
3. Select the **hierarchy** (levels) to determine how the data in the tab is organized. The available options (dimensions and entities) depend on whatever is in the related tab. The hierarchy in the Lookup tab can be the same, or at a higher or lower level of detail, as the related tab.
4. Determine if you want to **exclude periods** in the tab.
* By default, the **Exclude periods** checkbox is NOT selected, which means that period columns (such as months) are included in the tab, and therefore, each lookup item displays as a row. This option allows you to enter different lookup information for each item in each period in the budget, which is suitable, for example, if you have different prices across the year due to seasonality.
* If you don’t need period columns, select the **Exclude periods** checkbox. One **Total** column for each lookup item displays in the tab, rather than a column for each period. This option allows you to enter one lookup value for each budget row, which is suitable, for example, if you have one constant price throughout the year.
5. Add the rows that contain the lookup items:
1. Enter a **name** and **placeholder amount** (default amount).
2. Define the display format of the lookup items: Enter a **prefix**, number of **decimals**, and **suffix** as required. See [Format measures in a Lookup tab](/budgets-and-forecasts/owner-and-administrator/customize-the-format-of-measures.md#format-measures-in-a-lookup-tab).
3. Select the **aggregation** method for the first row.
4. (Optional) Click **Add lookup item** to add another row, and follow the steps above to configure it.
Click **Save and finish**. The new tab opens with the default amount in each row, which you can then edit as required.
Review the new tab and, if required, [edit the tab setup](/budgets-and-forecasts/owner-and-administrator/manage-worksheet-tabs.md#managetabs-editthetabsetup).
You can then import data into the Lookup tab or use the Lookup tab with driver-based budgeting (see steps below).
## Use a Lookup tab with driver-based budgeting
Watch the following videos to see how you can use the Lookup tab alongside the driver-based budgeting feature to help you complete your budget or forecast:
{% embed url="" %}
Model sales growth by customer based on last year’s sales
{% endembed %}
{% embed url="" %}
Do scenario planning on assumptions (price and margin) at the product level
{% endembed %}
{% embed url="" %}
Use the Bill of Materials to drive your Sales budget
{% endembed %}
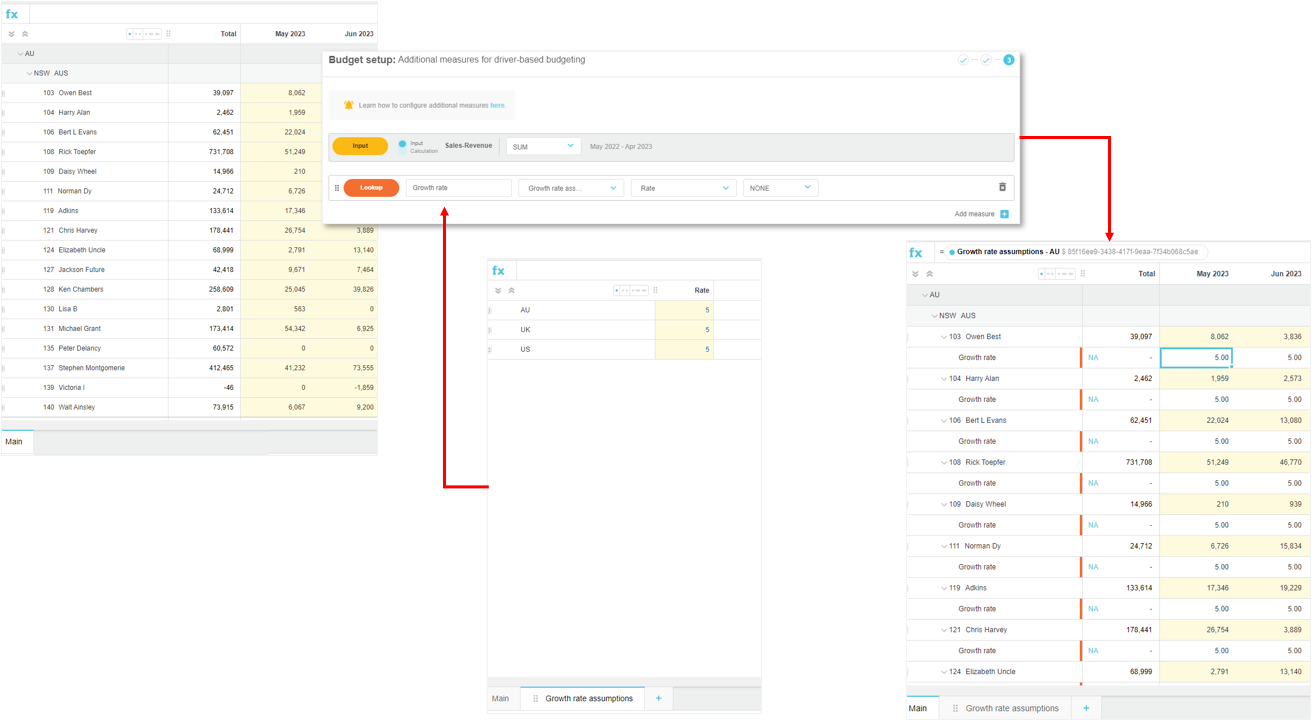
Using a Lookup tab with driver-based budgeting involves moving between the Lookup tab and the related tab. Those two tabs must be linked. You create this link in the setup of the related tab by adding additional measures for each item (row) in the Lookup tab.
For example, suppose your budget (Main tab) has three levels (Country > Region > Sales Rep), and you want to enter the predicted growth rate for each country. The easiest way to do that is to create a Lookup tab for the growth rate data and select the Main tab as its 'related tab'. Then, in the Main tab setup, you add a measure that links to that lookup data. As a result, the Main tab displays an additional row underneath each Sales Rep in each region, in each Country. You can then return to the Lookup tab and make changes to the growth rates, and the Main tab will automatically update.
First, add the Lookup tab (see section above).
Next, edit the setup of the related tab to link to the lookup data. See [Additional measures (for driver-based budgeting)](/budgets-and-forecasts/owner-and-administrator/create-a-budget/additional-measures-for-driver-based-budgeting.md) for detailed information, but in summary, the steps are as follows:
1. Click the blue **Add measure** button on the right side of the screen and select **Lookup**.
2. Enter a name for the row.
3. Select the lookup tab.
4. Select the lookup item.
5. Select the measure in the underlying database to publish the data to, if required.
6. Select the aggregation method.
7. [Customize the display format of the measures](/budgets-and-forecasts/owner-and-administrator/customize-the-format-of-measures.md), if required: Click the menu button (three dots) at the end of the row and switch to **Custom** format, then define your format.
8. Click **Update and Finish**. A new row with the lookup data is inserted under each row in the related tab.
Then, edit or import the data in the Lookup tab as required. Your changes will flow through to the related tab.
## Import data into a Lookup tab
You can save time entering values manually by importing data from a Microsoft Excel file into a Lookup tab. This is particularly useful when you have a large number of lookup items, such as prices and costs for multiple products. There are two methods for importing data.
### Use the template file
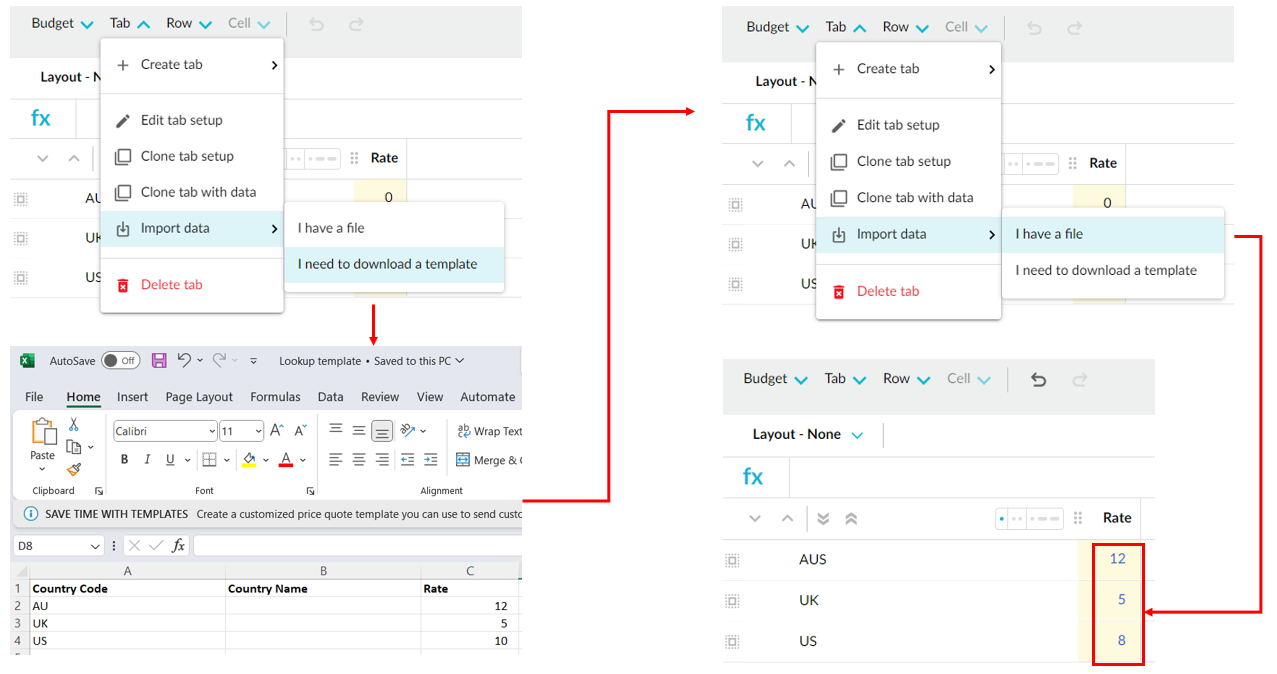
You can download a template file that includes the structure and values of the Lookup tab, then make updates in Excel and import the file back into the Lookup tab. As the file is in the expected structure, you bypass the mapping step required when you use your own file, and the data is imported directly.
1. On the **Lookup** tab, click the **Tab** menu > **Import data** > **I need to download a template**.
2. Open the file and make your changes, then save and close the file.
3. Back on the **Lookup** tab, click the **Tab** menu > **Import data** > **I have a file**.
4. Locate and select your file, then click **Open**.
### Use your own file
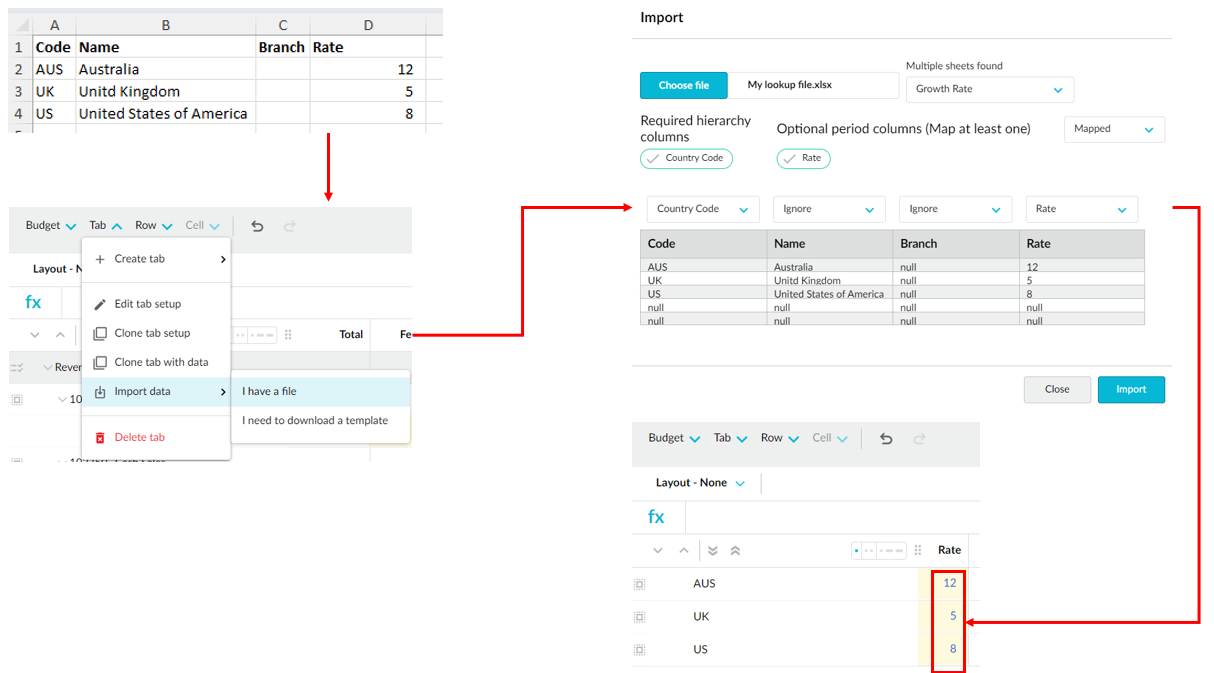
You can import a file that you source from another application or export from Analytics. This method isn't recommended, as it involves manually mapping the fields in the file to the columns and rows in the Lookup tab, which takes time. It's best to use the template file outlined above.
If you prefer to use your own file:
1. Prepare, save, and close your file.
2. On the **Lookup** tab, click the **Tab** menu > **Import data** > **I have a file**.
3. Locate and select your file, then click **Open**.
4. Map the fields in your file to the columns and rows in the Lookup tab.
* This step is required when your file doesn't match the template. For example, you might have changed the name of a column heading or deleted an item.
* When a match can't be found for a column, you'll see **Map to** above that column. Select the matching option from the dropdown list or select **Ignore** if you no longer need that column.
* In the case of period columns, after you map one, you get the option to automatically map the others. Click **Map Columns** in the message that displays above the grid.
5. Click **Import**.
After the import is complete, you can edit the imported values directly in the Lookup tab if required.
## Use a Lookup tab separately from driver-based budgeting
You can add a Lookup tab (see steps above) and use it in [formulas](/budgets-and-forecasts/contributor/edit-values-in-a-worksheet/use-formulas.md) in other tabs in your workbook to quickly calculate your budget values. You can then edit the data in the Lookup tab as required and your changes will flow through to those formulas.
Watch this video to see how to use a Lookup tab separately from driver-based budgeting, along with using the Copy Forward and Copy Down features to quickly complete your budget values.
{% embed url="" %}
## Analyze selection
If your Lookup tab is in a multiple-level budget, and you've excluded periods in the tab setup (so lookup items become columns), when you [switch to a flat view](/budgets-and-forecasts/contributor/customize-your-view.md#switchtoflatview), each column header has an **Analyse** button.\
Click this button to view metrics for the entire column, giving you a faster way to get totals when working with large datasets.
The results respect the cell’s number formatting, such as currency symbols or decimal places.
---
# Agent Instructions
This documentation is published with GitBook. GitBook is the documentation platform designed so that both humans and AI agents can read, navigate, and reason over technical content effectively. Learn more at gitbook.com.
## Querying This Documentation
If you need additional information that is not directly available in this page, you can query the documentation by asking a question.
Perform an HTTP GET request on the following URL with the `ask` and `goal` query parameters:
```
GET https://docs.phocassoftware.com/budgets-and-forecasts/owner-and-administrator/add-worksheet-tabs/lookup-tab.md?ask=&goal=
```
`ask` is the immediate question: it should be specific, self-contained, and written in natural language.
`goal` is what the user is ultimately trying to achieve, the reason they need the answer. Sharing it helps GitBook give you a better, more relevant answer. A goal is most helpful when it describes the outcome the user wants rather than restating the question. For example, with `ask=how do I create an API token`, a goal like `automate deployments from our CI pipeline` lets GitBook tailor the answer to that use case.
The response will contain a direct answer to the question and relevant excerpts and sources from the documentation.
Use this mechanism when the answer is not explicitly present in the current page, you need clarification or additional context, or you want to retrieve related documentation sections.

.png?alt=media)
.png?alt=media)