# Manage financial statements (Beta)
{% hint style="info" %}
**This feature is currently in beta, and the content on this page is temporary.**\
It will be merged into the main documentation when the feature becomes generally available.
{% endhint %}
{% hint style="info" %}
User permission: Manage Custom Statements
{% endhint %}
In Financial Statements, click **Statement** > **Manage Statements**.
The **Manage statements** page has three key elements:
### 1. Statement list
This is a list of the default financial statements in the database, plus any custom financial statements added by your organization.
Statements are grouped by type (Profit and Loss, Balance Sheet, and Cash Flow), so you can easily differentiate them.
Actions you can take here:
* [Select a statement to edit](https://docs.phocassoftware.com/financial-statements/managing-statements/overview-of-manage-financial-statements-beta/edit-a-financial-statement-beta)
* [Show or hide a statement](#show-or-hide-statements)
* [Duplicate a statement](#duplicate-a-statement)
* [Rename a statement](#rename-a-statement)
* [Delete a statement](#delete-a-statement)
* Reorder statements - coming soon
* [Add a statement](#add-a-statement)
### 2. Statement editing area
This is where you view and edit the items in a selected statement.
See [Edit a financial statement (Beta)](https://docs.phocassoftware.com/financial-statements/managing-statements/overview-of-manage-financial-statements-beta/edit-a-financial-statement-beta).
### 3. Exit button
This is how you return to the statement grid.
See [Exit and rebuild the database](#exit-and-rebuild-the-database).
## Show or hide statements
Use the eye icon  in the statement list to control whether a statement appears in the **Statements** menu.
* Click the icon to turn visibility off or back on again.
* When a statement is hidden, users cannot open it from the **Statements** menu.
* This does not delete the statement. It remains in **Manage statements** and you can show it again any time.
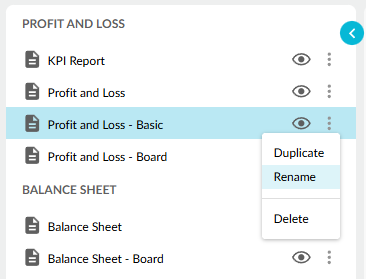
## Rename a statement
You can rename custom statements. You can't rename the default statements.
1. In the statement list, click the statement’s options menu.
2. Click **Rename**.
3. Enter the new name, then click **Rename**.
## Add a statement
You can add more Profit and Loss, Balance Sheet, and Cash Flow statements to the database to have different versions for different audiences. To do so, you can either duplicate an existing statement, use a template, or create a new statement from scratch.
For example, you might want to provide Profit and Loss statements with different levels of detail to satisfy the needs of different audiences. Compare the information required by three audiences in the table below.
| Board | Management | Branch |
| ------------------------------------------------------------------------------------------------------------------------------------------------- | ---------------------------------------------------------------------------------------------------------------------------------------------------------------------------------- | ----------------------------------------------------------------------------------------------------------------------------------------------------------------------------------------------------------------------------------------- |
|
Sales Cost of Goods Sold Gross Profit Operating Expenses Earnings Before Interest and Tax Interest Net Profit Before Tax
|
Sales Cost of Goods Sold Gross Profit Sales & Marketing Research & Development General & Administration Total Operating Expenses Net Profit Before Tax
|
Sales Direct Labor Direct Materials Total Direct costs Gross Profit Salaries & Wages Marketing Rent & Operating Expenses Insurance General & Other Total Operating Expenses Net Profit before Tax
|
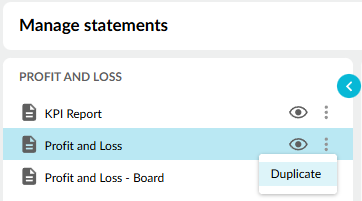
### Duplicate a statement
Duplicating an existing statement is the simplest and quickest way to add a new statement, as you base the new statement on one that is already in your database, taking advantage of existing mappings and so on. You can then edit the new statement as required.
1. In the statement list, click the statement’s options menu.
2. Click **Duplicate**.
3. Enter a name for the new statement.
4. Click **Duplicate**.
5. Proceed to [edit the statement](https://docs.phocassoftware.com/financial-statements/managing-statements/overview-of-manage-financial-statements-beta/edit-a-financial-statement-beta).
### Use a template (coming soon)
*This functionality is still in development.*
### Add a new statement from scratch
1. At the bottom of the statement list, click **Add statement**.
2. Enter a name for the new statement.
3. Choose how to map the accounts in the statement. Account mapping is managed by the [statement dimension](https://docs.phocassoftware.com/financial-statements/getting-started/overview-of-the-link-between-financial-statements-and-dimensions). You can:
* **Use an existing dimension** (recommended): Reuse the account mapping from another statement.
* This method saves time now and reduces administration burden later. However, once selected, you can't change this dimension or its mappings.
* The account mapping of these dimensions is managed elsewhere, either via the Groups feature or in Designer, and often driven by the Chart of Accounts mapping in your ERP.
* **Create a custom dimension**: Create a new custom dimension and map the accounts yourself.
4. Click **Add**.
5. Proceed to [edit the statement](https://docs.phocassoftware.com/financial-statements/managing-statements/overview-of-manage-financial-statements-beta/edit-a-financial-statement-beta).
## Delete a statement
You can delete custom statements. You can't delete the default statements.
Deleting a statement removes its account mapping.
{% hint style="warning" %}
Any favorites, subscriptions, or dashboard widgets that use the statement will no longer work.
{% endhint %}
1. In the statement list, click the statement’s options menu.
2. Click **Delete**.
3. Click **Delete** to confirm.
## Reorder statements (coming soon)
*This functionality is still in development.*
## Exit and rebuild the database
{% hint style="info" %}
Changes to the statement list save automatically.
Changes inside a statement must be saved before you can exit.
{% endhint %}
After you add or edit statements, you need to initiate a database build for your changes to take effect.
Click **Exit** in the top-right corner, then choose one of these options:
* **Build now**: A database build is initiated and you return to the statement grid. This build process might take some time, depending on the size of your database. Keep an eye on the [database status](https://app.gitbook.com/s/7pj8v25BOyqZTdG5mdD1/getting-started/databases#databases-databasestatus) indicator. When the dot is blue, the database is being rebuilt. When it is green, the rebuild is complete.
* **Build later**: You return to the statement grid. The database will be rebuilt at the next schedule build time.