Accounts
In CRM, an account is a company you work with or have worked with in the past, such as a customer, supplier, or vendor.
User permission: CRM
Accounts are usually created automatically when a new customer is added to your company’s ERP system and then synced to CRM. If you have the right permissions, you can also add accounts manually or delete accounts that are no longer needed.
View a list of all accounts
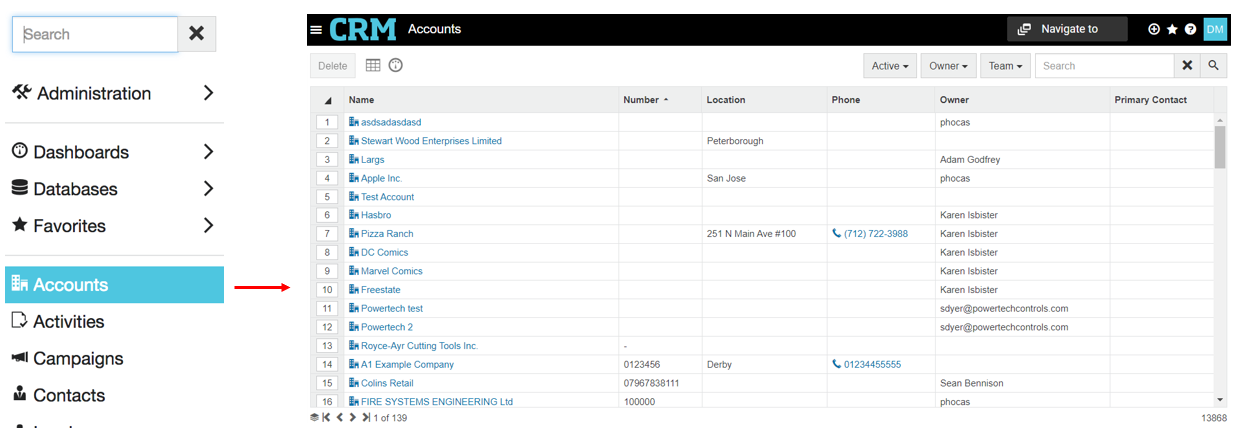
Select the CRM menu button > Accounts.
The Accounts screen displays a list of all your accounts. It is a good starting point for reviewing what is going on with an account or updating information relating to an account.
By default, accounts are listed alphabetically and typically include the following columns:
Account: Typically the name of the company.
Number: A code, often internally assigned, to distinguish this company from others.
Location: The location of the company.
Phone: The company's head office phone number.
Primary contact: The person in the company who is most commonly dealt with.
Owner: The CRM user who owns the account.
Team: The specific team the account is allocated to.

By default, the accounts are listed alphabetically, usually with the following columns:
Name: Typically the name of the company.
Number: A code, often internally assigned, to distinguish this company from others.
Phone: The company's head office phone number.
Email: The company's general email address.
Owner: The CRM user who owns the account.
Primary contact: The person in the company who is most commonly dealt with
The Accounts screen displays a list of all accounts you have permission to view. By default, accounts are listed alphabetically.
Find an account
On the Accounts screen, you can find a particular account using the filter and search options above the grid or by sorting the list.

Use the Active filter to switch between viewing active and inactive accounts in the list.
Use the Search box to search for a specific account. This performs an is like search on
Use the Location filter to display only your accounts or accounts that belong to a specific location.
Use the Primary Contact filter to show the account(s) linked to a specific contact.
Use the Owner filter to display only your accounts or accounts that belong to another user (that you have permissions to view).
Use the Team filter to display accounts allocated to a specific team to which you belong.
Select a column heading to sort data into ascending or descending order.
Filters remain active until you turn them off, so if you apply a filter and move away from the screen and then return, the filter will remain. To clear any filter you have applied, choose Select none from the dropdown list.
Learn more about filtering and searching in CRM.
Use the Active filter to switch between viewing active and inactive accounts in the list.
Use the Owner filter to display only your accounts or accounts that belong to another user (that you have permissions to view).
Use the Team filter to display accounts allocated to a specific team to which you belong.
Use the Search box to search for a specific account by name. This performs an is like search on the name column.
Select a column heading to sort data into ascending or descending order.
Filters remain active until you turn them off, so if you apply a filter and move away from the screen and then return, the filter will remain. To clear any filter you have applied, select All from the dropdown list.

Learn more about filtering and searching in CRM.
To find the account you require, type your search term into the box, such as a company name, location, or contact name, and any matching results will instantly be displayed.
View and edit an account record
On the Accounts screen, select the account name to open the account record.
You can also open accounts from other screens in CRM (where the account name appears in blue as an active link) and from within Analytics (see below).


An account record contains three standard tabs (Account, Contact and Activity) that each contain several fields. Your administrator might also add custom tabs containing additional fields and/or add custom fields to the Account tab.


You can add and edit account details in the fields, as required, then click Save to apply your changes.
Example
Suppose your company is assigning the BHC Electrical - Stoke account to its new account manager, Joe. You need to update this information in CRM.
Open the Accounts page, then type BHC Electrical - Stoke into the search box and select Enter.
Select the BHC Electrical - Stoke account name to open the account record.
Select Joe User as the new owner of the account.

Select Save > Close. A confirmation message appears at the top of the screen to show the account has been successfully updated. Changing the account owner does not affect the ownership of existing activities or c
Suppose your company is assigning the BHC Electrical - Stoke account to its new account manager, Joe. You need to update this information in CRM.
Open the Accounts page, then type BHC Electrical - Stoke into the search box.
Select BHC Electrical - Stoke to open the account record.
Select Edit to make changes to the account record.
Select Joe User as the new owner of the account.

Select Save > Close. A confirmation message appears at the top of the screen to show the account has been successfully updated. Changing the account owner does not affect the ownership of existing activities or contact
It is possible for your data to be overwritten by an overnight automatic update. If in doubt, talk to your administrator.
Account tab
The Account tab opens by default and displays key details, including the account name, owner, contacts, and address. The account owner is the CRM user responsible for the account.


The Account tab contains the following details:
Account details
Name
Free text
Typically the name of the company. Mandatory field.
Number
Free text
Usually a code number, often internally assigned, to distinguish this company from others.
Owner
Dropdown list
The person who normally looks after this account. Owners are CRM users. The owner of an account can be different to the owner of the associated contacts.
Is Active
Checkbox
Active accounts typically include companies that are currently doing business with you. Inactive accounts might be old customers or suppliers who no longer trade with you. Rather than delete the entire account and its history, it is often better to mark these companies as inactive. Select the checkbox to mark active, or leave it empty for inactive.
Location
Free text
Typically indicates a region or territory.
Payment status
Dropdown list
In our example, we use payment status to indicate ‘current’ or ‘overdue’. This is a customizable field that can be edited by administrators using picklists.
Communication details
Phone
Free text
Main head office phone number of the company. For direct phone numbers of individuals, see Contacts.
Fax
Free text
Main head office fax number of the company.
Free text
General email address of the company, such as [email protected]. For direct email addresses of individuals, see Contacts.
Website
Free text
Company website address.
Contact method
Dropdown list
Company's preferred method of contact, such as via phone or email. This is a customizable field that can be edited by administrators using picklists.
Address details
Street
Free text
Street address of the account.
City
Free text
City in which the account is based, if applicable.
State
Free text
State in which the account is based, if applicable.
Postcode
Free text
The zip or postcode of the account.
Country
Free text
The country in which the account is located.
Is mailing address
Checkbox
Select the checkbox if the mail address is the same as the street address. Leave empty if the mail address is different, and enter the details in the section below.
Mail details (if mailing address is different to street address)
Street
Free text
Postal street address (or PO box) and city.
City
Free text
City in which the account is based, if applicable.
State
Free text
Postal state.
Postcode
Free text
Zip or postcode (postal).
Country
Free text
Postal country for the account.
Custom details (fields)
Custom fields are any fields not listed in the tables above. They may be created by administrators, and if they exist, you can populate them as needed.
Contacts tab
The Contacts tab shows all contacts associated with the account. You can add new contacts or designate a primary contact, who is responsible for managing interactions with your company. A link to the primary contact also appears on the Accounts screen.


Activities tab
The Activities tab displays activities relating to the account, entered either by you or by someone else.
The list includes activities linked to the account itself or to any of its contacts. To filter by account level or contact level, use the Source column filter. You can also use the Activity, Status, Campaign, Owner, and Team column filters to narrow down your results.
Column filters are only available in the desktop version of CRM. To find the activity you need in the mobile-friendly version of CRM, type your search term into the box and any matching results will instantly be displayed.

Custom tabs and fields
You might also see a custom tab and/or additional fields in the main Account tab. These items are set up by an administrator.


View account information stored in Analytics
To view the information about an account that stored in Phocas, such as its sales figures or the products it purchased, you can open Analytics directly from CRM.
Open the account record, then on the Account tab, click the Number link.

Open an account record from within Analytics
Accounts are usually listed in Analytics as dimensions such as Customers, Suppliers or Vendors.
Open a database, such as Sales.
Click the dimension (such as Customers).
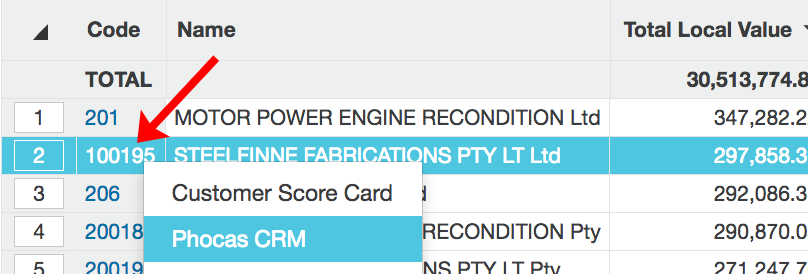
Locate and select the customer row (it turns blue), then click the code > Phocas CRM.

Add an account
User permission: CRM > Create Account
There are two ways to manually add accounts.
Add a new account from CRM
On the Accounts page, select Add account (the blue plus icon). Then enter the required account details and select Save. See View and edit an account record above for details on each field.


A message displays at the top of the screen to indicate if the account has been successfully added (or otherwise). If successful, new tabs and buttons display, allowing you to add contacts or add activities to the new account.
Add a new account from within Analytics
This option is only available in the desktop version of CRM.
Open a database (for example, Sales) and select a dimension (for example, Customers).
Find the row for the customer you want to add an account for, then select it. The row will highlight in blue.
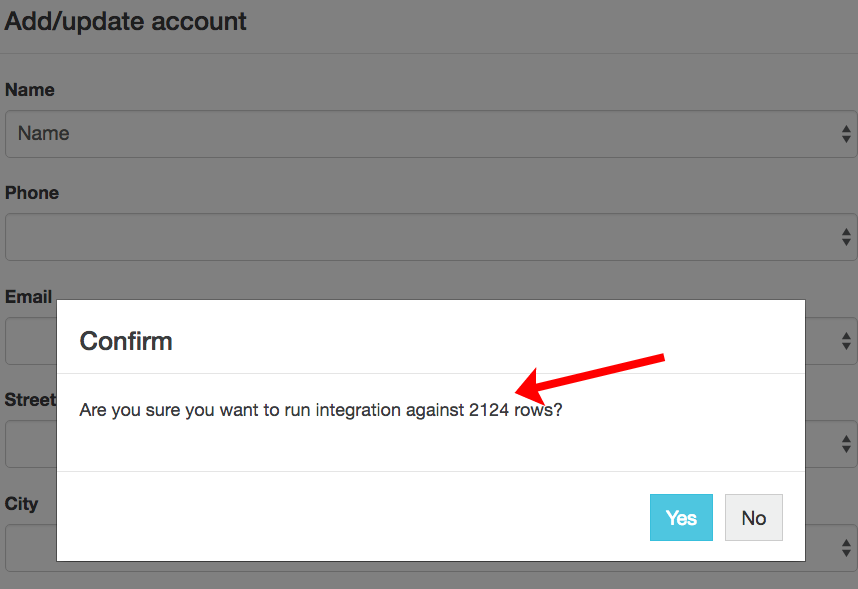
If you do NOT select any rows in the grid before selecting the Add/update account option, it is possible that you could inadvertently add or update all customers in CRM. In this case, you will get a confirmation message displaying the number of rows you are about to include in the integration.
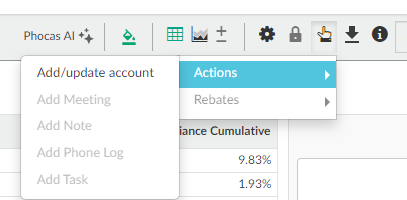
Select the Custom Actions button and select Actions > Add/update account.

Map the fields in CRM to those in Phocas using the dropdown lists. For example, you might map Phone in Phocas to Telephone in CRM. You can leave fields blank, in which case they will not be included in the export.

Choose Run, then select Yes to confirm the number of customers (rows) to add account details for (see warning below). A confirmation message appears at the top of the screen if the account is added successfully.

Delete an account
This option is only available in the desktop version of CRM.
User permission: CRM > Delete Account
Deleted items can be restored by administrators.
On the Accounts page, select the menu button (three dots) at the end of the account row, then select Delete.

Last updated
