CRM administration
Customize and manage the CRM module in your Phocas site.
User permission: Administration > CRM
The following CRM administration tasks are accessible from the Phocas navigation menu:
CRM picklists: Edit options in CRM dropdown lists
CRM deleted: Manage deleted CRM items
Customizations: Customize your CRM
CRM mappings: Map your CRM account data.

Another CRM-related administration task is the management of CRM restrictions, which you do on each user's maintenance form.
Edit the options in CRM dropdown lists (picklists)
You can change the options (values) in some of the dropdown lists in CRM to suit your business needs. For example, you might want to add a new Status called Allocated or remove a status that is not applicable.
Click CRM > CRM picklists to open the Picklists page, where you can view a list of the dropdown lists used in CRM, organized into tabs.
Call Type
Phone Log
Follow Up
Initial Call
Support Call
Sales Call
Quotation
Contact Method
Account Record
Contact Record
Lead Record
Face-to-face
Fax
Instant Messenger
Letter
Phone
Job Title
Contact Record
Lead Record
Director
Manager
Salesperson
Accounts
Sales Manager
Payment Status
Account Record
Current
Overdue
Status
Meeting
Task
Cancelled
Completed
Deferred
In Progress
Not Started
Overdue
Waiting on Someone
On the Picklists page, click the required tab (Call Type, Contact Method, Job Title, Payment Status and Status) then proceed as required:
Add an option: Click Add, enter a name for the option and click Save.
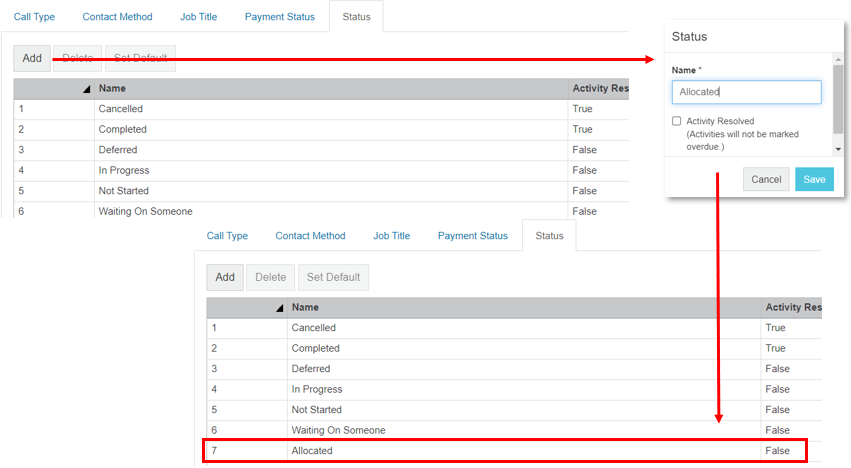
Delete an option: Select the option row and click Delete > Yes.
Set the default option: Select the option row and click Set Default.
Customize your CRM module
You can customize your CRM module for your own business by adding new tabs, tables, and fields to the entity screens. For example, you might want to add social media fields to a contact or a position field to an account. These custom additions allow you to record the exact details you need to manage those entities more effectively. If you map the custom fields to your CRM Analysis database, you can analyze the data entered against those fields in your Analytics module.
While this customization capability is straightforward and flexible, it’s suitable for adding basic additional fields only. It's not designed as a database or inventory management tool and there’s a limit to the number of fields you can add.
Add the custom item in CRM
You can add the following custom items to the CRM Account, Activity, Campaign, Contact, and Lead screens:
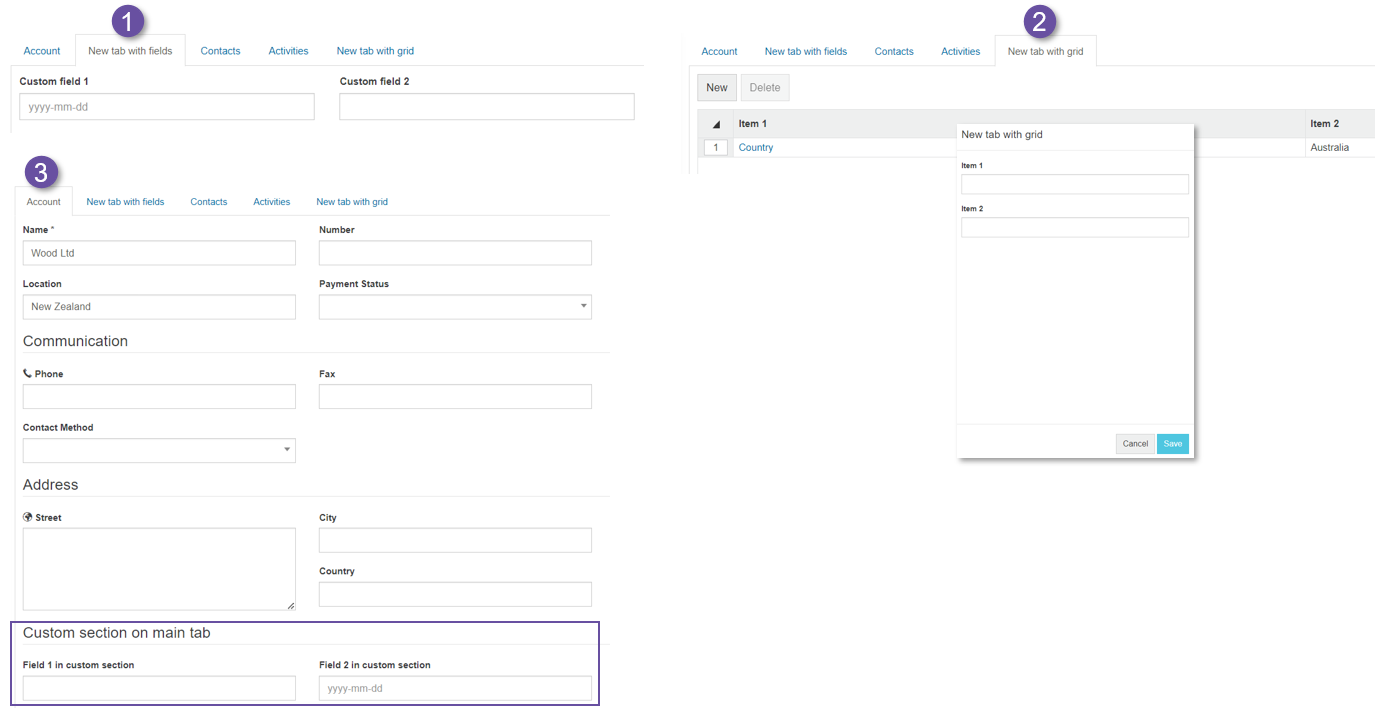
Tab of fields (1): An additional tab in which you can add custom fields.
Table of rows (2): An additional tab containing a table (grid) in which you can add a list of items.
This tab is only available after the CRM entity (such as an account) has been created and saved. It does not appear during the creation process. This is because the tab is designed to store records related to the CRM entity, which requires the entity to exist first. For example, when adding a new account, this tab will not be visible until the account is saved.

Fields on the main tab (3): Additional fields on the entity's main tab.
Click CRM > CRM Customizations.
Click New.
Enter a name for the custom item, and a description if required.
Select the entity from the dropdown list: Account, Activity, Campaign, Contact, or Lead.
Select the customization type: Tab of fields, Table of rows or Fields on main tab.
Select whether the customization is editable. If it is editable, the Entity and Type cannot be changed.
Click Save.
Click the Fields tab and add the fields:
Click New.
Enter a name for the field, and a group if required.
Select the field type: Date, Date Time, Integer, List (dropdown list), Number, Text, or Text Area. After you save the Field form, you cannot change the field type. If you select the List option, enter the options into the box that displays, separated by a pipe (|) character without space, illustrated in the image below.
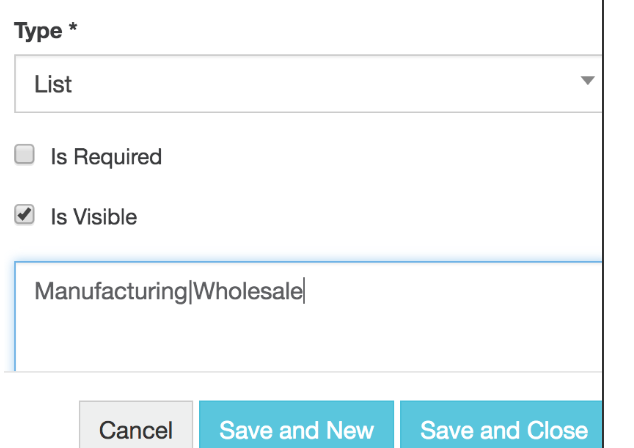
Either click Save and New (if you want to add another field) or Save and Close as required.
Click Save and Close. The new custom item displays in the list on the Customization screen and when you open the corresponding entity screen. Your CRM users can now add data against the new item.
(Optional) Proceed to map the custom fields to your CRM Analysis database.
Examples
Click the links to watch the videos. Note the UI is out of date but the context is the same. These examples are continued in the next section.
Example 1, part 1: Add social media fields to the Contact main tab, and add a tab to the Accounts screen with custom fields, including a dropdown list
Example 2, part 1: Add a Position field to the Account main tab
Map the custom item to the CRM database
To enable the analysis of data entered against custom CRM items, you need to map those items to the CRM Analysis database in Designer.
Generally, the Phocas Implementations team does this type of work for you but if you are familiar with using Designer, you can do it yourself. The steps are summarized below. See the following Designer pages for more information: Add (connect) data to a database and Map data to the database.
Open the CRM Analysis database in Designer.
Open the applicable entity (the data displays in the stream section).
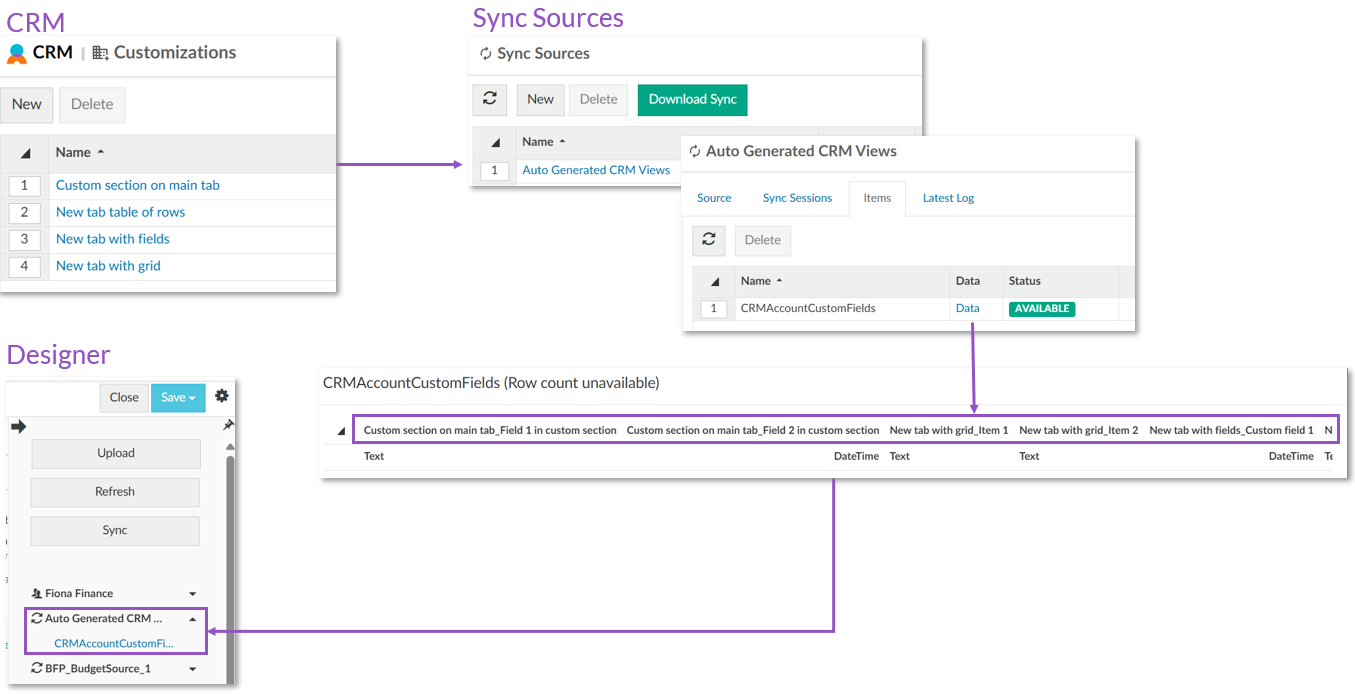
Open the data sources panel > locate the CRM custom file in the Auto Generated CRM folder > drag it into the Drag here box in the stream section.
Map the ID in the file (the activity data that you capture in the CRM) to the ID in the database.
Map the new custom item to the required item in the Dimension or Property section and edit the name of the mapped item, if required.
Save and build the database.
Proceed to view the custom item in Analytics.
Examples
Click the links to watch the videos. Note the UI is out of date but the context is the same. These examples continue from those in the section above.
Example 1, part 2: Map the social media fields as properties in the CRM Analysis database
Example 2, part 2: Map the position field as a dimension in the CRM Analysis database
How your custom items become available in Designer
When you add custom items, a sync source containing the CRM custom file is automatically generated for you and becomes available in the Data sources panel in Designer.
View the custom item in Analytics
After you build your CRM Analysis database with the custom CRM items, so long as data has been entered against those items in CRM, you can analyze that data in Analytics. Depending on how you mapped the custom items, they might display as a dimension or property.
See the following Analytics pages for more information: Filter data (use dimensions) and Change the properties.
Examples
Click the links to watch the videos. Note the UI is out of date but the context is the same. These examples continue from those in the section above.
Example 1, part 3: View the CRM social media properties data in the Analytics grid
Example 2, part 3: View the CRM position dimension data in the Analytics grid
Map your CRM account data
User permissions: Administration > CRM and Sync
Typically, the Phocas Implementations team adds, syncs or connects to your data on your behalf, and designs your CRM database. If you are familiar with using Designer, you can use the CRM mapping tool to keep your CRM data up-to-date. The tool pushes customer data into Phocas CRM as accounts, without the need for scripts or extensive preparatory work.
The CRM mapping tool works in a similar way to how you map data to a database in the Designer, therefore, the information on this page is summarized. See the Designer pages for more information.
Add and map the data
Click Administration > CRM Mappings. The CRM mapping tool opens on the Source Mapping tab. This is where you add (connect to) data items from the data sources panel, then map (match) the columns of raw data to their respective item in the account.
On the Source Mapping tab, open the data sources panel > locate the data item (such as a Customer or Ship To sync or a flat file) > drag it into the Drag here box.
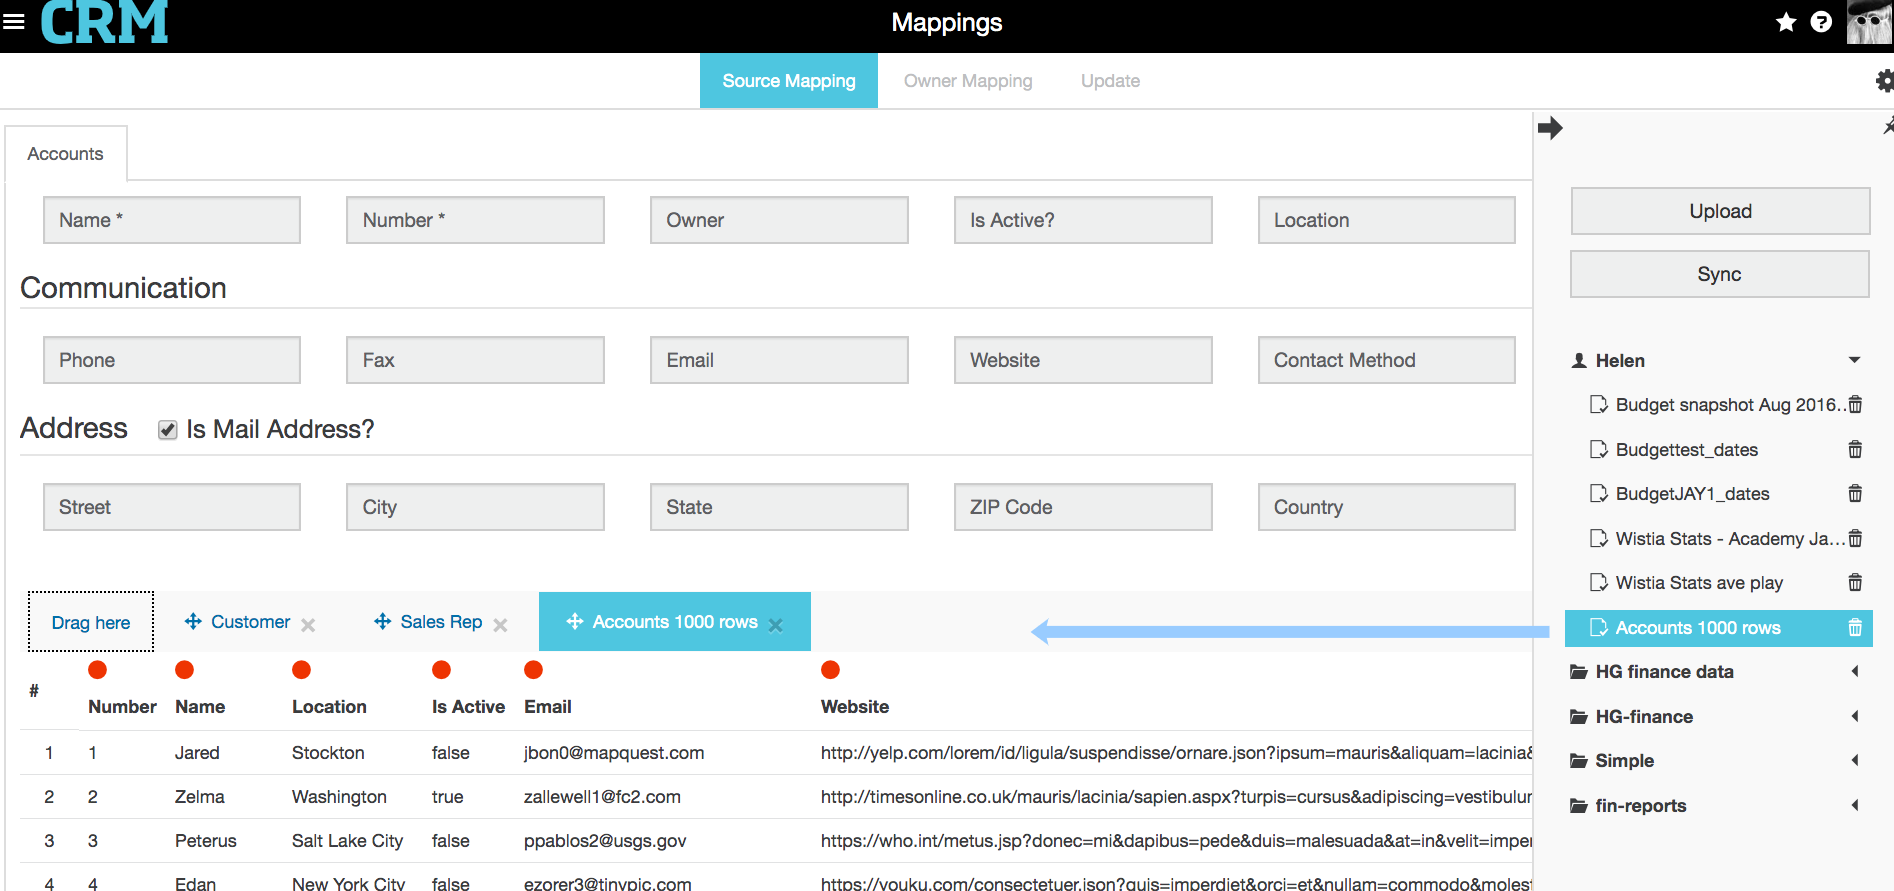
Map the data items to the account items. Start with the mandatory items of Name and Number, then map the other items as required.
The Number is a unique identifier, like the Code in Analytics. It might be called Linkfield.
The Payment Status, Is Active? and Contact Method items are mapped as a best match. If the source data uses different names for these items, you might need to check them.
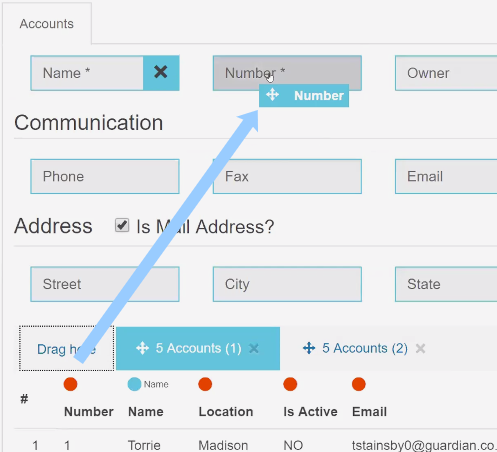
Add more data items, if required, and map the data (repeat the steps above). This step is necessary if your data comes from more than one source. You can add as many data sources as required. Any duplicate items within a single data source will be skipped and a record will display in the logs. Duplicates in multiple sources will be handled left to right.
Click Save. You might need to close the data sources panel to view this button.
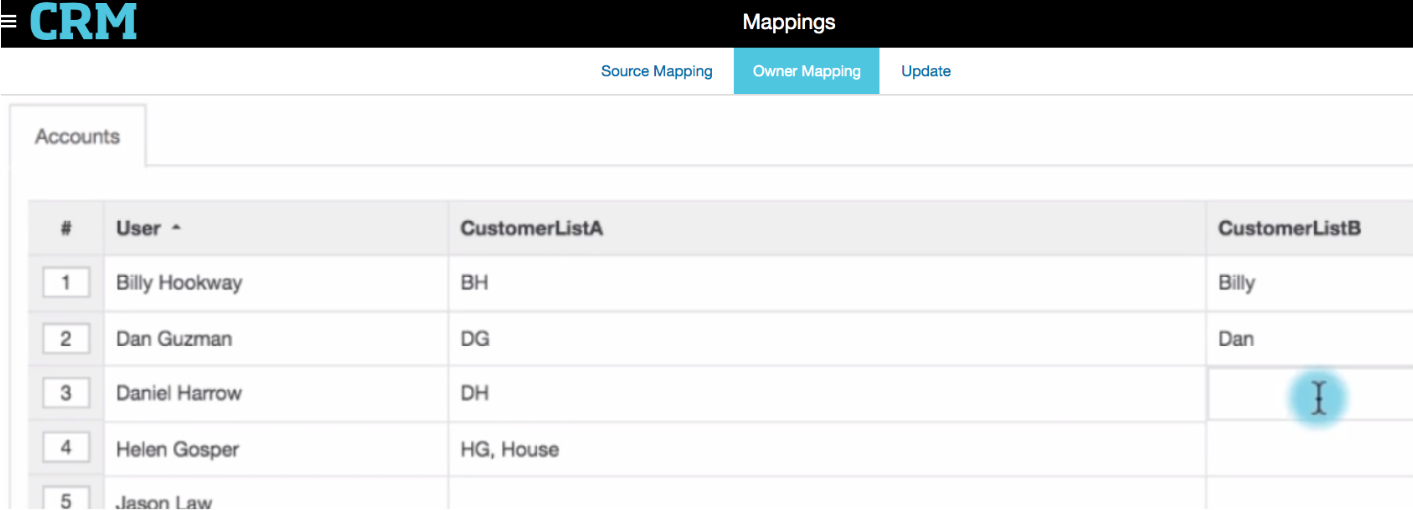
(Optional - available only if you mapped data to the Owner element) Map your CRM users with account owners (such as sales reps). It is important to note that if you later want to delete the CRM user’s Phocas account, you will lose access to that user’s CRM accounts. To avoid this, you should reassign the user’s CRM accounts before deleting the user’s Phocas account. See Delete a user for more information.
Click the Owner Mapping tab.
Click in the empty box next to each user and select an owner (user) from the list that displays, as applicable. In the example below, there are two lists of owners to map. You can map multiple accounts to users.
Click Save.
Proceed to update the data.
Update the data
The Update tab only becomes available after you map the data and click Save on the Source Mapping tab. The update action works like a database build in Phocas, in that it brings in updated data. An update cannot be undone.
Click the Update tab.
Determine whether you want to overwrite existing values*. If you do, you need to take an additional step, see section below.
Select one of these options:
Immediately queue and run the update and display the logs page: Click Update and click Yes to confirm. A progress bar displays during the update process, then when complete, logs relating to the update display.
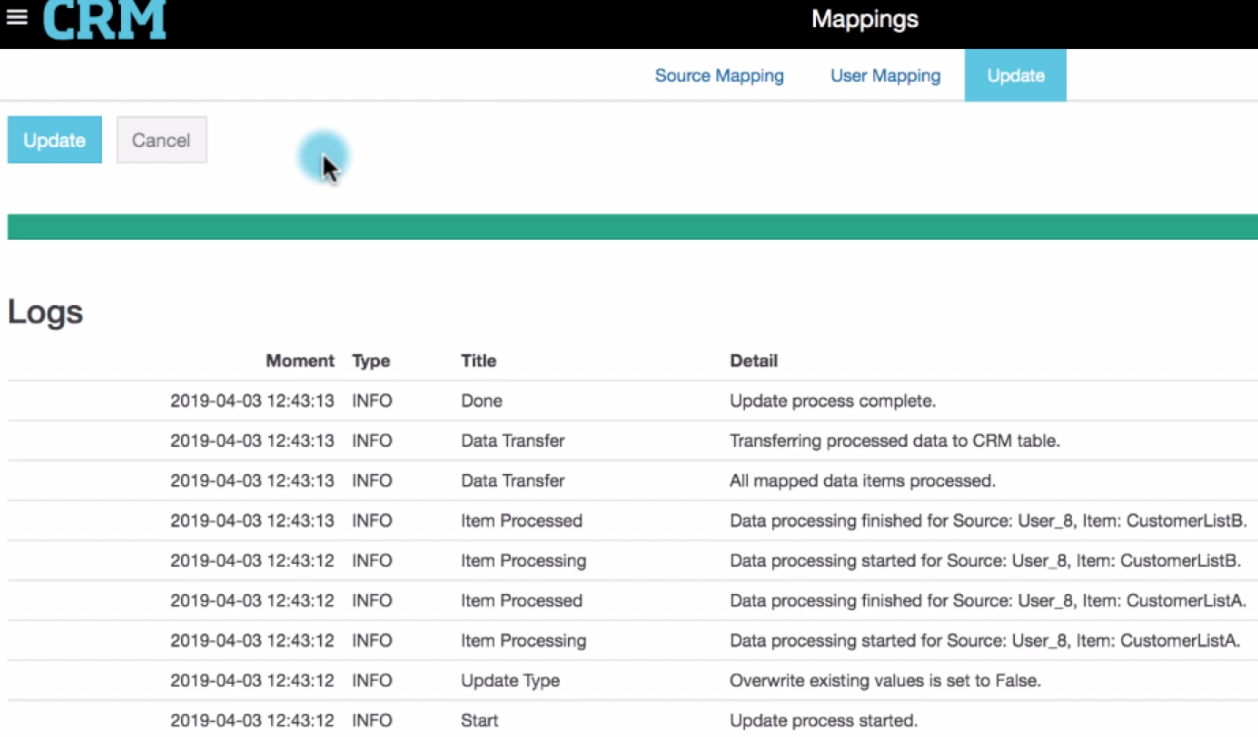
Schedule an update to occur at another time: Click Schedule, select the frequency and click Save.
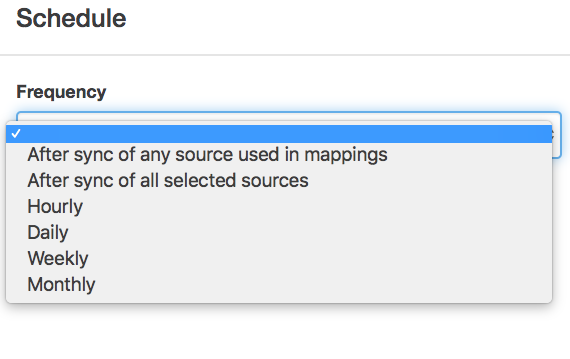
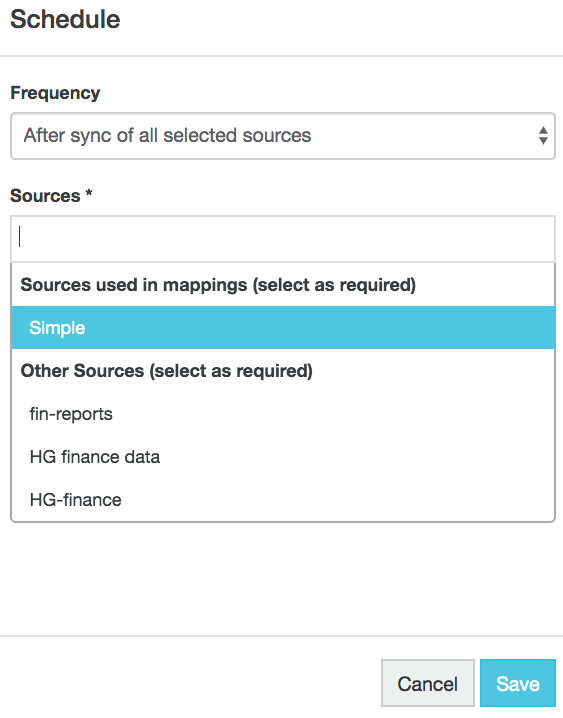
Schedule an update after sync of selected sources: Select the After sync of selected sources option, then select the required sources.
Overwrite existing values
By default, the ability to overwrite existing data is turned off, to avoid accidentally replacing data you want to keep. This also ensures that users who manually input details into CRM don't have their work overwritten.
You might want to turn this on, for example, if you need to do a bulk update of information, but you should use caution.
To turn this option on and overwrite existing values:
Click the Settings button on the top right corner.
Select the Overwrite existing values checkbox and click Save.
Turn this option off again, after the update is complete, to avoid accidentally overwriting anything in the future.
Manage deleted CRM items
Click CRM > CRM Deleted to open the Deleted page, where you can view a list of entities deleted from CRM, along with the entity type, who deleted it and the deletion date.
To restore one or more items to the correct location in CRM, select the required row(s) and click Restore. Restoring an Activity or Contact which is a child of an Account will result in the Account also being restored.
To permanently delete one or more items, select the required row(s) and click Delete. Deleting an Account will result in any child Activity or Contact also being deleted. Deleting a Contact or Lead will result in any child activity also being deleted.
To permanently delete all deleted items, click Purge.
Last updated
