Add, update or delete a user account
Add new users to Phocas and update their details and permissions as things change over time.
User permission: Administration > Users
Add users
There are three ways to add a new user account. You can manually add a new user account from scratch or clone an existing user account to create a new user account with most of the same settings. You can also import multiple user accounts (and assign the same settings) at the same time.
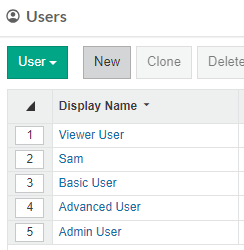
You start all of these actions on the Administration > Users page.
Manually add a user
On the Users page, click New.
On the New User page, enter the user’s details, including their email address and display name. See the User account page for more information.
Determine whether or not you want to send the user an email with their login details. See Manage user passwords.
Select the applicable license(s).
Select the applicable permissions: General (Account Locked and Detailed Logs), Folders and Custom Actions.
Click Save. The new user account is created and extra tabs appear.
Click the Profile tab and either assign an organization profile or create a user-specific profile.

Click the Databases tab and give the user access to the database(s) and set restrictions as applicable. See Overview of access to data (Administration) and Manage a user's database access and restrictions.
Click Save > Close.
Clone a user
On the Users page, select the existing user you want to clone and click Clone.
In the Clone User window, enter the user’s username and display name. See the User account page for more information.
Select the LDAP Authenticated? checkbox, if required.
Select the Copy personal favorites checkbox, if you want to copy the original user's personal favorites and assign them to the new user. These are copies only - if the original user deletes a personal favorite, it doesn't affect the new user's copy.
Personal favorites are those favorites that are owned by the original user. Any favorites that were shared with the original owner are not copied.
Any shared users on the original owner's personal favorites are not copied.
Subscriptions are not copied.
Enter and confirm a password for the new user.
Select the Force password change? checkbox (only available on non-LDAP sites) if you want to user to be required to create a new password when they first sign in.
Click Save. The new user account is created and opens on the User tab.
Proceed to update the user’s account.
Import users
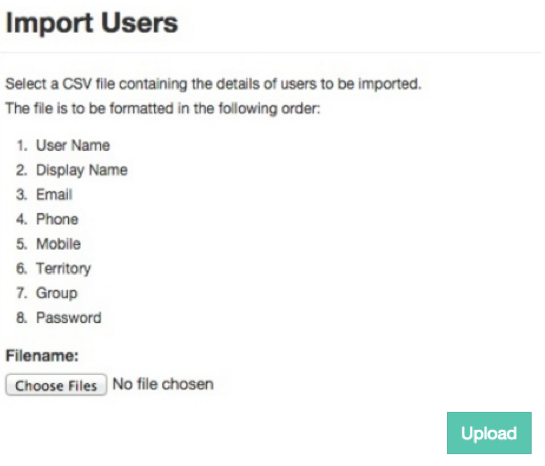
On the Users page, click More > Import.
Upload or select users, according to your server configuration, which is either Phocas (default) or LDAP authentication:
Phocas (default) authentication: The Import tool allows you to upload new users via a CSV text file, for example, based on a Microsoft Excel worksheet. Ensure the data in your file is in the order specified on the Import Users window. You might prefer to download and edit the example file below. Then select your file and click Upload.
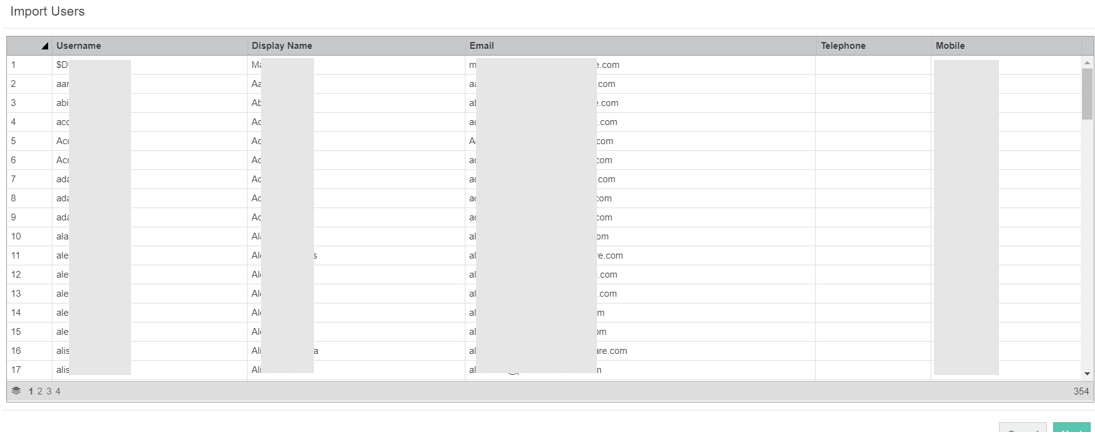
LDAP authentication: The Import tool retrieves a list of all LDAP users who are not already in the Phocas user list. Select the required users and click Next.
Select the applicable license(s).
Assign the users to a group, territory and/or team. Unless you have the Users: All Users setting selected in your profile, the Group and Territory fields will automatically be populated with your own group and territory and show as disabled. If you have either Users: Users In Same Group or Users: Users In Same Territory, but not Users: All Users, both Group and Territory will be disabled.
Select the applicable permissions: General (Detailed Logs), Folders and Custom Actions.
Determine whether or not you want to send the user an email with their login details. See Manage user passwords.

Click Next.
Select a defined period next to the database or databases you want the new users to be able to access.

Click Save.
Proceed to update the individual user accounts, as required.
Update users
You can update the details, settings, permissions and restrictions for an individual user account or update multiple user accounts at the same time using the Bulk Update tool.
Update an individual user
On the Users page, click the user’s name (blue link) to open their user account page where you can update the user account as required:
User tab: Update the user’s details, license and main permissions.
Profile tab: Edit the profile or assign a different profile.
Databases tab: Update the user’s database access and permissions.
Favorites and Databases tabs: Remove the user’s access to favorites and dashboards.
Click Save to save and apply your changes, then click Close to return to the Users screen.
Update users in bulk
The Bulk Update feature allows you to update multiple settings, permissions and restrictions for one or more users at the same time, which can save you a lot time.
Update user settings, permissions and restrictions
As the following steps outline, along with updating the general permissions for selected users, you can specify the databases to which they have access. Then within each database, you can specify which dimensions, streams and measures the users can access. You can even apply filters to the dimensions to restrict access at the lowest level of data.
1. Select users and access the Bulk Update screen
On the User page, select the users for whom you want to update details and click More > Bulk Update.
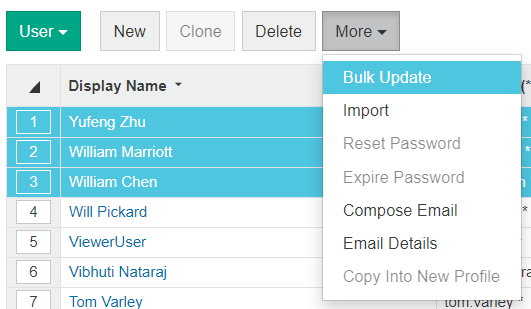
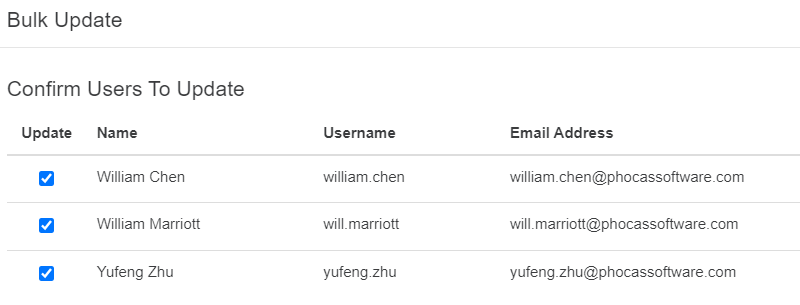
On the Bulk Update screen, ensure you have selected the correct users (clear the checkboxes of any users you do not want to update) and click Confirm.
2. Update the user settings and permissions
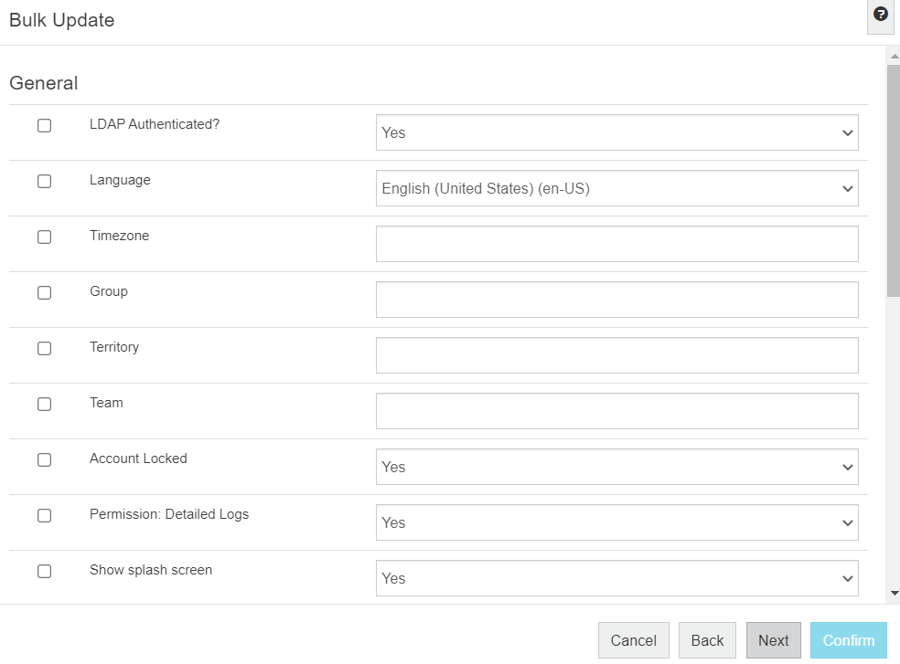
On the next Bulk Update screen, update the General, License, Settings, Folders and Custom Actions permissions, as required and click Next.
You might not see all of the permissions in the list, as some of them are only available to users whose profile has the Users: All Users permission or administrators with special permissions, as they relate to system-wide settings. Learn more about administration permissions.
3. Update the Database access
On the next Bulk Update screen, update the database access for the selected users, as required. You can give or remove access and change the default period for each database.
Users need to have a defined access period to be able to access a database.
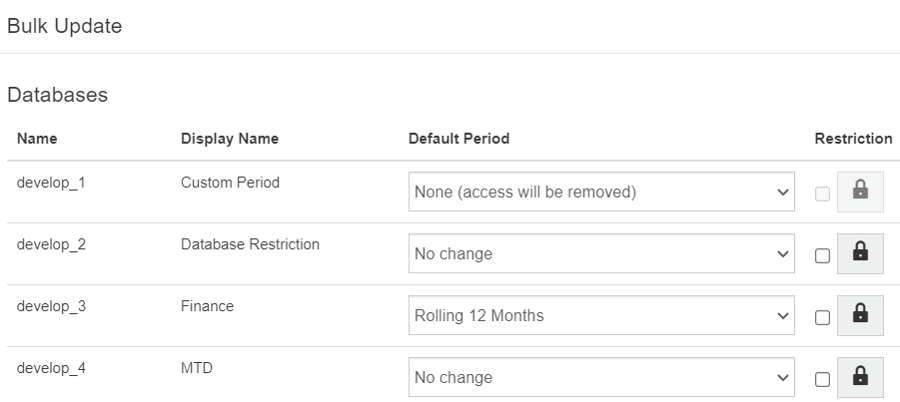
To give access to a database, select a default period from the dropdown list.
To change the default period for a database, select a different default period from the Default Period dropdown list.
To remove access to a database, select the None option from the Default Period dropdown list.
4. Update the database restrictions
On the next Bulk Update screen, click the Restrictions button (lock icon) of the database for which you want to update restrictions.
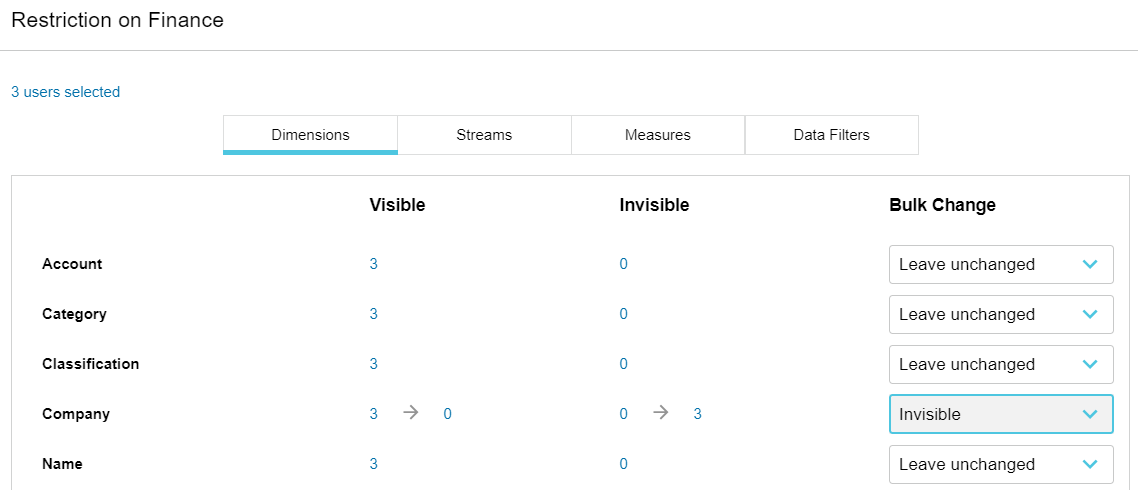
On the Restriction on [database name] screen, confirm you are making changes for the correct users. In the top-left corner, you will see a blue link with the number of users included in the bulk update. You can click the link to view the list of user names. If you need to make any changes to the selected users, click Close > Cancel and start again.
Set which Sub-Database (if applicable), Dimensions, Streams and Measures in the database are visible to the selected users:
Click the Dimensions/Stream/Measures tab (as required) and for each item.
Select either Visible or Invisible from the Bulk Change dropdown list, as applicable. If you do not want to make any changes, leave the Leave unchanged option selected. The numbers in the respective columns identify the changes you are making.
Apply filters to the dimensions: Click the Data Filters tab and expand the dimension for which you want to apply a filter. Select Create new filter, then configure the filter condition as required. Click the blue plus button to add another filter condition, if required.
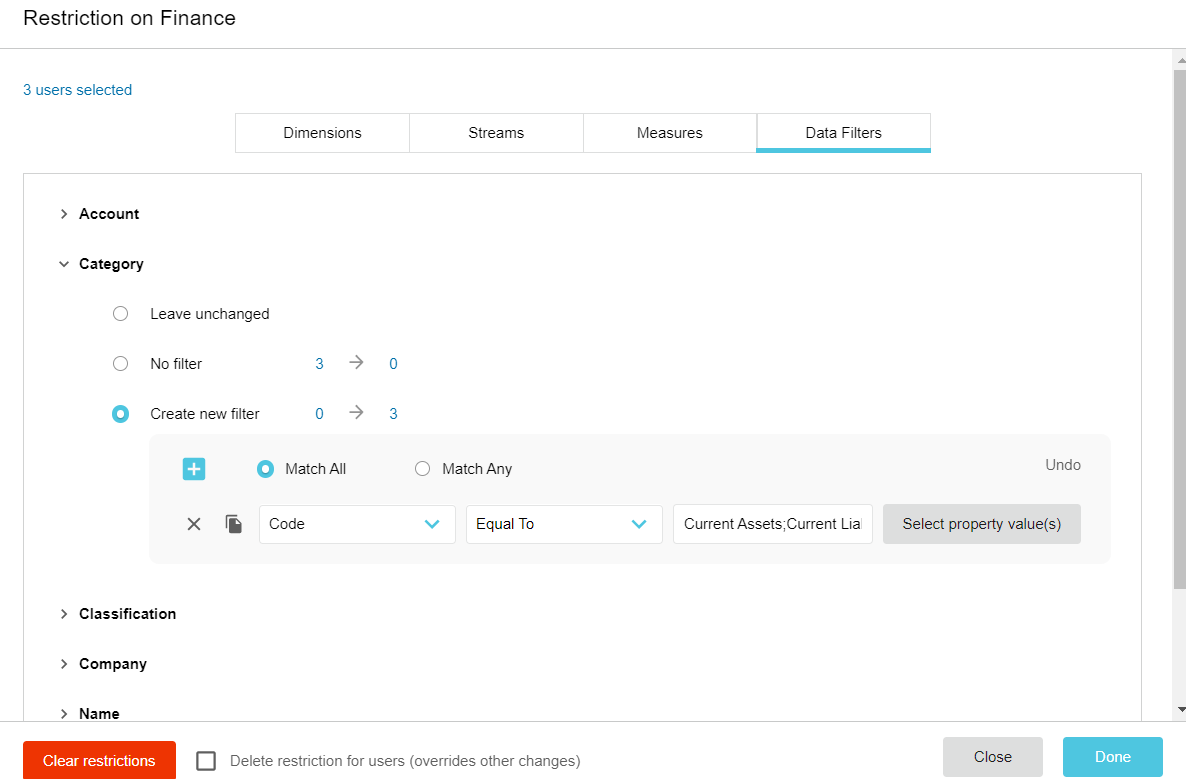
Click Done. You return to the Bulk Update screen, where the Restriction button is yellow to indicate that changes were made.
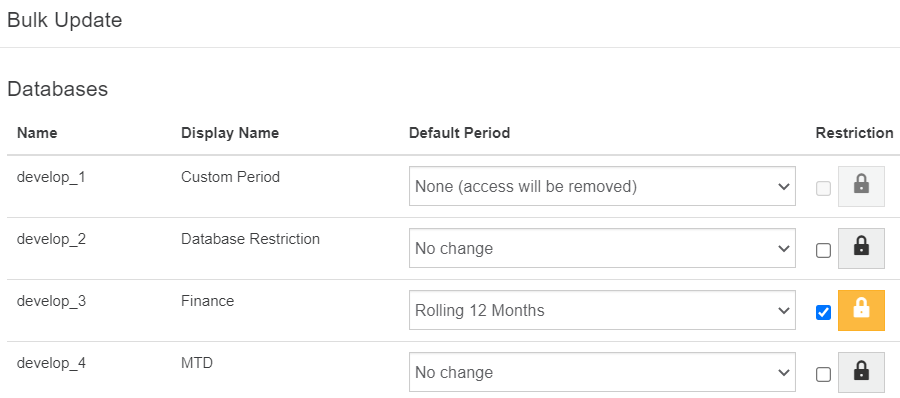
Repeat the above steps to update the restrictions for other databases, as required.
If your applied restrictions don’t look or behave as expected, please contact our Support Team. We are aware that the application of restrictions differs slightly depending on where or how you apply them. We are working on making this more intuitive and consistent.
5. Review and confirm changes
Back on the Bulk Update screen, when you have made all your changes for the selected users, click Next.
Review the changes you are about to make, then click Confirm to apply the changes to the selected users.
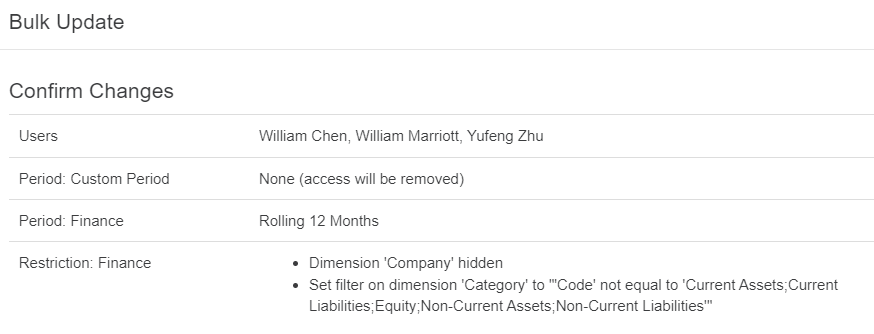
Clear or delete database restrictions for the selected users
In addition to adding new restrictions or changing existing restrictions, you can clear and delete restrictions in bulk. At the bottom of the screen there are options to clear and delete those restrictions:
Clear restrictions: Reset all restrictions that were applied to the selected users (regardless of whether you have applied them during this update session or not). This action is the same as selecting Visible from the Bulk Change dropdown list for all items and deleting all filters. In other words, you give the selected users permission to view all the data in the database.
Delete restrictions: Remove all restrictions that were applied to the selected users (regardless of whether you have applied them during this update session or not) and apply the default database restrictions (if any) instead. This action disables the options in the database restrictions screen, as they are no longer applicable. In other words, you remove the special treatment you previously applied to the selected users, which as a result, might reduce the amount of data they can view in the database.
Click the Clear restrictions button or select the Delete restriction for users checkbox, as applicable, then click Done.

Delete a user
When you delete a user, you permanently remove their user account from Phocas. This action also removes any content the user owns, such as favorites they saved and dashboards they created. If this content is shared with other users, deleting the user might have negative consequences for your business, as you will lose access to content you actively use.
Deleting a user also removes any CRM accounts that the user created. Such accounts cannot be reassigned after you delete the user, so you must reassign them before you delete the user account.
The best way to remove a user but retain the content they created is to remove their license. This removes the user’s ability to sign in to Phocas. As a result, all of the user’s content will no longer have an owner. You can then assign that content to another user (owner) so that it is retained when you delete the user. If applicable, you should also reassign any CRM accounts created by the user to other users. You can then delete the user account from your Phocas site.
1. Remove a user’s license
Open the Users page, click the green Users button and select License. Then, in the Licence view, select the blank option from the dropdown list to remove their Phocas license.

2. Lock the user account (optional)
For peace of mind, in addition to removing the user’s license, you might want to lock their user account.
3. Reassign a user’s content ownership
After removing the user’s license, you can assign a new owner to that user’s favorites and dashboards.
Click Administration > Dashboards or Favorites (as applicable) and select the user (from whom you have just removed the license) from the Owner filter above the grid. The grid updates to display only the content that user owns.
Select an item row and click Share, then select a new owner and click Save.
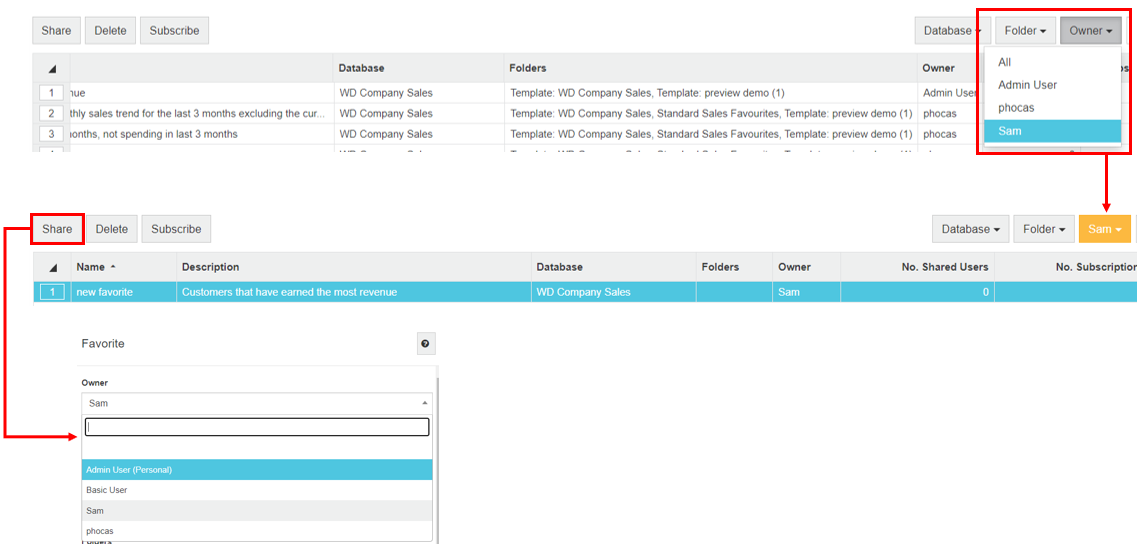
Repeat the above steps to assign a new owner to the user’s other favorites and dashboards.
See these pages for more information: Manage favorites (at the administration level) and Manage dashboards (at the administration level)
4. Reassign the user’s CRM accounts
Assign a new owner to the user’s CRM accounts, if applicable. You do this on the Account tab of each individual account record. See View and edit accounts.
5. Delete the user account
Click Administration > Users to open the Users screen, select the user row and click Delete.
Last updated
