Designer
Use the Designer tool to modify the design of Phocas databases that were created for you by the Implementation team, and design new databases by yourself.
User permissions: Administration > Databases and Sync
Immediately after you create a database, Designer opens automatically, so you can design (set up) that database. You can return to Designer at any time to modify your database setup, build the database and view versions, using either of these methods:
In the Phocas menu, click Administration > Databases to view a list of your databases.
Use one of these methods to access a database design:
On the Databases page, select the database and click the Design button.

On the Databases page, click the blue link to open the database maintenance page, then click the Design button.

Open the database then click the blue arrow next to the database name and select Design database.

Key functions of Designer
Designer has three key functions, organized into three tabs:
Design - This tab opens by default and is where you design your database. It is often referred to as the Design screen or page.
Build - This is where you initiate a build of your database or schedule a build to occur later.
Versions - This is where you can view the changes made to your database builds, along with any comments that were added. You can also revert to a previous version if you need to.
Design tab
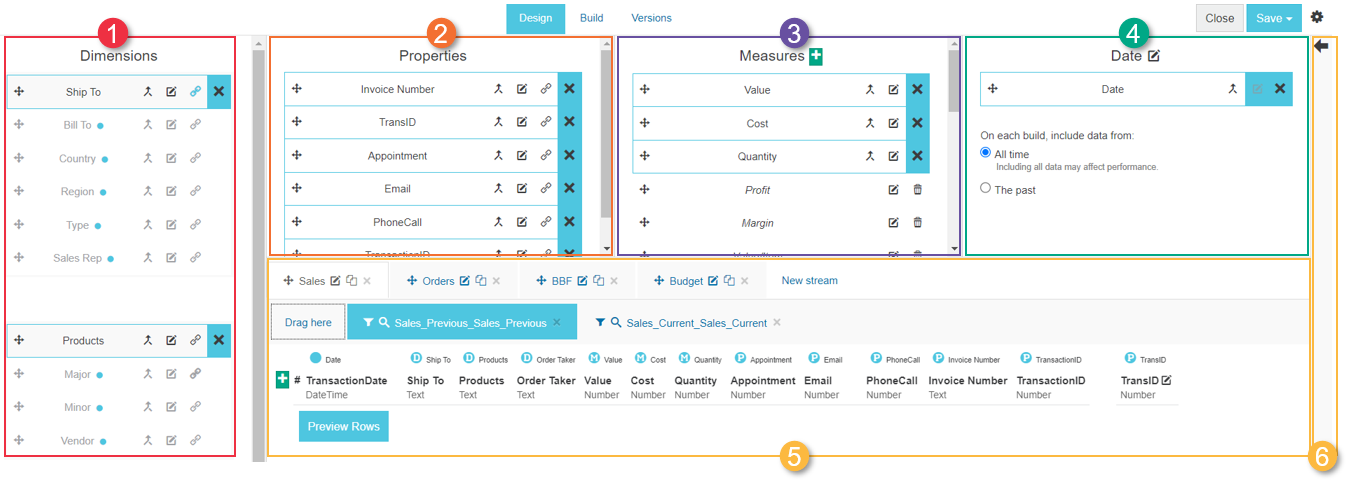
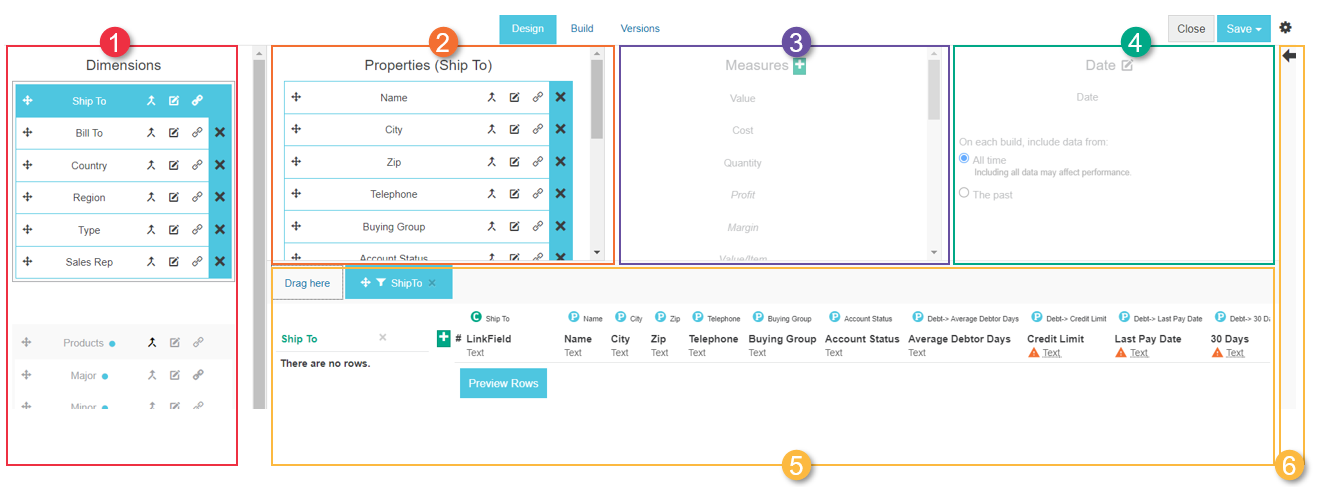
The Design tab has two modes, Stream and Dimension, and these modes look similar. They are divided into five sections, as identified by the numbers 1 to 5 in the images below and outlined in the table. These panels correspond to the components of your database and this is where you add, then map, the various columns of data to their structure in Phocas. The Design tab also has the data sources panel (number 6 in the images), which slides out from the right side of the screen.
Stream mode
Stream mode is the default mode that displays when you open the Design tab. It is where you define the streams in the database. Each stream is made up of one or more data items that form the transactions.

Dimension mode
Dimension mode opens when you click a dimension in Stream mode. It is where you group dimensions and add properties specific to the selected dimension.

1. Dimensions (and dimension groups)
Dimensions are subsets of data, the types of data records, the key analysis points. They give organization and structure to your data and form the basis of all analysis in Phocas. For example, in a sales database, you'll always see the dimensions for Customer and Product, along with others, such as Sales Reps and Regions.
Dimensions are often put into groups. For example, underneath the Product dimension, you might have the Product Class, Product Sub Class and Supplier dimensions.
When you open a database, the dimensions appear as buttons down the left side of the grid. You use the dimensions to slice and dice the data.
2. Properties
In Stream mode, properties are details stored about the transactions, such as the Invoice Number or Transaction Number.
In Dimension mode, properties are details stored about the selected dimension, to provide extra information about that dimension. For example, for the Customer dimension, you will have the customer Name and Code, and possibly other properties, such as the Address and Contact number. For the Product dimension, you will have the Name and possibly other properties, such as the Description, Unit of Measure and Weight.
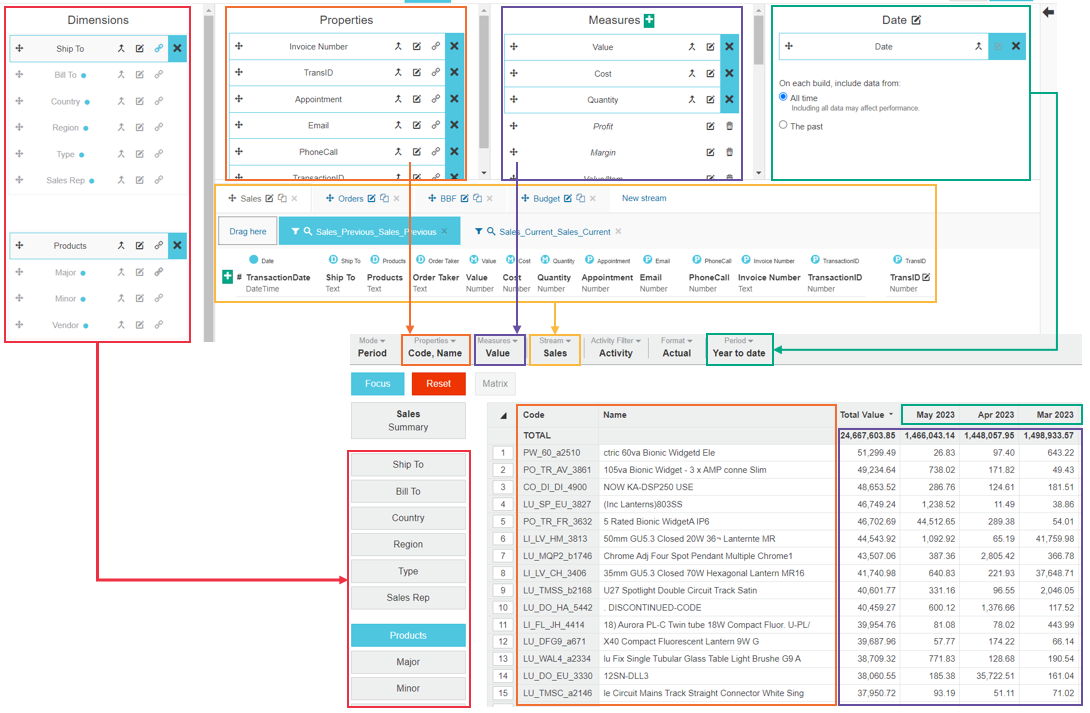
When you open a database and select a dimension, the properties display as columns in the grid. You can change those properties via the Properties menu.
3. Measures
In Stream mode, measures are data values, typically numeric, relating to dimensions. Examples of measures include the dollar value of sales, the quantity of items sold, number of hours, profit percentage, number of past-due accounts and so on.
In Dimension mode, the Measures section is not available, as it is not applicable.
When you open a database and select a dimension, the measures display in the value cells in the grid. You can change the measure via the Measures menu.
4. Date
In Stream mode, the date is the moment at which the activity (transaction), such as a sale or order, occurred. This moment forms the basis of time periods in Phocas. Some databases, like Stock on Hand, might simply use today's date.
There can only be one date per stream, as this is the date that determines how you analyze the data in that stream using different periods, like Year to Date or This Month. You can add other dates as properties, if required. As you can have multiple streams in a database, you can have different dates in each of those streams. For example, you might want to add the invoice transactions file into three separate streams but map a different date in each one, so you can analyze the data by order date, shipped date and delivered date.
You can determine what period types to make available to users. Typical period types are weeks, months and days.
In Dimension mode, the Date section is not available, as it is not applicable.
When you open a database, the periods display as columns in the grid. You can change the period via the Period menu.
5. Stream or data items
In Stream mode, the section at the bottom of the screen is where you define the streams in the database.
A stream is a set of transactional data, which can be made up of one or more data items that you add from the data sources panel (6). As it contains the transactions, the stream is the starting point for designing your database.
You can have more than one stream per database. Typically, the streams have the same dimensional structure. For example, in a Sales database, typical streams would be Invoices and Budgets, where the structure is the same (you still see the Customers, Products, Sales Reps, and other dimensions) but the data in each cell changes, depending on which stream you are viewing.
In Dimension mode, the section at the bottom of the screen is where you add the data files from the data sources panel (6) that contain the dimension properties.
When you open a database, the streams display as columns in the grid. You can view a single data stream or multiple streams for comparison purposes. You can change the stream via the:
Stream menu in a non-financial database (Analytics).
Current and Budgets menus in a financial database (Financial Statements).
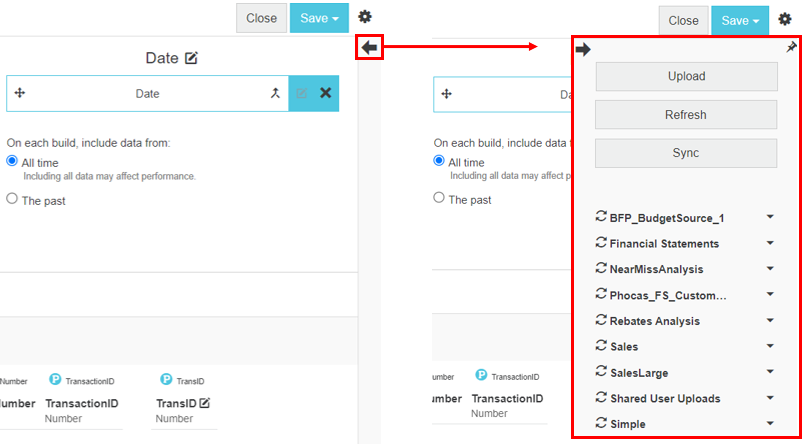
6. Data sources panel
This expandable panel displays a list of your data items. On the Design tab, click the arrow on the far right to expand the data sources panel, which slides out from the right side of the screen.

The data sources panel displays a list of your data items. This is the same list that displays on the Sync Sources page. Think of each data source as a directory or folder that you can expand to view the items it contains. For example, one data source might be your ERP system.
If you upload any files, they will display under your personal data source, labeled with your user name.
Data items uploaded by other users display under the Shared User Uploads directory.
You can click any data item name to open a preview of the data it contains. The total number of rows appears in the bottom right of the window and you can click through to view the subsequent pages of data. Click Close to close the preview window.
All the items are available for adding to a database design (Stream section).
The data sources panel is also where you access the following actions:
Upload - Upload a data file to your personal data source.
Refresh - Refresh the list of data sources and files.
Sync - Access the Sync Sources page.
You can drag the data sources panel out to make it bigger and see the full names of the files. You can also click the Pin button in the top right corner to keep the panel open.
Here's an example of how the above components make a Phocas database.

Last updated
