Databases
Manage various aspects of your Phocas databases, such as user access, restrictions, and defined periods.
User permission: Administration > Databases
In the Phocas menu, click Administration > Databases. The Databases page lists all your Phocas databases in a grid along with details about each one. Expand the section below to learn more.

Database details
Name: The name that is generated automatically when a database is created. This can't be changed and is not displayed to users.
Display Name: A user-friendly name added by the user who created the database. This is displayed to users.
Status: The current status of the database, which could be one of the following:
Available: The database is available and contains the latest available information.
Queued: The database is waiting to be built.
Sync pending: Typically this means Sync is running. If the database has already been built, it will be available but may not contain the latest data. Pending can in some cases indicate that Sync has failed.
Building: A database build is underway.
Failed: The most recent build failed. The database will still be available but may not contain the latest data.
Unavailable: The database is missing or can't be accessed.
Is Suspended: This indicates where builds on a database have been temporarily suspended due to lack of use. As soon as a user accesses the database they'll see a notice and a new build will start.
Owners: The user who created the database or was added as an owner. Owners can access the underlying sync source’s data.
Database type: The type of database, which is either default (operational or non-financial) or financial.
Last Build: The time and date of the most recent build.
Last verified
Schedule: The frequency of the build.
Next Build: The time and date of next scheduled build.
Min Year: The year of the earliest transaction date in the database (values are read from the first stream in the database).
Max Year: The year of the most recent transaction date in the database.
Has Default Restriction: Shows 'True' if the database has a default restriction. See Manage access to data for more information.
Solution: If the database was installed as part of a pre-built 'solution', the name of the solution will appear in this column. Solution-based databases can not be edited.
No. Users: The number of users currently assigned to the database.
Version: The version of Phocas that was in use when the database was built.
Size (MB): The sum of MDF and LDF files for the database.
On the Databases page, click the database name (blue link) to open the database settings page for that database. The settings are organized into the following tabs. Unavailable databases only have three tabs: Database, Build Logs and Usage.
Database tab: Change the name and owner and the Hide Total, Month to Date, and Show Net Zero settings.
Users tab: View a list of users who can access the database, and manage individual user access and restrictions.
Defined Periods tab: Set defined periods for a database.
Custom Views tab: View the custom properties in the database.
Default Restrictions tab: Manage the database's default restrictions. These are database-wide restrictions that apply to all users who can access the database.
Build Log tab: View the history of the database that was built in Designer.
Usage tab: View a graph illustrating the usage of the database over time.
Change the name and owner and other general settings
On the database settings page, the Databases tab opens by default. Here you can take the following actions:
Change the Display Name of the database (the name that users see).
Change the database Owners. Use this setting to prevent unwanted changes to a database design, as only an 'owner' can edit a design. Select the user(s) from the dropdown list, which displays all administrators who have permission to access databases.
Change the following settings: Hide Total, Month to Date and Show Net Zero. These settings all relate to the Options menu that users see in the Analytics module. See Get more options for viewing data for information on what each one does.
Note about the Month to Date setting
There are month to date options on both this database settings screen and the user profile screen. These work in conjunction to determine user ability to use month to date. Different combinations of these settings yield different results:
Month to Date NOT selected in both database and user screen: Month to date is not available to the user.
Month to Date selected in database but NOT selected in user screen: Month to date is turned on and can't be turned off by the user.
Month to Date NOT selected in database but selected in user screen: Month to date is OFF by default, but the user can turn it on using the options menu.
Month to Date selected in both database and user screen: Month to date is ON by default, but the user can turn it off using the options menu.

Manage user access and restrictions for a database
This section outlines how to manage access and restrictions for a database, for one or more users, via the Databases page. To do this for an individual user via the Users page, see Manage a user's database access and restrictions. For other information, see the Overview of access to data page.
Changes you make here override any default database restrictions (see next section) that might have been applied to the database.
On the database settings page, click the Users tab and review the current access and restrictions:
If a period displays next to a user’s name, it means the user has access to the database. If no period displays (a red outline displays on the period box), it means the user does not have access to that database.
If the lock icon (Restrictions button) next to the period is grey, it means no restrictions have been applied to the database. If a black button displays, it means one or more restrictions have been applied.
Locate the user you want to update, then manage the access and restrictions as required:
Give access to the database: Select a period from the list of defined periods that have been set up for the database. This action grants the user access to the database and the period you select becomes the default period that is applied when the user opens the database. Learn more about periods, a core concept in Phocas.
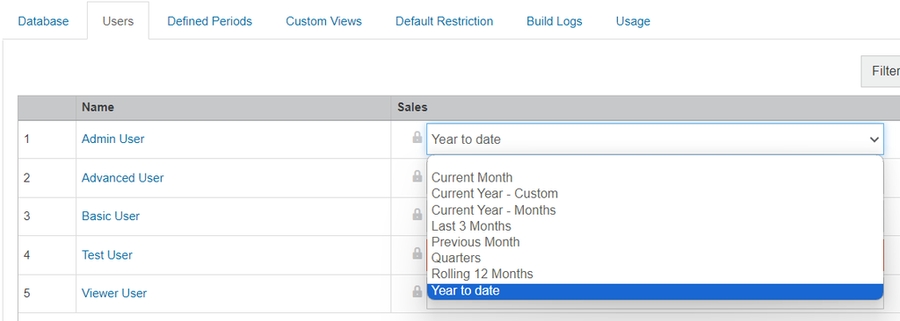
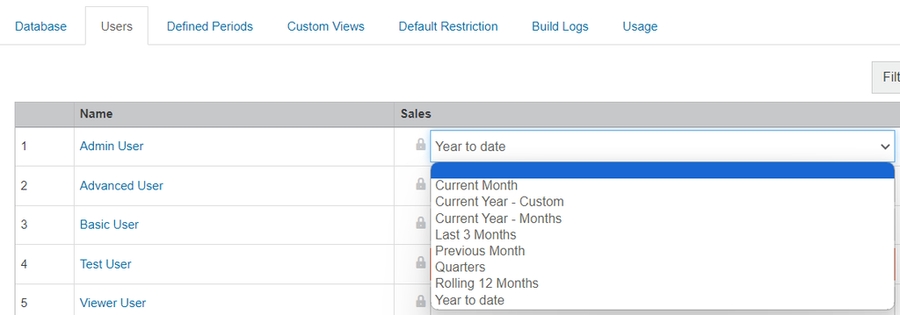
Remove access to the database: Select the blank option from the dropdown list.
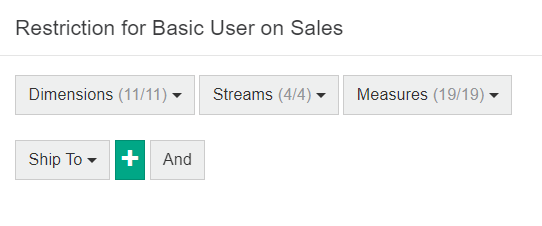
Add or update restrictions: Click the Restrictions button (lock icon) next to the period dropdown list, then configure the restrictions and click Save. See the examples in the Manage default database restrictions section, as the process is similar.
Repeat the above steps to manage the access and restrictions for other users, then click Save > Close.
Set defined periods for a database
Periods are a core concept in Phocas. Read the Periods page to learn more about the Period menu in Phocas and the different types of periods.
You can determine what defined periods (date ranges) are available for use in a database. In Analytics and Financial Statements, this correlates to the defined periods that display in the Period menu. While users can add their own user-defined periods, if a particular period is required by several users, it is better to add it as a defined period at the database level. This makes the period available across the database, so all users can access it from the Period menu.
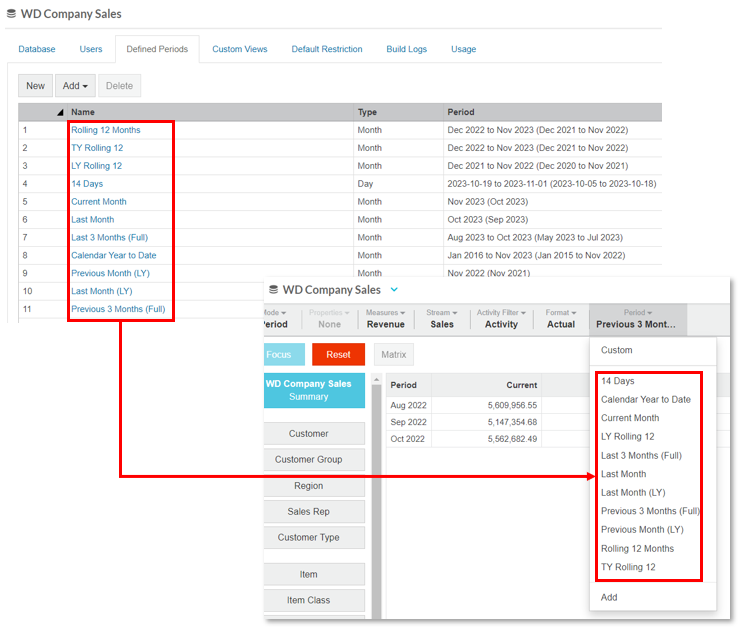
Defined periods are based on period types. Therefore, you might need to add a new period type before adding a defined period. For example, if you want to add a defined period for the Current Financial Week, you must first add a period type for Financial Weeks to the database.
The Month to Date option in Analytics only works for defined periods based on the Month period type.
On the Databases page, click the database name (blue link) to open the database settings page, then click the Defined Periods tab. This tab displays the defined periods available for the database. Here you can take the following actions:
Add a built-in defined period
The simplest way to assign defined periods to a database is to select from a list of common periods built into Phocas.
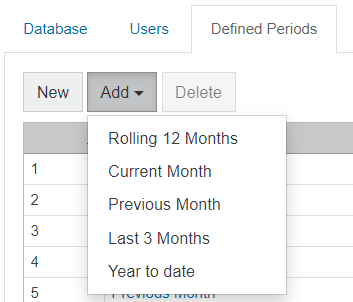
On the Defined Periods tab, click Add and select the defined period you require.
Edit a defined period
On the Defined Periods tab, click the period name (blue link) to open its setup window. Then in the Defined Period window, make your changes and click Save.
See the Add a new defined period steps below for more information.
Add a new defined period
If none of the built-in defined periods meet your needs, you can add your own defined period.
On the Defined Periods tab, click New.
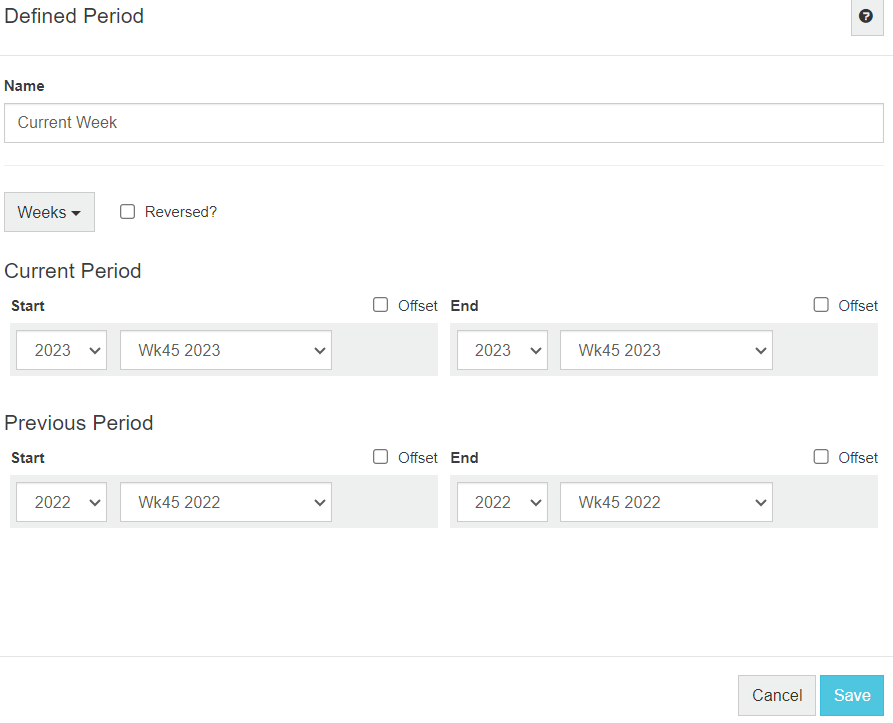
In the Defined Period window, enter the name of the period.
Select the period type (time unit) upon which the defined period is based. Typically the period type options are Year, Month or Day but other types might be available, such as Quarter and Week, depending on whatever has been added to your Phocas site. See Period types to learn how to add new period types.
(Optional) Select the Reversed checkbox. By default, time units (years, months, weeks or days) display in the grid in chronological order from left to right. To avoid users having to scroll across to the most recent time unit, you can reverse the display order.
Select the Start and End dates for your Current period. Often a fixed set of dates is of limited use, so you have the following dynamic date options. The use of a dynamic date is a simple way to get a date range that updates each year and it saves you from having to update dates each new calendar or financial year.
Dynamic month option (available when defining a date range based on months) - Select either a fixed month or one of two dynamic options: Most recent (the past 12 months) or Second most recent (the 12 months before that).
Offset dates - Define a date range based on today's date, so that the data continues to update. The defined period becomes a dynamic date range, such as Year to Date or Last Six Months. Selecting the Offset checkbox converts the date range into a number. For example, if using the Month type, an offset of zero means the current month, and an offset of -2 means two months ago. See Use offset dates for more information and examples.
Special offsets (available when defining a date range based on days) - Select from one of four matches (First Day, Last Day, Match Today or Match Yesterday) and offset that match against a chosen month. See Use offset dates for more information.
Review the Start and End dates for the Previous period. These dates are automatically set by Phocas based on what you selected for your Current period. If they are not correct, change them using one of the same methods above.
Click Save. Your newly defined period is added to the list and also becomes available to users in the Period menu when they open the database.
Delete a defined period
On the Defined Periods tab, use the dropdown list on the top right to filter by period type, then select the row of the defined period you want to delete. Click Delete > Yes.
Manage default database restrictions
You can manage the default restrictions that apply to all users who have access to a database. For other methods and more information on applying database restrictions, see the Overview of access to data page.
Typically, database restrictions are applied on a user-by-user basis, so if a user doesn't have a restriction, it implies they have access to all data items (streams, measures and dimensions) in the database. Default database restrictions allow that logic to be reversed, so any user without a specific restriction will get the default restriction from the database. Instead of applying a user restriction to limit access, it is used to increase access. This allows a secure by default way of setting up a database.
On the database settings page, click the Default Restriction tab, then configure the restrictions (see examples below) and click Save > Close.
Create a default restriction on streams
In the example below, a default restriction has been created to allow access only to the main stream, which is Sales. All users without a specific restriction will only be able to access the Sales stream. To grant a user access to the Budget stream, you would add a user restriction.

Create a default restriction on measures
You could set a default restriction on measures to allow access only to the Value and Quantity measures. This would mean that all users would be prevented from seeing Profit and Margin figures, unless specifically granted that access. For example, you would grant access to the Profit and Cost of Sales measures for managers and directors by adding a user restriction.
Create default restrictions based on user settings
A further refinement to the regular way of applying database restrictions is to base a dimension restriction on a user's settings, instead of an absolute, fixed value. By replacing a fixed value with one of the two user variables {{user:group}} or {{user:territory}}, the appropriate setting value from the user will be applied when they sign in to Phocas. This allows the restriction to be created at a database level, but applied per user. In the screens below, a default restriction has been set on the database using the territory value from the user. In the second screen, the users have multiple territory (or State) codes assigned to them, which are used when they access the database. Note: Semi-colon separated values are used when specifying multiple allowed values.

Significantly for this type of restriction, a mistake or a missing territory or group value on the user will result in no data being exposed. This mechanism provides a 'secure by default' way of setting up the system.
Troubleshooting
If your applied restrictions don’t look or behave as expected, please contact our Support Team. We are aware that the application of restrictions differs slightly depending on where or how you apply them. We are working on making this more intuitive and consistent.
View and delete custom properties
Phocas Analytics users can add their own custom properties to a database via the Properties menu > Custom option.
You can view the list of these custom properties for each database.
On the database settings page, click the Custom Views tab. This tab displays a list of all custom properties that have been created in the database, along with who created them.

You can delete these custom properties, if required: Select the property and click Delete. This permanently deletes the property from the database.
View the database history
On the database settings page, click the Build Logs tab: This tab displays a record of the database that builds.

Generate a database report
A database report provides a printable summary of the design and configuration of a database.
On the Databases page, select the database row and click More > Report.
The report opens in a new browser tab and displays the following information:
Database Info
Basic information about the database, including its physical SQL Server name and the internal ID that Phocas uses for referencing the database externally. To directly link to a database from elsewhere, you just append this ID to the URL: http://localhost/Query/Database/{ID}
Defined Periods
A list of the defined periods in the database, with its period type and period range.
Dimensions
A list of the dimensions in the database, and the number of records in each as well as all of the properties they contain.
Streams
A list of the streams in the database, with their min and max transaction dates.
Measures
A list of the measures in the database.
You can collapse/expand the sections using the minus/plus buttons next to the section headings.
You can print the report using your browser's standard Print function.
Clone a database
On the Databases page, select the database you want to clone, then click More > Clone.

Enter a Display Name for the new database. This is the name users see.
Select the items you want to copy (clone) into the new database, then click Save.
Description of database items...
Defined Periods: All the defined periods are copied to the new database.
Users: All existing users and their current default period and user restrictions are copied to the new database. This option only becomes available when the Defined Periods option is selected.
Default Restriction: If the original database has a default restriction, it is copied to the new database.
Folder Favorites: All global favorites, stored in folders against the source database, are replicated in the new database.
Personal Favorites: All personal favorites created by users in the original database are replicated in the new one.
Design: You get very different results, depending on whether you select this option or not. If you are cloning a financial database, you must select this option to clone the design.
If you clone the design:
A physical copy of the SQL server database is created, which includes a copy of the original database design (setup).
No link is retained between the original and clone database. The clone becomes a completely separate database.
You can proceed to modify the design of the new database in Designer.
If you do NOT clone the design:
Only a copy of the application database, not the physical SQL server database, is created.
A link is retained between the original and clone database, so if you edit the original, the clone will also be edited. Because the cloned application database refers to the same physical database, both databases are updated at the same time when the physical database is built.
This option allows you to apply sophisticated user access restrictions, where the same physical database is made accessible to a user multiple times but with different levels of restriction.
You cannot modify the design of the new database in Designer.
Create or modify a database design
The creation of new databases and the modification of existing database designs is an advanced administration task that requires additional user permissions. These tasks, along with changing a database's build schedule, are done in the Designer module.
Last updated
