
User account page
You access a user’s account page (sometimes called a user maintenance form) when you add and update a user account.
This page contains several user details, permissions and other settings, organized into tabs. Depending on your own profile, you might not see all the tabs.
Click Administration > Users, locate the user and click their name to open their account page.
If you make any changes to any tabs on this page, ensure you click Save to save and apply those changes. If you click Close or move to a different tab, your changes are not saved.
User tab
The User tab displays when you are adding a new user account (other tabs display afterward) and it is the default tab that displays when you open an existing user account. This tab has the following settings:
Username (mandatory): This is the name the user will use to sign in to Phocas. This usually matches the user's network sign-in name.
LDAP Authenticated?: This setting is only available on LDAP configured implementations. It indicates which authentication method is been used. If the checkbox is selected, the user is authenticated against the LDAP server. If the checkbox is not selected, the user is authenticated against Phocas. If the user is being added from a source other than Active Directory, an additional Password setting is available. See Configuration > LDAP.
SAML Authenticated?: This setting is only available if the Single sign-on (SSO) feature is turned on for your Phocas site, in which case the checkbox is selected by default.
Windows or SQL user name: This setting is only required for older desktop versions of Phocas.
Email*: This is the user's email address. Users need a valid email address to receive subscriptions. New users on the current version of Phocas will be asked to enter an email address the first time they sign in, unless one has already been entered here.
Display Name (mandatory)*: This is the name that displays on the User menu.
Phone, Cell and Home*: These are the user’s telephone numbers.
Language*: This is the user’s language, which affects the user interface (UI), number formatting, and date formatting in Phocas. See the Account settings page for general information about the language settings in Phocas and their impacts.
Timezone*: This is the user’s timezone.
Home: This is the user’s default homepage. You can either leave this blank to present the user with a homepage listing the databases, dashboards and favorites to which they have access, or select a dashboard (to which they have access) as their default home screen.
Group, Territory and Team: These settings are only available if you have the Administration > Users: All Users permission. These items make bulk updates easier and allow filtering in some areas of Phocas.
Password: This setting determines if the user receives sign-in details by email.
Auto-generate password: If selected, this automatically creates a password that conforms to your site's password policy (as long as your site uses the default Phocas authentication), which is always used in conjunction with the Email details to user setting below. See Manage passwords.
Force password change: If selected, when the user first signs in, the system forces them to enter a new password.
Email details to user: This is only available if the SMTP details are configured and the user has an email address. If selected, it sends the URL, username and password to the user in an email.
License: This is the user’s Phocas license type (Full or Viewer) and access to the CRM, Rebates, and Insights modules (if applicable).
CRM license
The ability to assign a CRM license to someone depends on the number of licenses that are available for your Phocas site.
To assign the license to the user, select Yes from the CRM dropdown list and click Save. While in the user's account page, proceed to assign the CRM permissions on the Profile tab.

You can also assign a license to multiple users using the bulk update tool or License view on the Users page.
Rebates license
The ability to assign a Rebates license to a user depends on the number of licenses that are available for your Phocas site. You can assign the license in three ways.
To assign the license to the user, select Yes from the Rebates dropdown list and click Save. While in the user's account page, proceed to assign the Rebates user permission on the Profile tab.

You can also assign a license to multiple users using the bulk update tool or License view on the Users page.
Permissions: These are high-level, site-wide settings applicable to the user.
General > Account Locked: This setting controls whether the user’s account is locked.
General > Detailed Logs: This setting controls whether every query by the user is recorded. If selected, every query is recorded, along with the export activity. The logs are viewable in the user account’s Usage tab (see below). Caution should be used when enabling this option, as it can result in large quantities of data being collected, slowing the system down.
Folders: These are the folders that contain the favorites and dashboards the user can access. You can manage these folders in the Administration > Folders page.
Custom Actions: These are special actions the user can access from the Analytics grid, relevant to the CRM and Rebates modules.
Profile tab
The Profile tab controls what a user can do in Phocas from a functionality perspective.
When setting up a new user account, you can assign an organization profile or create a user-specific profile.
When reviewing or editing a user account, you can see the name of the assigned profile and the underlying user permissions.
See the Profiles page to learn more about the different types of profiles and how to assign them to user accounts.
Databases tab
The Databases tab displays a list of the Phocas databases. This is where you control the data the user can access in Phocas. Even if a user has permission to do something in Phocas, such as view a favorite or dashboard, if that user does not have access to the underlying data, no data will display. See Manage user database access and restrictions.
CRM Restrictions
This tab becomes available when the user has a CRM license.
Rules-based CRM user restrictions determine what CRM entities (accounts, contacts, leads, and activities) a CRM user can view or edit.
While you can assign users to teams, groups, and territories to help you with user management, these settings are also used in CRM restrictions to determine what CRM entities each user can view and edit. If you have connected with Microsoft 365 Outlook calendar, these rules also affect what you can see in your activities calendar.
The basic principles of the CRM restrictions are:
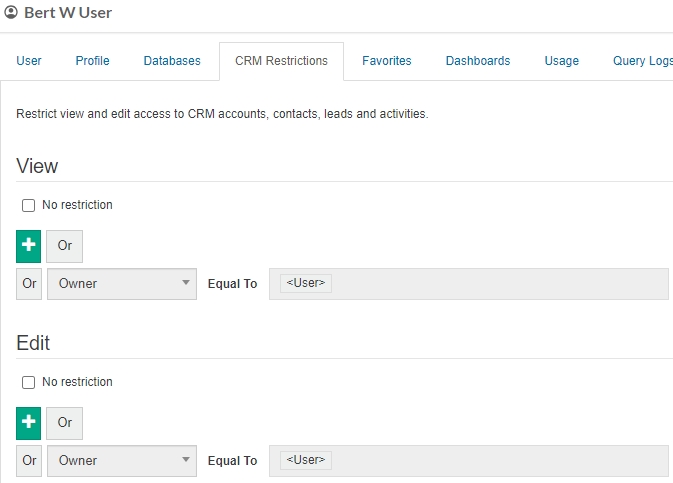
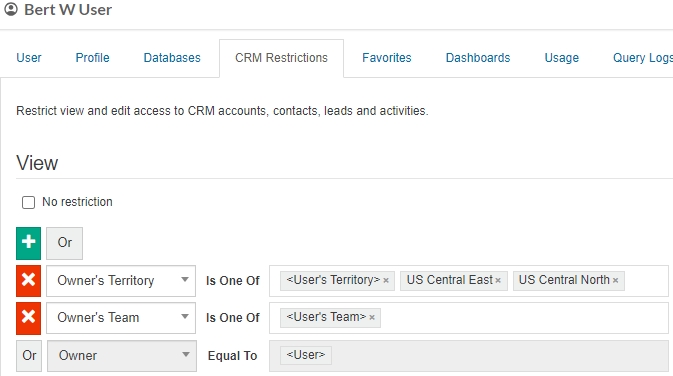
You can always view and edit the entities you own. In the following image, you can see the default rule is Owner Equal To <User>, which means that the user (Bert) is restricted from viewing and editing all CRM entities except for those he owns.
If you have edit access to an account (or lead), you can edit the entities associated with that account. For example, if your restrictions allow you to edit an account (the parent), you can also edit that account's activities and contacts, and even the contact's activities (the children).
If you have view access to an account, you can view its entities and meetings (activities).
Campaigns can be viewed by all users, regardless of restrictions.
You can view and/or edit other CRM entities if you are linked to the owner of those entities via a restriction rule (as explained in the next section).
You can view meetings (activities) created against an account in your calendar. If you have , you can also view any .
Add restrictions
You enable users to view and edit more CRM entities (not just the ones they own) by adding restriction rules that link them to those entities. There are two models for adding restriction rules.
Use single values (static)
Add specific users, groups, territories, and/or teams to a restriction rule, one at a time.
This model is suitable for small organizations that typically have a flat hierarchy or only a few users because:
When circumstances change, you need to update the restriction rule for each user manually.
It can be difficult to understand who can access what, as the Users page only lists each user’s group, territory, and team, not any others to which they have been linked via a restriction rule. You need to go into each user’s CRM Restrictions tab for such details.
Example: Allow a user to view the CRM entities owned by another user
Suppose you want Bert the sales executive to be able to view the CRM entities owned by his colleague Betty.
Open the user's account page and click the CRM Restrictions tab.
In the View section, click the green plus button to add a rule.
In the new rule row, select Owner. <User> automatically displays in the next box.
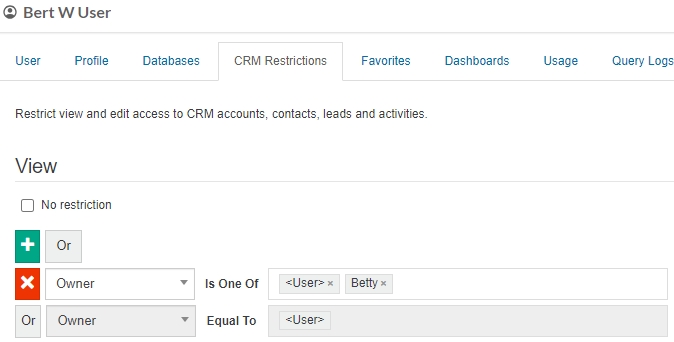
Start typing the other user’s name (Betty) into the box and select the name in the list that displays.
Click Save. Bert can now view Betty’s CRM entities along with his own.
This is a very basic example; it would be more common to add additional criteria such as territory, team, and so on.
Example: Set a range of CRM view and edit restrictions for a user
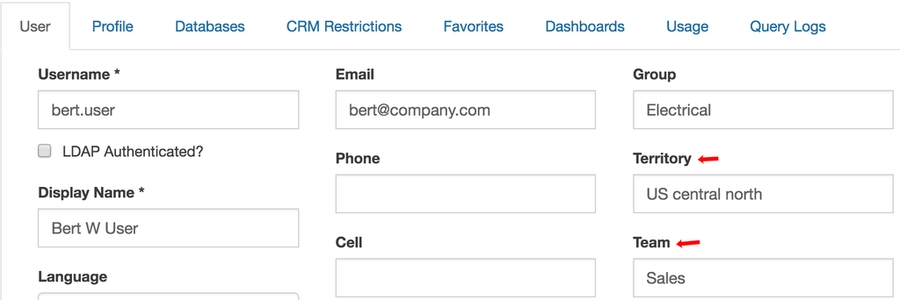
Suppose you want Bert the sales executive to be able to view and edit everything within his own team and territory. You also want him to be able to view entities within the neighboring territory (US Central East) but not edit anything relating to that territory.
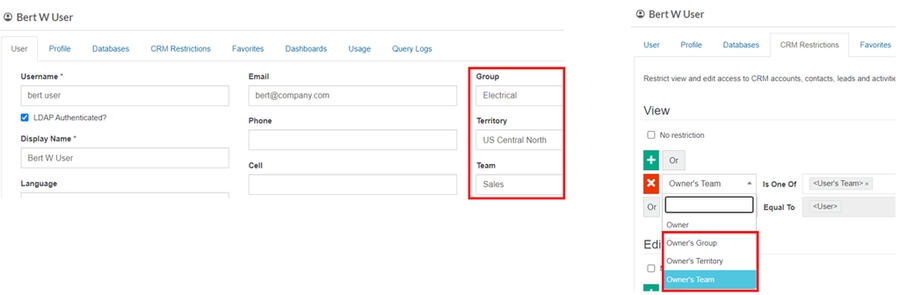
On Bert’s user account page, you can see that he belongs to the US Central North territory and the Sales team. He also belongs to the Electrical group but you do not want to use that group as the basis for any restrictions.
Open the user account page and click the CRM Restrictions tab.
In the View section, enable Bert to view the additional CRM entities:
Click the green plus button to add a rule and select Owner's Team. <User's Team> automatically displays in the next box. In Bert's case, this is the Sales team.
Click the green plus button to add another rule and select Owner's Territory. <User's Territory> automatically displays in the next box. In Bert's case, this is the US Central North.
Start typing US Central East into the box and select the item in the list that displays.
Click Save. Bert can now view anything he that he owns, entities within his own team (Sales), territory (US Central North), and entities within US Central East, and any campaigns.
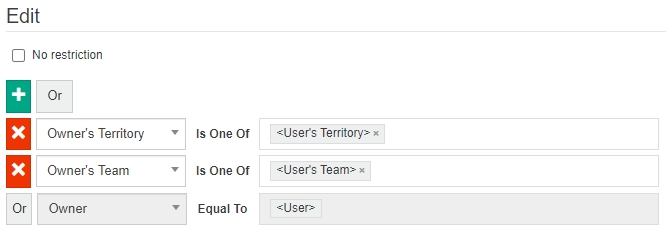
In the Edit section, enable Bert to edit the additional CRM entities:
Click the green plus button to add a rule and select Owner's Team. As a result, <User's Team> automatically displays in the next box. In Bert's case, this is the Sales team.
Click the green plus button to add another rule and select Owner's Territory. <User's Territory> automatically displays in the next box. In Bert's case, this is the US Central North.
Click Save. Bert can now edit anything he that he owns, and entities within his own team (Sales) and territory (US Central North).
Multiple values (dynamic)
Use the Group, Territory, and/or Team settings on the User tab to drive the restrictions. Add multiple groups, territories, and/or teams to the user’s account page separated by a semicolon and select the …(as semicolon separated values) option in the rule.
This model is suitable for larger organizations that likely have a more complicated hierarchy because:
The set-and-forget approach reduces the need to manually update restrictions for each user.
On the Users page, it is easier to see at a glance who can access what, which is handy when you have hundreds of users.
Example: Allow a user to view the CRM entities in two territories
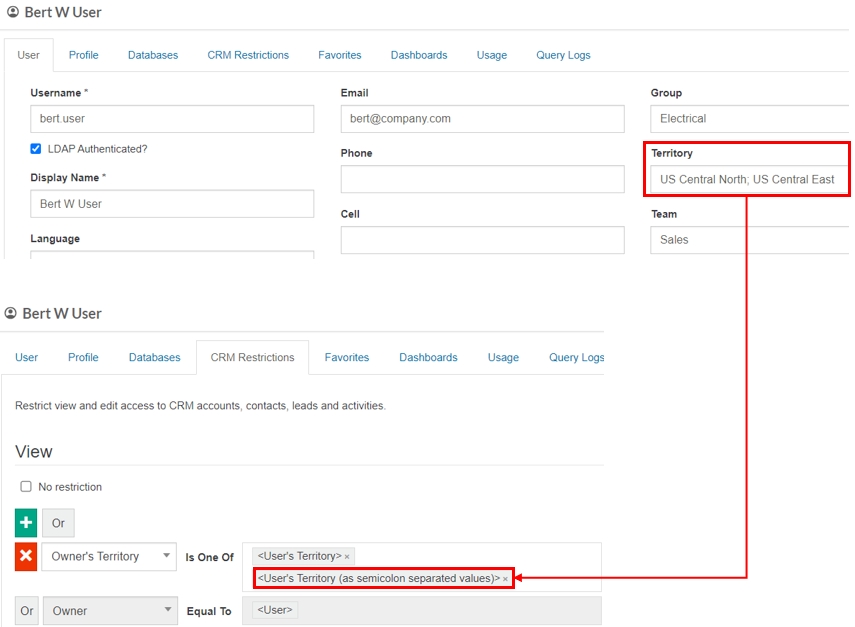
Suppose Bert the sales executive is training new sales executives across the country, therefore, you want to allow him to view the CRM entities in multiple territories. You want to update this access from time to time without having to edit Bert’s restriction rule each time. You also want to have an easy way to see which territories Bert currently has access to view.
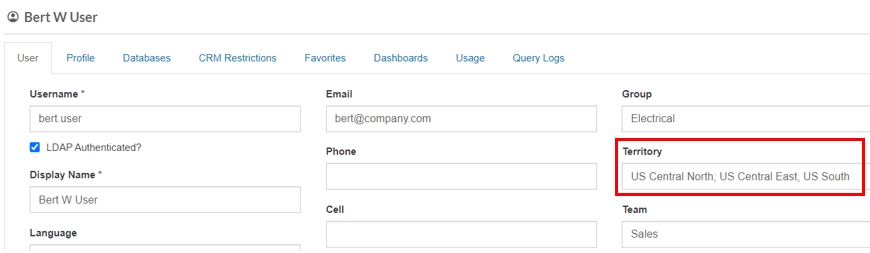
In Bert’s user account page > Territory box, type the additional territories after his own territory, separated by a semicolon and click Save.
Click the CRM Restrictions tab.
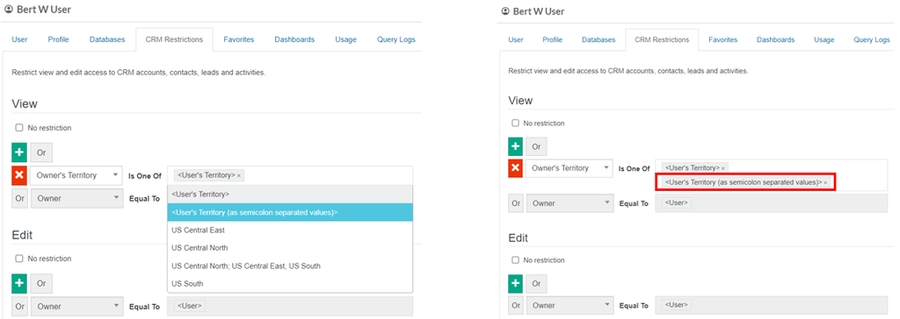
In the View section, click the green plus button to add another rule and select Owner's Territory. <User's Territory> automatically displays in the next box. In Bert's case, this is the US Central North.
Click the box and select the <User’s Territory (as semicolon separated values)> option in the list that displays.
Click Save. Bert can now view anything he that he owns and all CRM entities in the territories specified on his user account page.
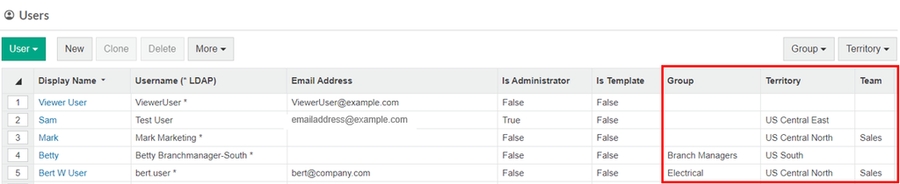
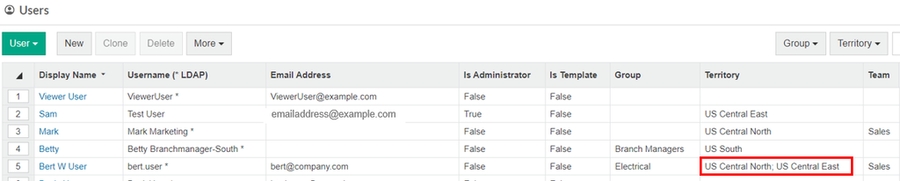
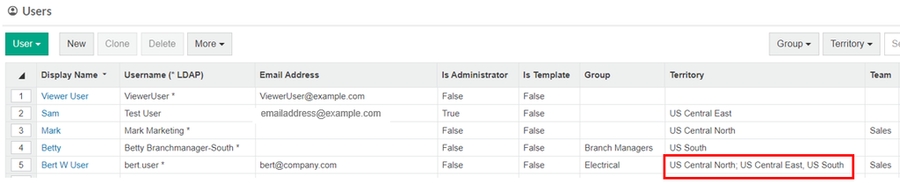
Back on the Users page, in the Territory column, you can see all the territories to which Bert is linked.
If you change Bert’s territories on the user account page > User tab, the changes will automatically be applied to the rule in the CRM Restriction tab.
Remove all restrictions
Removing all restrictions gives the user full access to all the CRM entities. This action is suitable for administrators and users who require a broad level of access, as they typically need to view and edit all CRM entities.
Open the user’s account page, click the CRM restrictions tab, select the No restriction checkbox, and click Save.
Favorites tab
The Favorites tab displays a list of the favorites to which the user has access, which includes any personal favorites created by the user and the favorites shared with them. You can delete any of these favorites. See Manage favorites.
Dashboards tab
The Dashboards tab displays a list of the personal dashboards created by the user, if any. You can delete any of these dashboards. See Manage dashboards.
Usage tab
The Usage tab displays activity information for the user. See Monitor user activity.
Query Log tabs
The Query Logs tab displays details for each query the user makes. See Monitor user activity.
Other tabs
The user account page contains some additional tabs not typically available to administrators, which are used by Phocas implementation and support consultants. These include Settings and Audit.
Last updated