Map data to the database
The next step in the design process is to map (match) the data columns to their respective component in the database.
User permissions: Administration > Databases and Sync
This step and the next one influence what your users see in Phocas and how they can conduct analysis, so it is worth spending some time thinking about what structure will make sense for your business. You can map some data, build a database and see what it’s like in Phocas. If it's not what you want, you can go back and modify your design. It's quite common for experienced administrators to revise their design to get it just right.
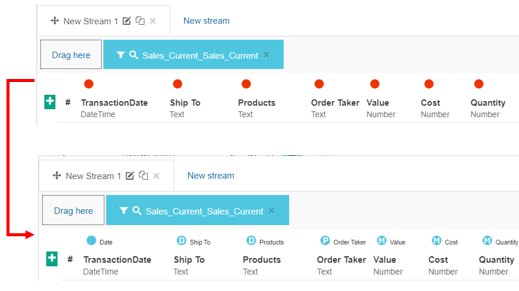
After you add raw data items in the Stream section of your database, each column of data has a red dot above it, to indicate that it is not mapped to the database. The next step in the design process is to map (match) these data columns to their respective component (Dimensions, Properties, Measures or Date) in the database.
When you map a data column to the appropriate database component, the dot turns blue and an initial displays in it, to show what it has been mapped to (for example, ‘D' for dimension, 'P’ for property and so on). The name of the mapped item displays next to the dot.
Some notes about mapping:
If no date is mapped, Designer will default to today's date.
If no measures are mapped, the whole item is skipped, in other words, it is not included when the database is built.
A property cannot have the same name as a measure.
The order in which properties are mapped, and their naming convention, will affect the results that users see when using the Map charts (Marker, Circle and Heat) in Analytics. With regards to names, Country 'AUS' does not map, so use 'AU' or 'Australia' instead. Similarly, use 'Due date' not 'Date due'. To test mappable properties enter the string into https://www.openstreetmap.org.
Map the date
Drag and drop the applicable Moment (Date) column heading into the Date section.
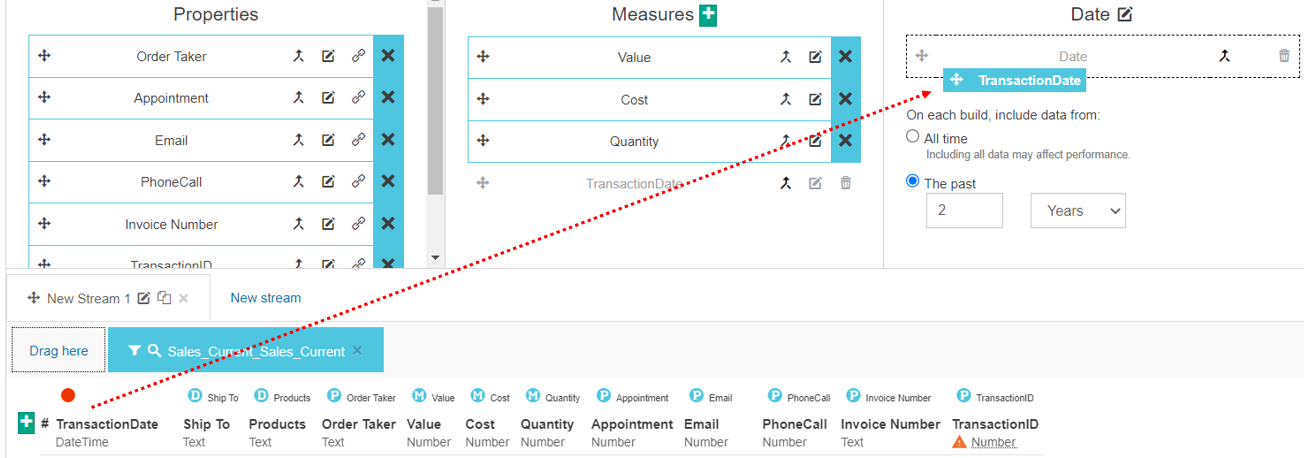
Designer checks the data type of the Moment (Date) column in the data item: If it the data type is correct, the Edit button on the Date component is disabled. Skip to step 3. If the data type is NOT correct, the Edit button on the Date component is enabled. You need to change the date format to match the format of the Moment (Date) column. Proceed to step 2.
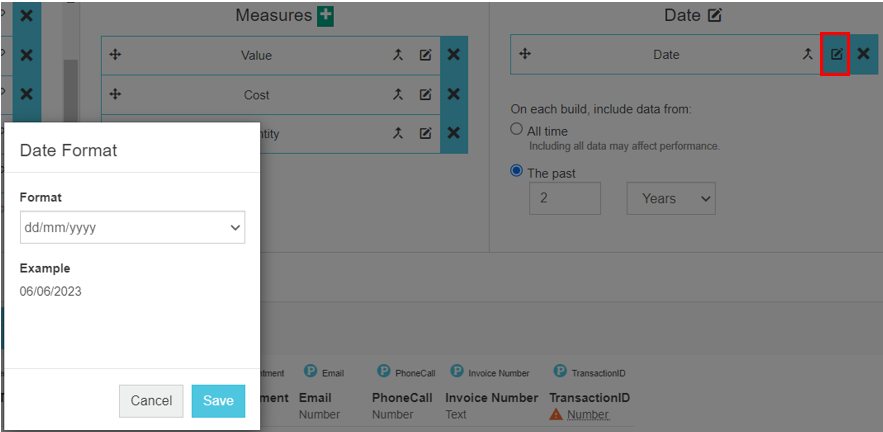
(If applicable, see the previous step) Change the date format: Click the Edit button on the Date component, then select the required date format from the list and click Save. For example, if the dates in the item are in the format of date/month/year, such as 01/03/2020, you need to select the corresponding date format in Designer, which is dd/mm/yyyy.
Set how much data you want to include in each database build:
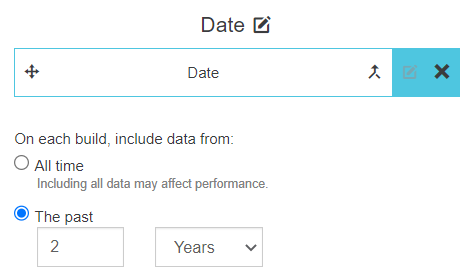
All time - All of the historical data that is available.
The past - Apply a filter to the historical data to determine how much data is included. For example, you might want to maintain only 2 years or 6 months of historical data at all times. This filter works on the calendar year (Jan - Dec), so the current period is added to your specified timeframe. For example, if you enter 2 Years and today is June, you will get the full two prior calendar years plus the 6 months of the current calendar year.
Map the dimensions, properties, and measures (manually)
Drag and drop each* data column heading into the appropriate section: Dimensions, Properties or Measures.
For example, in the following image, the first four data columns have been mapped and the Value data column is mapped to the Measures section.
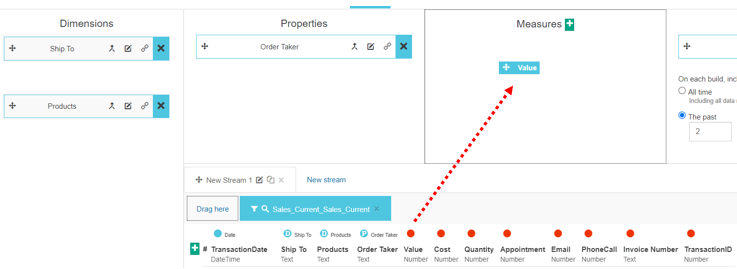
*Except for the Date column. You can map all the columns now or do some later, depending on how much information you need in your database initially.
Use existing mappings for a new item
If you already have mapped data in your database, when you can add more items, you can take advantage of some time-saving options.
Usually, the data from the second and subsequent items need to match the mapping structure that was already created from the first item. If that’s the case, you can drag data columns on top of the corresponding mapped items. The X turns blue to indicate the mapping was successful.
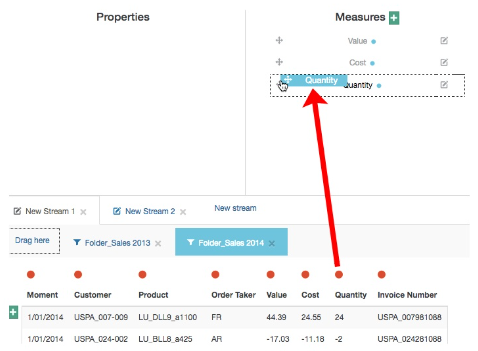
If you drop a data column onto the wrong measure, click the X to remove the mapping.
View source data item
After you map an item, a visible connection is made between the data column and the item in the database. You can view this connection at any time. This is a handy option in the case of troubleshooting, particularly when you have a lot of mapped items.
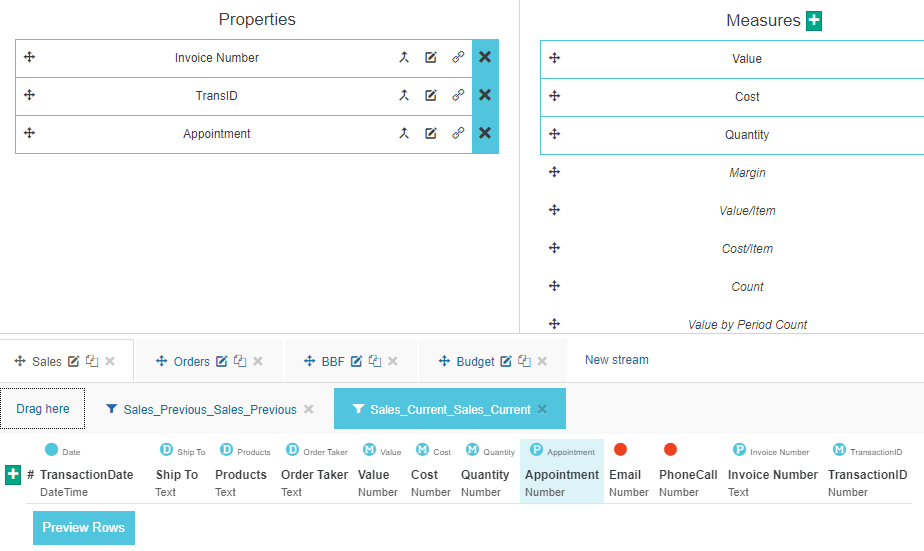
In the database item, click the Source button (next to the Edit and Link buttons). The name of the mapped stream(s) and data item(s) displays.

Click the data item to highlight its counterpart in blue, in the stream section below.
Unmap or delete mapped items
The act of dragging and dropping a column creates both structure and mapping at the same time. If you make a mistake or change your mind, you can remove the mapping (unmap the item). Depending on the situation, if you unmap an item, the structure remains. You can delete the structure unless the value has a foreign mapping. The results are explained in the following example.
The blue border around an item means that Value has been mapped from the data item that displays in the stream section at the bottom of your screen.
Click the X on the item to remove the mapping.
There are three potential outcomes for the item:
It becomes unmapped and deleted; it will disappear completely.
It becomes unmapped but the structure remains (see point 2 below).
It becomes unmapped but a foreign mapping remains - see point 3 below.
Ensure you click the X on the mapped database component, as this only removes the mapping between the data column and that database component. If you click the X on a stream tab, you delete the entire stream, and therefore, all your mapping.
In this situation, the blue border is gone, signifying that the item is not mapped (you won't see it in Phocas after building the database). Value exists only as a structural element.
This is often the case when a template or a previous design is used. The structure serves as a placeholder, awaiting a future mapping.
Click the Delete button to permanently delete the structure.
A blue dot next to an item name means it is mapped from a different raw data item - not the one that currently displays in the stream section at the bottom of your screen.
There is no ability to unmap or delete this foreign mapping here. You need to locate the correct data item (it could be in a different item tab in the same stream or another stream tab).
Troubleshooting
Mapping warnings
Designer expects all dimensions and properties to be Text and all measures to be a Number but that might not always be the case for your data items. If the data types do not match, you will get a warning in the data column header. You can click this warning icon to display the message.
To resolve the issue, click the Edit button in the mapped item and change the data type.
For example, the PhoneCall data is a number but when it was mapped to the Properties section, the system expected the data type to be Text, so you change it to Number.

Missing raw data
Even if you have the ideal database design, raw data items can get moved, deleted or renamed, which could cause a build error. In Designer, if there is a mismatch between the design and raw data, the streams that have missing raw data will be red and an error similar to that in the following image will display.
Click OK to close the error message. Hover over the data item tabs to display the name of the missing data.
To resolve the issue, you have the following options:
Restore: Put the missing data item back. This could mean re-uploading it, re-syncing it, and checking the item name.
Replace: Drag a new data item on top of the missing red item. The item will turn blue again and any existing mappings will be retained.
Remove: If it is no longer needed, you can remove the red data item by clicking the X.
Next step in the design a database process: Either proceed to save your design and build your database to see what it’s like so far, or modify the design first.
