Schedule the sync process
Rather than manually run the sync process every time, set a time to run the sync regularly, using Windows Task Scheduler.
User permission: Administration > Sync
You can automate the Sync process via a Windows scheduled task. Phocas uses the Run a Program option and defines the PhocasCLI.exe as the program and the Sync File with the run switch -r.
Prerequisites
Before you schedule the sync process, think about the account that will be used for the Windows Task Scheduler and the sync timing.
User account
Windows Task Scheduler requires a user account to run the Sync process. If you use a real user account for this, you run the risk of the schedule failing to launch (see the Troubleshooting section below). Therefore, we recommend you set up a dedicated (service) account to run the Windows Task Scheduler job. For example, an account called PhocasScheduler. This type of account satisfies the following requirements:
It will never be disabled.
Its password will never expire or be changed.
It has the Local Security Policy “Logon as a Batch Job” permission.
It has appropriate access to SQL, ODBC, file locations, and so on.
See the Microsoft Service Accounts page to learn more about such accounts. It’s up to your IT team to choose the appropriate account for your organization's security policy.
Timing
Phocas generally syncs over night so that data is accurate as at close of business the day before. Consider the following points:
When the data will be analyzed? Will it be analyzed or changed over the weekend?
If you use GETDATE() calculations, consider which side of midnight you are syncing.
If syncing multiple times per day, is there a time window required?
Are there any other processes running that might affect the sync at that time?
Schedule sync
The steps below are a basic guide, but you might also want to look online for Microsoft's instructions on using Windows Task Scheduler. When you schedule Sync, other options become available, as outlined on this page.
Set up an account to use for the Windows Task Scheduler (see Prerequisites section above).
Create and save your Sync file.
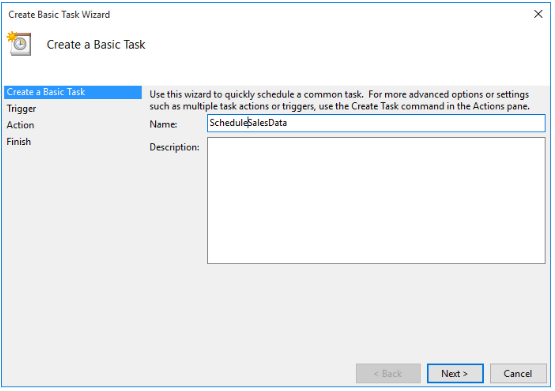
Open Windows Task Scheduler, create a basic task, give it a name, and click Next.
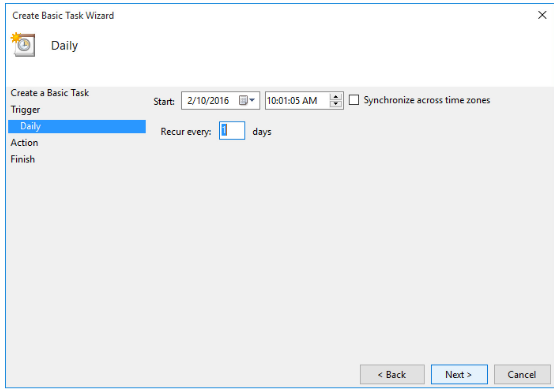
For the trigger, select how frequently you want to run the task. In this example, it will run every day at 10.01am.
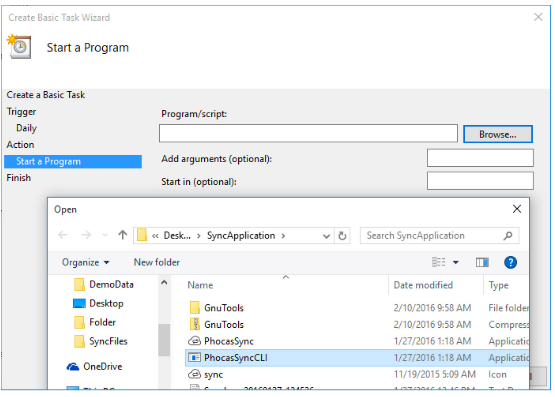
For the action:
Click Start a program, then click Browse and locate the PhocasSyncCLI.exe file.
In the Add argument box, enter the location of your sync file in quotation marks with -r at the beginning, for example:
To prevent the task scheduler from failing:
Avoid using spaces in your file and folder names. In the example above, the -r attempts to mitigate this risk.
Ensure you use straight quotes (" ") instead of curly quotes (“ ”).
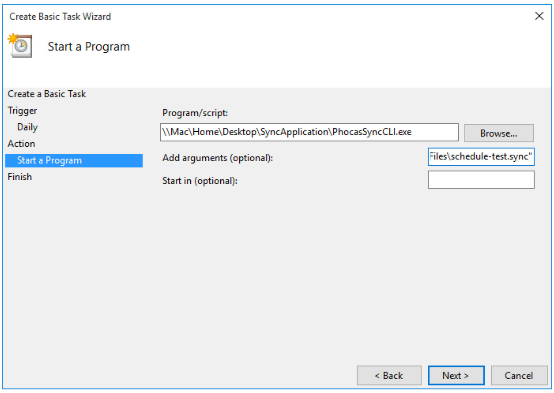
Click Next and Finish. Your sync will now run on a schedule.
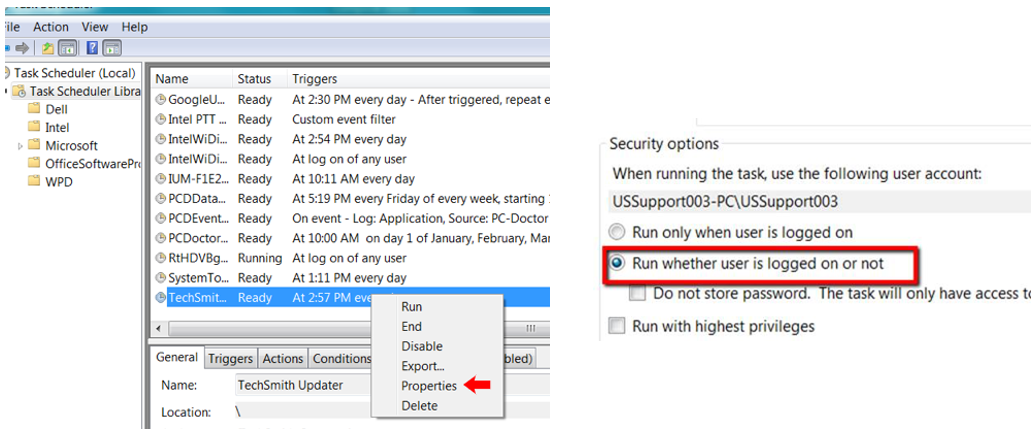
Ensure that the task runs even when you are signed out of Phocas: Locate the task in the list, right-click on the task and click Properties, then on the General tab, select Run whether user is logged on or not and click OK.
(Optional) Test the new sync process.
Set an alert on Sync failure
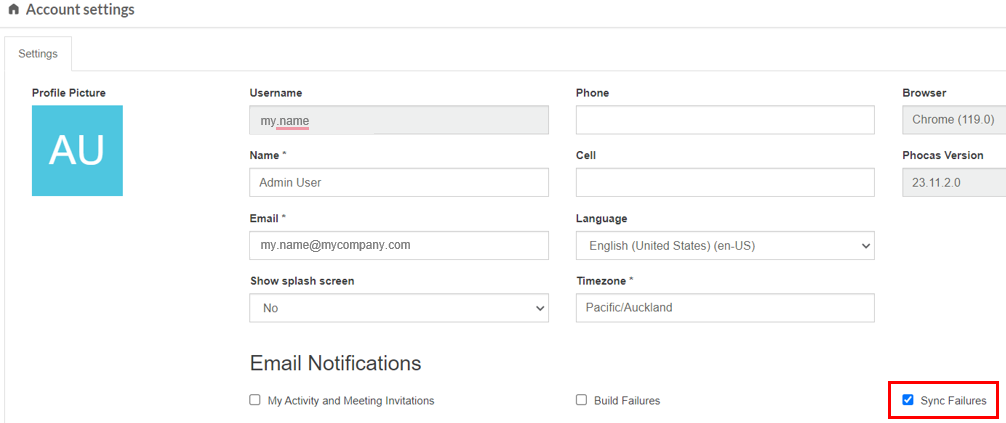
To receive an email alert if a Sync fails, go to your account settings and select Sync failures under Email notifications.
See the Troubleshooting section below for information about failures.
Set Designer builds to be based on scheduled Sync data
If data has been scheduled to sync regularly (for example each night), typically users expect the database at the other end to re-build almost immediately with this new data. For this to occur, a database must be set to build when a sync occurs.
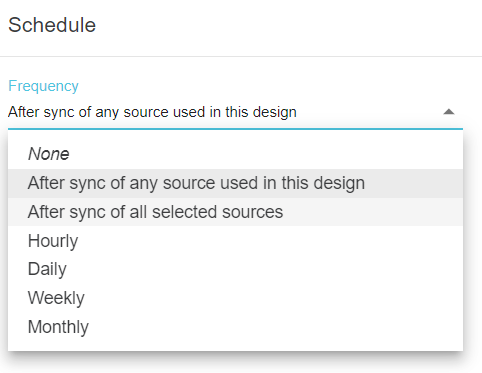
There are two schedule frequency options applicable to Sync: After sync of any source in this design and After sync of all selected sources.
See Build a database for more information.
Only sync data items used in a database
After the initial sync of data, you can choose to only sync data items that are used in a Phocas database design in Designer (and exclude unused items). For example, if a Sync file has ten data items listed in the Data Items tab but only three have been used in a database, the unused seven data items will not be synced.
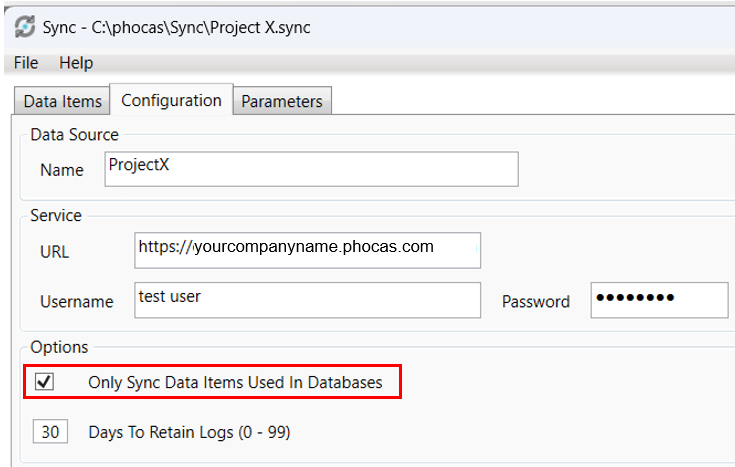
In Sync, select the Configuration tab and select the Only Sync Data Items… checkbox.
Troubleshooting
The most common reasons for sync failing to run are related to the account that's used for the Windows Task Scheduler:
The password is changed or expired.
The user leaves the organization and their account is disabled or deleted.
The security policy is changed to exclude the Local Security Policy “Logon as a Batch Job” permission.
If you discover that there are suddenly no Sync Logs in Phocas, check the Windows Task Scheduler. You can see the name of the account (Windows Credentials) being used on the General tab. The History tab will contain Launch Failure messages, assuming the history function is enabled. The error value for the message depends on the issue. For example, value 2147943731 means the account is disabled.
To relaunch the schedule, you need to resolve the issue with the account. For example, enter in the new password. To avoid such issues, use a dedicated account for the Windows Task Scheduler (see Prerequisites section above).
Last updated
