Add (connect) data to a database
After you create a database, the next step in the design process is to add (connect) the raw data items (such as files and views) to streams in that database.
User permissions: Administration > Databases and Sync
Even if the Phocas Implementations team designs your databases for you, you might want to add more data items to those databases later. There are different ways to add items to a stream, and some methods can save you a lot of time.
The items should be already be available in the data sources panel. Expand the data sources panel to view the items. If they're not there, see Get your data into Phocas.
Add the transaction file to a new database
The first data item you should add to your new database is the transaction file. This file typically contains data about an activity that occurred on a particular date, such as sales to customers and orders to suppliers.
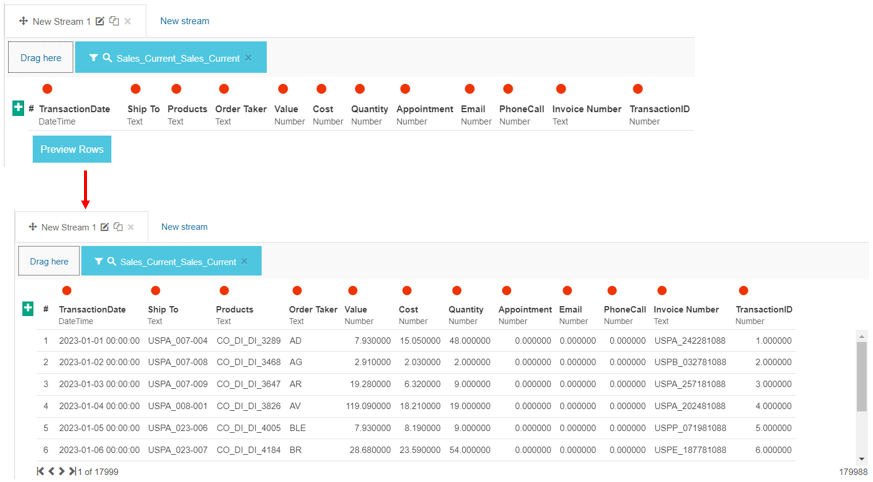
In the data sources panel, locate the transaction file and drag it into the Drag here box in the New Stream 1 tab.

(Optional) Click the Preview Rows button to get a preview of the data.
(Optional) Rename the stream.
Proceed to map the data to the database.
Add more data items to a database
Typically, not all the data required for your database is contained in a single raw data file. In addition to the first transaction file, you might want to add more transactional data items. You can add multiple transactional data items, into the same stream or different streams, according to your database design requirements.
You also might want to bring in some other non-transactional data in the form of other files and supporting structural tables that allow you to enhance and add depth to your database design. For example, you might want to add more information about your dimensions.
Add an item to the same stream
The addition of other data items into an existing stream allows you to populate the dimensions, properties and measures correctly, and it gives more data analysis options to your users.
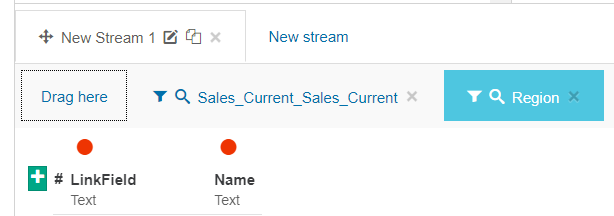
In the Stream section, click the required stream tab to open it.
Expand the data sources panel and locate the required item, then drag the item into the Drag here box in the stream tab.

The data displays in a new tab, within the existing stream tab.
Proceed to map the data to the database.
Add an item to a new stream
The use of multiple streams adds different layers to your database. The streams are separate; they do not interact with each other. For example, you could add a stream for your current period transactions, one for your previous year’s transactions and another for your budget. Then, when users open the database, they can switch between those streams to view the different data, or view compare the data within them. Each stream can contain one or more data items.
In the Stream section, click the New Stream tab.
Expand the data sources panel and locate the required item, then drag the item into the Drag here box in the new stream tab.

(Optional) Rename the new stream.
Proceed to map the new data to the database.
Add a budget file to a new stream
If you want to add a budget file as a stream in a non-financial database, see Easy budget upload.
If you want to add a budget file as a stream in a financial database, see Add a budget file and stream.
Add properties to a dimension
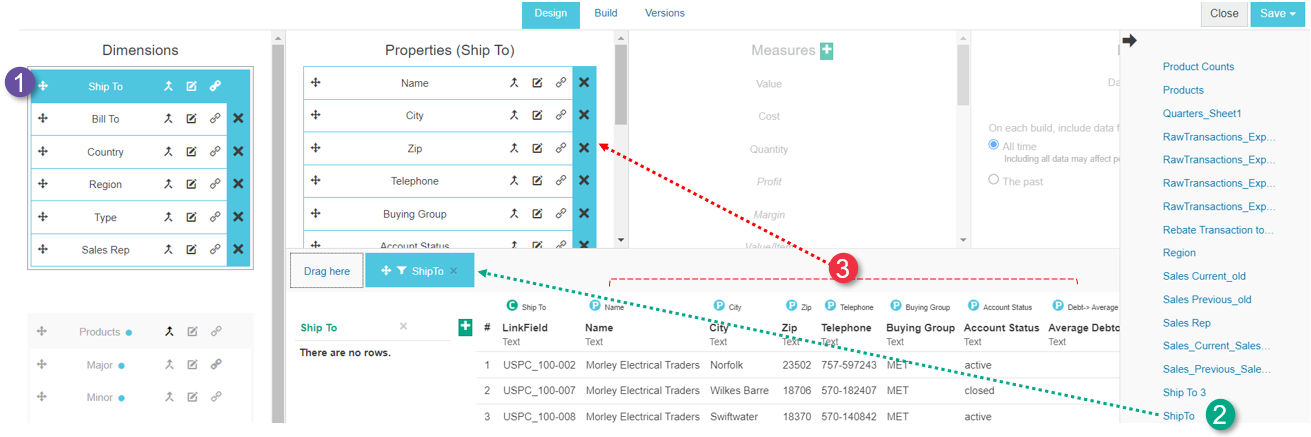
After mapping a data item in a stream to a dimension in the database, click that mapped dimension. The Design tab changes from the default Stream mode into Dimension Mode.
Drag across the relevant raw data file from the data sources panel on the right into the data item section at the bottom of the screen (where the streams would be in Stream mode).
Proceed to map the data to the properties section.
Exit Dimension Mode and return to Stream mode: either click the dimension again or click on any blank space in the dimension box.
Replace an item (use existing mappings)
The Replace option is particularly useful when you want to modify an existing design. It allows you to replace an existing data item with a new one (such as an updated version), but maintain the existing mappings. This option saves you a lot of time, as you would otherwise have to manually un-map and re-map the individual dimensions, properties, and so on.
When you replace an item, the following points apply:
Columns do not have to be in the same order.
Identically named columns in the new item will be mapped.
New columns can appear anywhere in the new item. They need to be mapped manually.
Any removed columns will be automatically unmapped.
In the Stream section, open the applicable stream tab and identify the item (tab) that you want to replace.
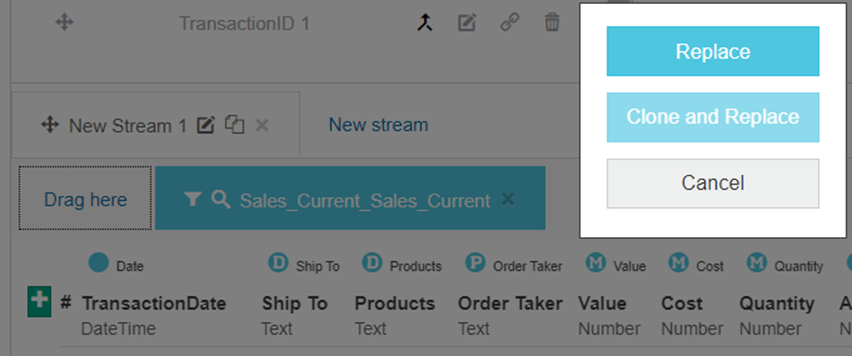
Expand the data sources panel and locate the required item, then drag the item onto the header of the item tab.

In the window that displays, click Replace.
Add an item to a stream (use existing mappings - clone and replace)
The Clone and Replace option allows you to apply existing mappings to new items that you add to a stream. The items must have the same structure. This option is particularly useful if your design contains a lot of mappings or transform columns that take a long time to set up.
For example, suppose you have two data items, one for the EU sales and the other for the UK sales but you want the data to display in the same stream, where the Total sales value is the sum of the EU and UK sales. You first add and map the EU sales data, then add the UK sales data using the Clone and Replace option. The UK sales data will be automatically mapped in the same way.
In the Stream section, open the applicable stream tab and identify the item (tab) that has the mapping you want to reuse.
Expand the data sources panel and locate the required item, then drag the item onto the header of the item tab.

In the window that displays, select Clone and Replace. The original item tab is cloned into a new tab that displays on the right, but the data in that new tab is replaced with the data from the new item. The mapping from the original item is applied to the new data, thus creating a new data item with mappings already done.

Clone a stream
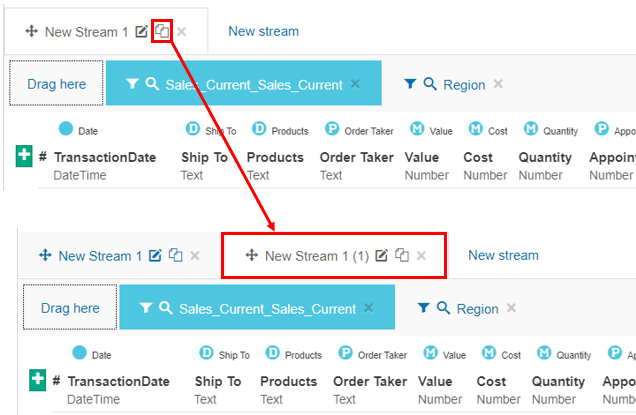
The clone option allows you to instantly make a copy of that stream, including its data items, filters and mappings. You can then modify the new (cloned) stream as required.
Cloning a stream saves you a lot of time when designing a new database or adding more data to an existing database. There are many reasons why you might want to clone a stream, such as:
To allow users to analyze the data by different dates. For example, suppose you have a stream that contains your Sales data. You have mapped all the Dimensions, Properties and Measures but you are left with three date columns (Delivery Date, Invoice Date and Paid Date). You can only map one of those date columns to the Date section in the database. To get around this, you can map the first date column to the Date section, then clone the stream. In the cloned stream, leave everything the same except for the date - change the date column that is mapped to the Date section (map the second date column). Repeat this action to map the third date column to the Date section. As a result, the database has three almost identical streams, the only thing that is different is the date.
For testing purposes. For example, if you want to try out a different point of view based on the same data. You can clone the stream, make the change, then see what it looks like in the database. You can then go back and make more changes or delete the excess streams.
In the Stream tab header, click the Clone button. The new stream tab (clone) displays on the right of the original tab, with a 1 appended to its name. The new tab is automatically open, ready for you to make your changes.
Filter the data in a stream
The filter option allows you to include or exclude specific data in the stream. This is useful when an item contains a lot of data but you are only interested in a subset of that data. The ability to filter data items removes the need to have many individual items - you can simply take what you want from one item.
Filtering is useful when you want to split one item into two streams. For example:
Suppose you have a UK company that operates in the UK and EU regions. You add the Sales data item as a stream. That item contains data for both regions but you are only interested in the UK sales data, so you filter out the EU sales data.
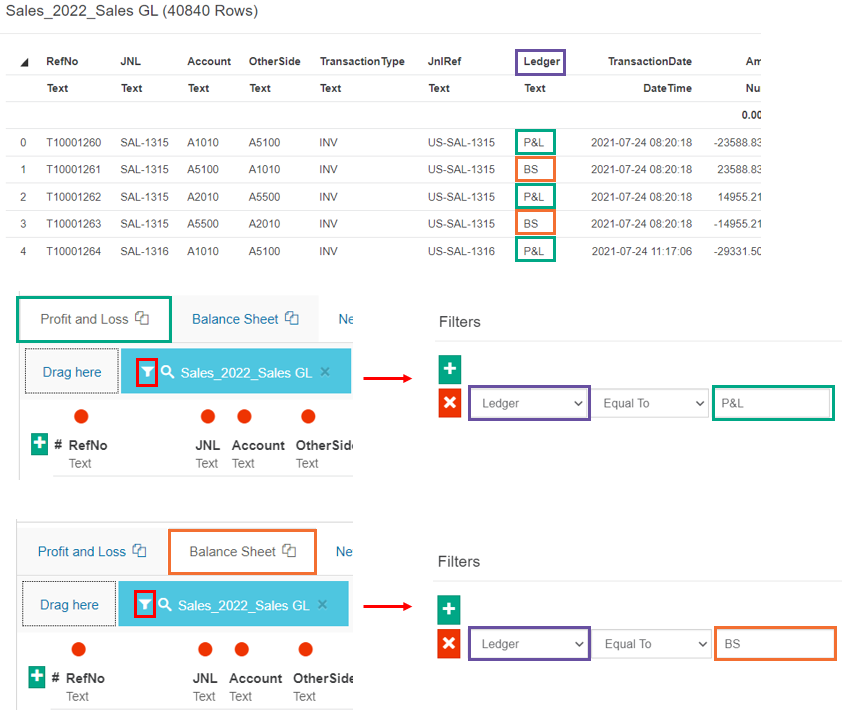
Suppose you have a financial database in which Stream 1 has a General Ledger file with Balance Sheet and Profit and Loss transactions. You can clone that stream (see section above), then filter Stream 1 to display only the Profit and Loss transactions, and filter Stream 2 to display only the Balance Sheet transactions.
In the stream section, in the data item tab, click the Filter button.
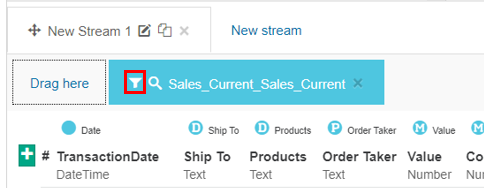
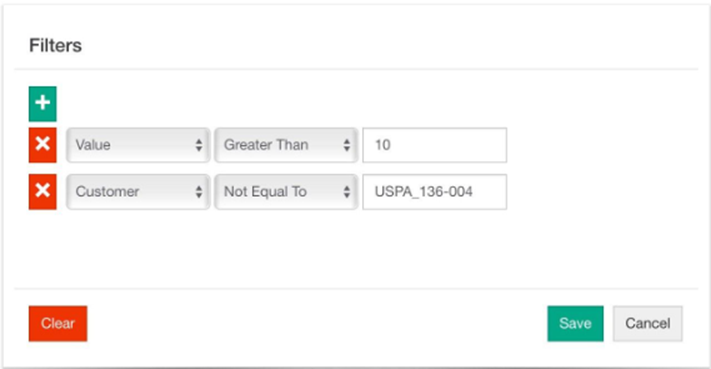
Click the green plus button to add a filter, then configure the filter as required.
Repeat the above step to add more filters.
(Optional) Click the And button at the top to switch to the Or condition. This option is available when you add multiple filter items to a stream, allowing you to choose how they’re combined:
And (default): all filter items must be true
Or: any filter item can be true
All filter items use the same join option. You can’t mix and and or within the same filter.
Example: Filter sales transactions
The following filter configuration will filter the sales transactions; only transactions with a value greater than $10 will be included and any transactions involving the customer USPA_136-004 will be removed.
Example: Filter Balance Sheet and Profit and Loss transactions
The following filter configurations will filter the General Ledger transactions in two streams; only the Profit and Loss transactions will display in one stream and only the Balance Sheet transactions will display in the other stream.
Transform a column
After you add a data item to a stream in a database design, you can transform the data columns using expressions and if-then statements, as described below. If you need to add a column type that is more complex, a Phocas consultant can help you.
Create an expression (to add a column, or concatenate or duplicate columns)
You can create three types of expressions to achieve different results:
Calculate: Add a column based on a calculation, which you create by entering a simple formula. Available for numeric data.
Concatenate: Join two or more of the existing columns together. Available for text data.
Duplicate: Copy an existing column.
The following rules apply when creating expressions:
Expressions must be legal SQL expressions. These can be column names, mathematical, date, or string functions. They can be aggregate or logical functions, CASE expressions, or CAST or CONVERT functions.
Some legal SQL expressions aren't permitted:
Expressions can't contain configuration functions, like
@@SERVICENAMEand@@VERSIO, as these are security concerns.Expressions can't contain the
FORMATfunction, because it results in very poor performance.
Expressions can't contain subqueries. In other words, they can't have SELECT statements inside them.
Column names must follow standard SQL rules:
They can't start with a digit or contain special characters like %, &, =, or spaces, unless they’re escaped in square brackets.
Letters in column names can be upper or lower-case Latin characters (A to Z) and can be accented or joined as ligatures, as long as the characters used appear in the Unicode Latin-1 Supplement, Latin Extended-A, or Latin Extended-B code blocks. (This covers most languages that use a Latin alphabet.)
In the Stream section of the Design tab, click the green plus at the left of the data stream and select Expression.
In the Calculate window, edit the default column title, if required.
Enter the applicable expression (following the rules given above):
To calculate: Add, subtract, multiply or divide two or more columns using standard mathematical notation (+, -, * and /) with brackets, if required. For example, value-cost.
To concatenate: Enter the names of the existing columns that you want to concatenate, joined by a plus symbol. For example, Branch+Region. You can also include other text in the concatenation in single quotes. For example, to join Branch and Region together separated by a hyphen, enter the expression Branch+'-'+Region.
To duplicate: Enter the name of one of your existing columns.
Click Save. A new column displays to the right of your existing raw data columns. Proceed to map the new column in the usual way.
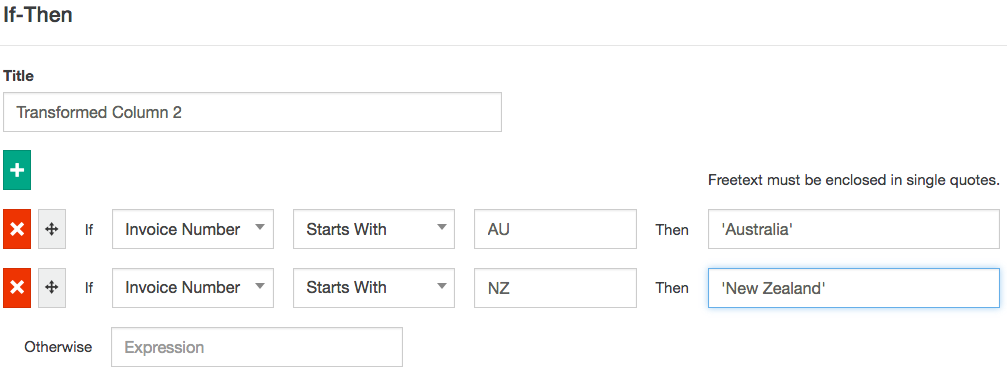
Create an if-then statement (to add a column)
The If-Then option is useful for creating advanced transforms without SQL knowledge. These columns are useful for many reasons, such as to clean up source data, where a name has been entered inconsistently throughout: If [Name] Is equal to 'Joe Smith' Then ‘Joseph Smith’ If [Name] is equal to ‘J Smith' Then ‘Joseph Smith’
In the Stream section of the Design tab, click the green plus button at the left of the data stream and select If-Then.
Configure the if-then statement as required (see examples below) and click Save.
Example: Create a Country column using part of a country name (taken from an account code prefix).
Example: Create groups on the fly using keywords in a product name. Use semi-colons to separate multiples.
Last updated
