Sync
Learn about the Phocas Sync application and its basic setup process.
This page is for the Phocas Sync application, which differs from the Sync Sources page in Phocas.
User permission: Administration > Sync
From 26 February 2025, the Sync application self-updates, so you'll always have the latest version.
Watch this PUG Training video: Intro to Sync
If you require assistance installing or configuring Sync, or need any other help, contact our Support team.
Phocas Sync, also known as Sync Client or simply Sync, is one way to get your data into Phocas.
Sync is a small Windows-based piece of software (middleware) that you install on your computer. It connects to your raw data items, collects them, and securely sends them to your Phocas site over the Internet.
Sync can connect to multiple data sources, including SQL and other ODBC (Open Database Connectivity) compatible databases, as well as flat files in multiple formats (Excel worksheets and CSV and TXT files). The data items from these sources become available to your administrator in Designer as sources for database design.
As the name suggests, Sync synchronizes updates to the synced data at scheduled times, such as overnight or weekly. This regular synchronization is important for most Phocas users, as they want to view the latest data whenever they open a database.
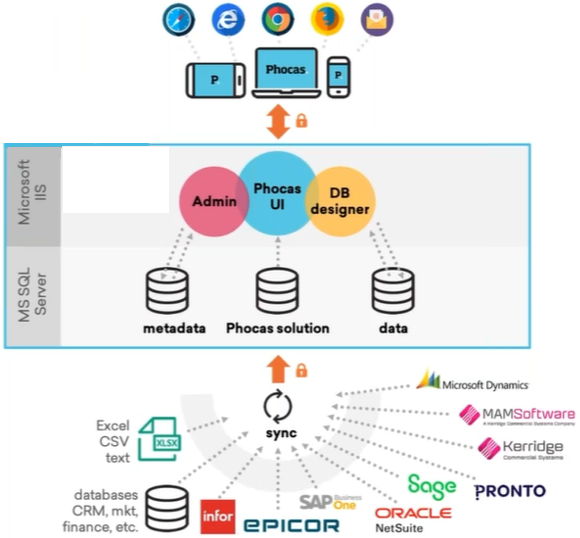
See the Additional technical information section below for more about how Sync works. See also the Sync requirements and Technical limitations pages.
Sync setup process
The following diagram summarizes the Sync setup process (purple boxes) and shows the output (green box). The same steps are required when you need to reinstall new versions of Sync.
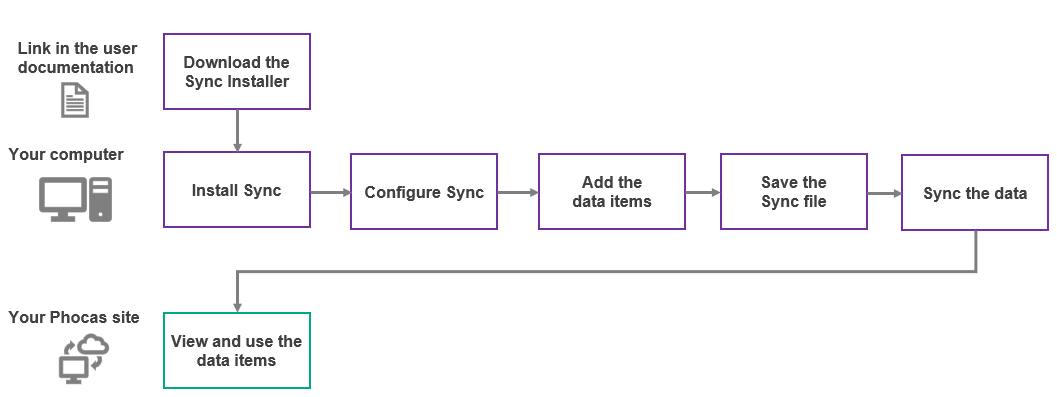
Step 1. Download the Sync Installer
If you are reinstalling Sync, ensure you don’t have Sync open or currently running.
Before you download and install any files, please read the System requirements page and take note of the following points:
Although Sync can connect to data sources on network drives, it should never be installed on a network drive.
Sync doesn't have to be installed on the same physical machine as the data source as long as it can access that data source from its location, such as via a network drive.
(Applicable if you are reinstalling Sync) Ensure you don’t have Sync open or currently running.
Click the applicable link to download the Sync Installer to your computer:
Step 2. Install Sync
If you are reinstalling Sync, ensure you install the file in the Sync application folder, not the Sync files. Otherwise, it will overwrite your existing projects.
Locate the downloaded SyncInstaller zip file on your computer.
Unzip the file (right-click the file name and click Extract All), noting where the file will be extracted.
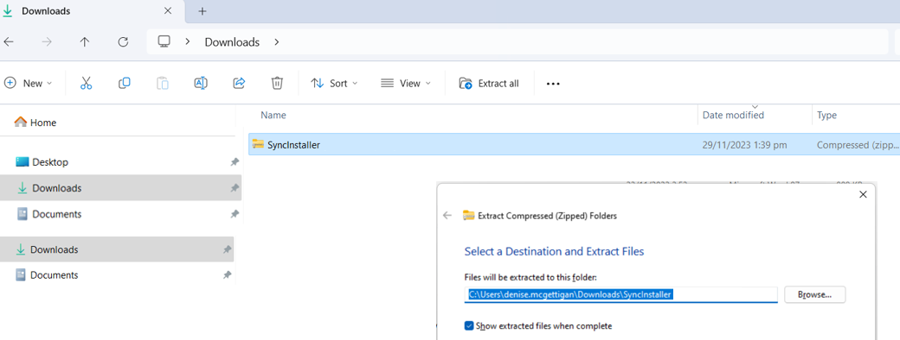
Locate the extracted SyncInstaller file, then right-click > Run as Administrator.

Follow the steps in the Sync Installer wizard.
If you're using 32-bit ODBC (Open Database Connectivity) drivers on a 64-bit machine, you need to install the 32-bit version of the Sync Installer.
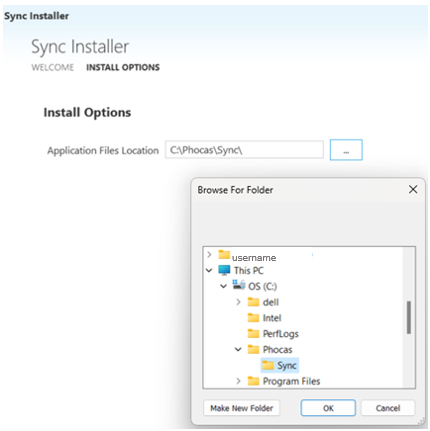
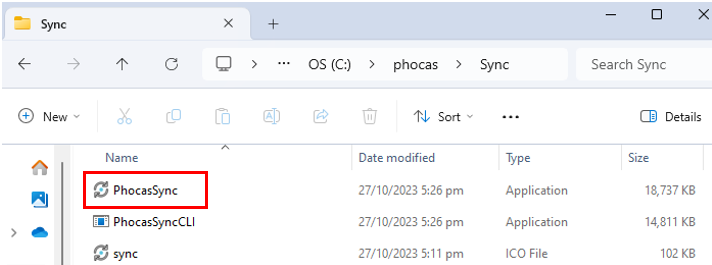
By default, the Sync application folder is installed on the root of the C: drive, in a folder called Sync inside a folder called Phocas. The Sync folder contains the Sync app and later, the Sync file, which is essentially a configuration file that tells it where to get the data, what to do with it, and where to send it.
Step 3. Configure Sync
The configuration of Sync involves connecting to your Phocas site and creating a source. The source is the directory in Phocas to which you will send the data items.
On your computer, locate and open the Sync app (PhocasSync.exe).
If you've already installed Sync and configured one or more sync files, the last used file will open. Don't edit this existing sync file unless you are confident in what you are doing. Mistakes can have huge consequences that can be time-consuming and costly to fix. If you have any doubts, please contact your Customer Success Manager.
In this case, it's best to create a new file: Click File > New.
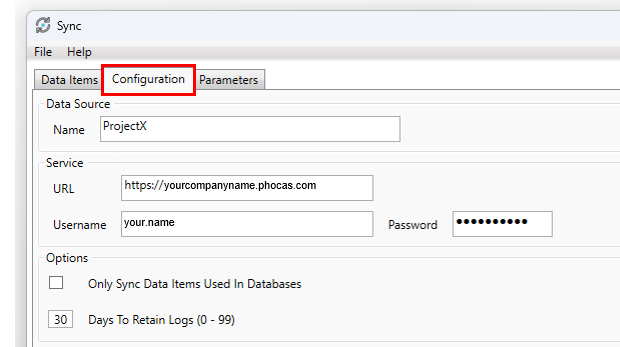
Click the Configuration tab.
Enter a name for your Sync data source.
This is the name of the container for the data you're going to send to Phocas. You'll see this name on the Sync sources page in Phocas. This isn't the name of the Sync file itself; you add that later (see Save the Sync file below).
Enter a name that will allow end users to easily identify the data. The typical naming convention is [DataSource]-[RawData]. Don't use an underscore in the name, as this is a reserved character.
Enter your Phocas service credentials:
Enter the base URL (web address) of your Phocas implementation, including the prefix (https://). For example: https://yoursubdomain.phocassoftware.com.
Enter your username and password.
Ignore the Only sync data items used in databases option, as it is not applicable at this stage.
Change the default [30] Days To Retain Logs, if required.
Each time the sync process runs, a log file is saved. You can set how many days you want to keep those logs. After the specified number of days is met, files older than that number of days are automatically removed. If you schedule Sync to run every hour, you will quickly accumulate a lot of log files, so you might want to reduce the number of days. You can change this number later.
Proceed to add data items.
Step 4. Add the data items
After you install and configure Sync, the next step is to add (connect to) the data items that you want to sync to your Phocas site. The Sync setup process is incomplete until you add at least one data item and run the sync process. You can add more data items later.
Regardless of the data type, the data must be well structured and consistent and only contain what is required for analysis in Phocas.
In Sync, click the Data Items tab.
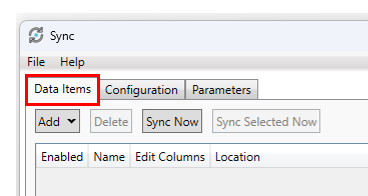
Click Add and select the required data item type. Typically, you will either add files or an SQL table or view, but several other data item types are available. Expand the section below to learn about the available types.
Data items (file, directory, spreadsheet, SQL, and database)
Note: This option is generally used for data migration, so limited information is provided here. Contact your Customer Service Manager for more information.You can add the following types of data items:
File
This is a flat delimited file, such as a TXT, CSV, or PSV file. You need to add these files one at a time. Each file appears as a data item.
Directory
This is a folder that contains files. This is a great way to add very well-formatted and consistent files, where additional files might be added at different times.
Multiple files are added at the same time, but only files prefixed with phocas_ in that directory are synced. Files not following this naming convention are ignored. You should only prefix the files you need for analysis.
Each file appears as a data item, and the phocas_ part of the file name is replaced with name_.
All sub-directories are traversed and all filenames starting phocas_ are processed, not just the starting directory specified.
While you can specify options (such as ignore quotes), all files in the directory to be synced must follow the same format. For example, they must have the same delimiter and must follow the same rules for ignoring quotes and having a header row.
The column mapping option is not available for this data item, but you can set the data types for each individual file on the Sync Sources page in Phocas.
Spreadsheet
This is a Microsoft Excel workbook file, such as an XLS, XLSX, or XLSB file. You need to add these files one at a time.
Multiple worksheet tabs are supported and will be synced as individual data items, named filename_sheetname. The file should only contain tabs that need to be synced because you should only sync the data required for analysis.
Each tab will show as a unique item on the Sync Sources page in Phocas.
All tabs must follow the same format. There must be no merged cells and no multiple headers. Avoid cell formatting.
Sync will attempt to identify the data type of each column based on the data type assigned by Excel. Number columns are treated as decimals. Integers and non-numeric fields that contain numbers (such as IDs, phone numbers and so on) should be formatted as text in Excel by preceding with a ‘.
Sync uses the first line to determine the datatype. You can force Sync to see that as text by prefixing the first data entry of the column with a single quote.
Note: From version 8.0.5 onwards, Sync recognizes number columns in Excel. This may affect database builds involving some older synced files where number columns were previously treated as text and manipulated via a ‘CAST’ expression.
SQL
A SQL script for an SQL table or view that produces a data item. This data item type allows you to extract data from a database using a single query.
Note: Syncs from SQL sources should only be attempted by those with good SQL knowledge and experience. Incorrect and poorly structured SQL queries can have catastrophic effects on the database and ultimately cause loss of service for your business. Contact your Customer Service Manager if you need help with this.
The data must be well structured and you should have a good understanding of the database and how data is related before attempting to extract data. Only extract what is required for analysis and carefully construct your queries to be as efficient as possible. See best practices and examples of SQL scripts in the Additional technical information section below.
Add and test the connection string
Click Add.
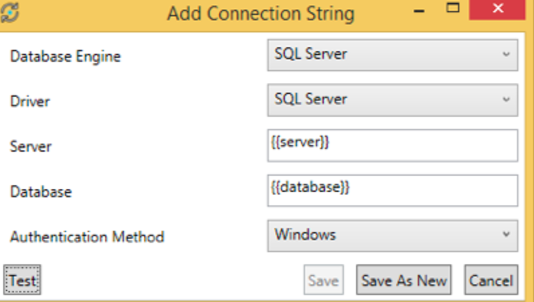
Enter the string used to connect to the database along with the security credentials. First, select one of the pre-defined Database Engine types, then complete the other fields (which change depending upon the selected type).
The Custom Database Engine type allows you to enter a bespoke connection string.
If you use the Windows authentication method for the SQL server, the user running any automation (scheduled tasks) must have the required SQL access.
Click Test to test the connection. If it's OK, click Save to overwrite any previously saved connection or click Save As New to create a new connection.
Complete the configuration
See below for information about the Enabled, Incremental Process, and Retain Snapshots options.
Enter the SQL Query into the box.
Click Preview to preview the results of the script. In most cases, Sync will limit the return to X rows. If using ODBC connections, limit the return before previewing.
Click Save and Close or Save. The Save and Close option tests the query before closing. If the preview doesn’t automatically limit the return for that database type, use Save for large queries.
Database
A SQL, MySQL, Oracle, or custom database. This will extract the data for all columns in any tables prefixed with Phocas_ from the database listed in the connection string.
Note: This option is generally used for the migration of data, so limited information is provided here. Contact your Customer Service Manager for more information.
Data must be well formatted, data typed and follow the other rules of SQL extracts as closely as possible.
Each table appears as a data item. You need to enter the appropriate connection details and security credentials. Only table names prefixed with phocas_ will be synced.
Supported data types
bit
boolean
tinyint
smallint
int
bigint (from 7.0.15)
int16
int32
int64
integer
int identity
date
datetime
datetime2
smalldatetime
decimal
money
numeric
char
varchar
string
text
double
float
nchar
nvarchar
ntext
uniqueidentifier
Precision level of decimal(18,6) in SQL is the maximum that can be synced. If decimals with larger precisions are required, convert the decimal to a float.
Considerations and constraints
Considerations:
Although data can be transformed later, the ideal is always that the source data is in the correct format to upload and use. Ensure the data is properly typed and formatted (date columns). Consider if you can add any concatenated or calculated fields to the source data rather than doing it in Phocas.
Ensure you sync only the data required for analysis. For example, remove any columns of data that will not be used and time-limit the data so you don't add years of unnecessary data. Several options (below) can help you achieve this.
Constraints:
Limit the item sizes to less than 4G. 2G is optimal. Remember, Sync places the data into memory, so free memory should be around 2x the largest sync item. Each data item is different; we've seen some 4GB files that contain 5 million rows / 60 columns, but others that contain 25 million rows / 10 columns.
Data items that exceed the 4GB limit can be split into multiple smaller data items by year.
Your network bandwidth will significantly affect sync times, especially if Sync is not located on the same machine as the data. SQL drivers can also significantly affect sync times. Sync times can vary significantly, but 1 million rows with 10 or so columns using MS SQL Server should take less than a minute.
Click Browse and select the path for the item. This is where it's located on your computer. The name is then populated for you, but you can edit it if required.
Select the applicable options for the item and click Save. The available options depend on the data item:
Review column mapping, and edit or exclude columns
The Edit option is available for files. It allows you to get a preview of the data so you can check everything looks OK.
You can also change the column details of the file before you run the sync process:
Edit a column, such as rename a heading, change the data type (text, number, date/time, boolean, or Unicode), and set a field length.
Exclude (disable) a column to temporarily remove it from the sync process. This option is suitable when you have very large data sets where not every column is required, as it makes sense to only sync the columns that you want to see in Phocas.
Regarding the Data Types field, all columns are treated as text unless otherwise defined. You can also set the datatypes when viewing the item in Sync Sources in Phocas.
If you are adding a new file, click the Edit button in the Add File window.
If you have already added the file, double-click the file in the Data Item tab to open the Edit File window, then click the Edit button. Note: If you change the order of columns, add new columns or change the type of data within a field, the column mapping and/or data types must be updated or the sync might fail.

Make your changes, or to disable a column, clear (uncheck) the Enabled checkbox, then click Save.
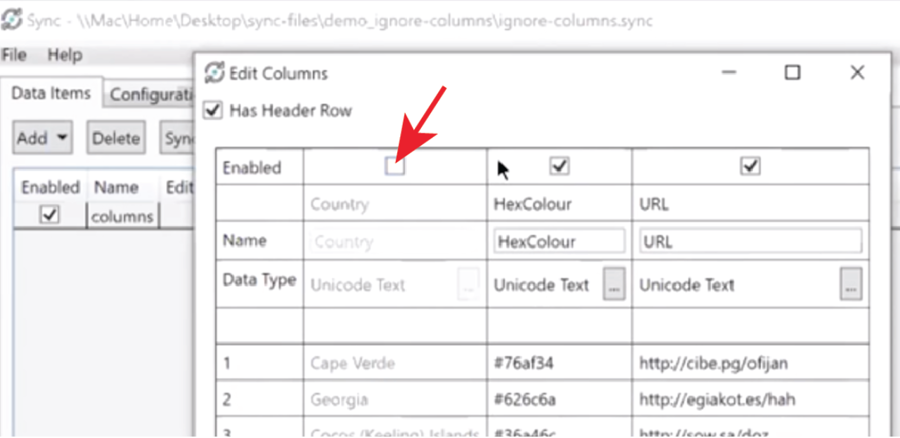
After you save the file, an asterisk displays in the Edit Columns column in the Data Items tab.
Select your own delimiter when syncing
The Autodetect Delimiter option is available for files and directories and it's selected by default. As the name suggests, this option automatically recognizes common delimiters that might be used to separate your data, such as commas and tabs, and separates the data into columns accordingly.
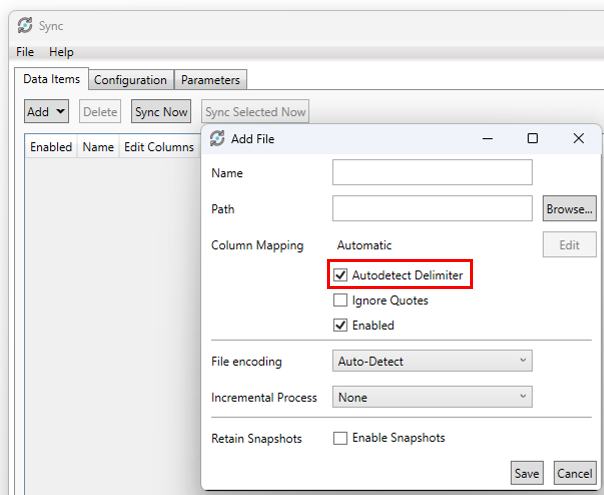
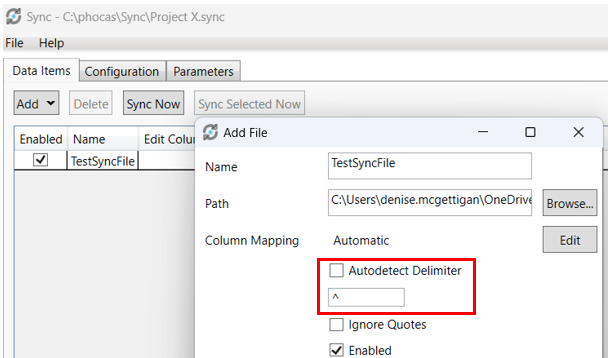
You might prefer Sync to ignore these delimiters and select a specific delimiter to use instead. This option is useful if your data contains other delimiters, such as ^ symbol. If this is the case, clear (uncheck) the Autodetect Delimiter checkbox and enter a delimiter in the box below it. Note that the tab delimiter is only compatible with TXT files.
Ignore quotes
The Ignore quotes option is available for files and directories. The checkbox isn't selected by default, which means quotes in data are interpreted as the opening quotes of a single string. This can cause a single cell to be populated with rows of data until the next set of quotes is found. The difference is shown in the tables below.

You can select the checkbox to ignore quotes when syncing to handle files containing embedded quotes in the data, such as product descriptions that contain imperial measurements and, therefore, the " character. For example, a 12" ruler. When the checkbox is selected, any embedded quotes are treated as normal text characters and the data is written out correctly rather than defining a single string (escaping the delimiters).
Disable a data item from syncing
The Enabled option is available for all data item types. It's selected by default, which as the name suggests, means all of the items are enabled to be synced.
You might prefer to disable an item, so Sync temporarily removes it from the sync process. This allows you to control when it's synced; you sync it manually. This is a good idea when the item is not required for analysis. Disabling an item doesn't delete the item; it just means that no new data for that item will be synced as long as it remains disabled. The Last Successful Sync date will not change.
To disable an item, clear (uncheck) the Enabled checkbox. You can do this either when adding or editing the item, or on the Data Items tab.
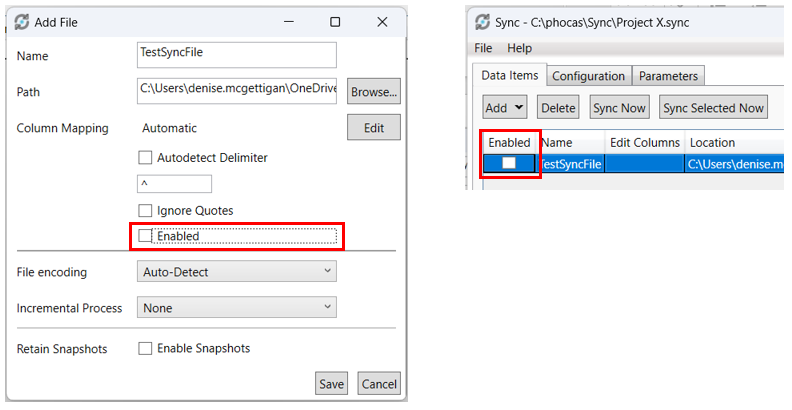
To re-include that data item in the sync process, select the Enabled box.
Set data items to sync incrementally
The Incremental Process option is available for files and SQL items.
Use this process when historical data is stored on the Phocas server and only a small subset needs to be synced to keep the data up-to-date. It prevents very large sync items when only the recent data has changed. Your historical data is retained while new data is synced.
It's particularly important when you're dealing with transactional data that might change after it has been initially synced. For example, think of a car database containing a list of car registrations, models, colours and so on. The existing synced data won't change often, perhaps only when a colour is changed, but new records are likely to be added during each sync. Rather than update the whole database, you only need to update some of it.
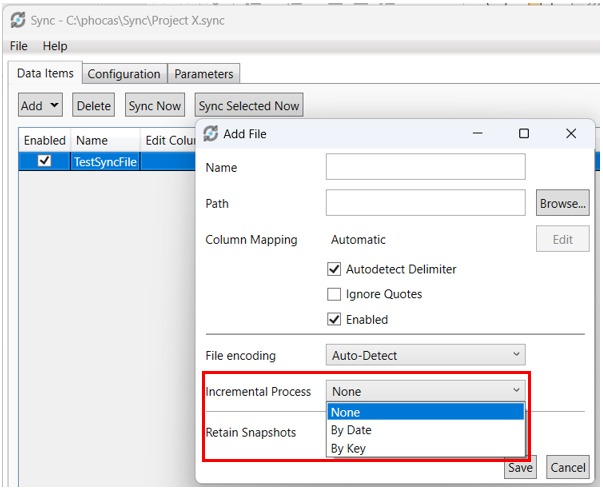
Select the Incremental Process checkbox, then select your preferred incremental method depending on the data you're syncing. Use the following table to help you decide.
By Key
You only have to load new or updated data.
It can't handle data that is deleted from the source system. The data must have a unique key.
Master data like stock records, customer records, supplier records, closed sales orders most of the time, except when the ERP allows reopening a closed order, posted nominal journals, and other transactional data that cannot be deleted.
By Date
It can handle data that is deleted from the source system. The data doesn't need to have a unique key.
You have to reload sections of data, which are larger than incremental by key but smaller than a full load.
Open sales orders, where users can delete order lines while the order is open.
Configure the settings as applicable. Read on for more information on each method.
Incremental process by key
This method requires you to define one or more columns as a unique key for each transaction line. You can select columns of any data type, including columns from text files.

It then uses a merge process:
When the key doesn't exist in the existing data, it insert new records.
When the key does exist, it updates the existing record with the new values.
Key columns
Each record must have a key or unique identifier, which can be:
A single column. For example, the Sales Order number.
A combination of columns. For example, the Invoice number plus Line number.
High water mark
Although the High Water Mark setting is optional, it's best practice to use it in combination with a key to reduce the amount of data fetched by an SQL query, which improves performance.
However, this can be tricky to get right, so if you're interested in using this feature, please contact your Customer Success Manager for help.
Incremental process by date
This method is suitable when you can't construct a unique key for each transaction, but you still have a Date column that is static for the transaction, such as General Ledger Posted date.

This method syncs data using an offset period (a rolling window), such as the last 7 days. It then uses a purge and append process:
It works out the earliest date in the specified Date column in the incoming data and deletes all records on the server/cloud from that date forward.
Then the item is synced in the usual way; all the records are added to the existing data on the server/cloud.
Date column
The data item must contain a DateTime column. If the item doesn't have such a column, the By Date option is unavailable.
If this option is unavailable but your data does have a date column this means that the data is not of type DateTime. To make the option available you need to:
Fix the column's data type:
In the case of a SQL item, modify the SQL to convert the applicable column to a DateTime.
In the case of a CSV file, click Edit and set the data type to DateTime. See the section about column mapping above for more information.
Try again.
Include header rows
The Add header rows option is available in directories and spreadsheets. There must only be one header row, as multiple header rows are not supported.
If you're adding a spreadsheet that has multiple tabs, ensure each tab has a header rows.
Retain snapshots
The Retain snapshots option is available for files and SQL items. It's typically used to convert values as at now (live) type query into over-time analysis.
A popular use case is Stock on Hand, where a snapshot is taken each day. Without enabling this option, the Phocas database would just show the stock from yesterday. By retaining monthly snapshots, you could see what the stock was yesterday, and in any previous months, allowing variance reporting and trend analysis. This historical data is usually not available in an ERP system.
Snapshots are taken for every moment, even when there is no change to source data.
Impact of snapshots on build times Use caution when retaining snapshots, as they can result in very large volumes of data being stored, which can cause databases to take too long to build. This is especially true for daily snapshots. Snapshots should NOT be used for large data sources, such as sales invoices.
Enable snapshots
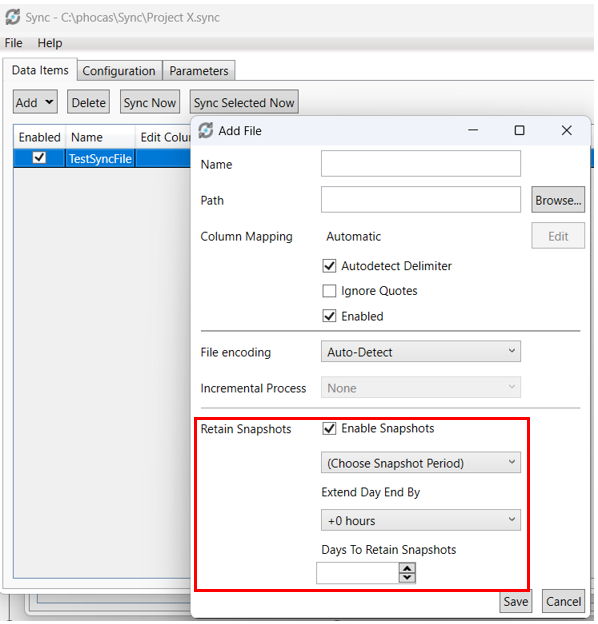
Select Retain Snapshots > Enable Snapshots checkbox.
Select whether you want snapshots retained daily, monthly, or a custom interval, such as quarterly. For example, if you select Daily, you can sync as many times as you like and Phocas keeps a copy of the data as at the last sync of each day. Similarly, if you select monthly, a copy of the data as at the end of the month is kept.
Enter the number of days you want to retain the snapshots. This is important, as it's not good practice to retain data that is not required for analysis.
Click Save.
View snapshots
Snapshots are kept over time in the relevant Sync item table, with a SyncMoment column automatically added.
To view the items in Phocas, go to Administration > Sync Sources and select the relevant source to view the data items in more detail. You will see not only the latest synced data but also data from retained snapshots. For example, in the image below, the most recent sync was on 2018-01-17. You can see this data, and data from the previous sync a day earlier, on 2018-01-16.
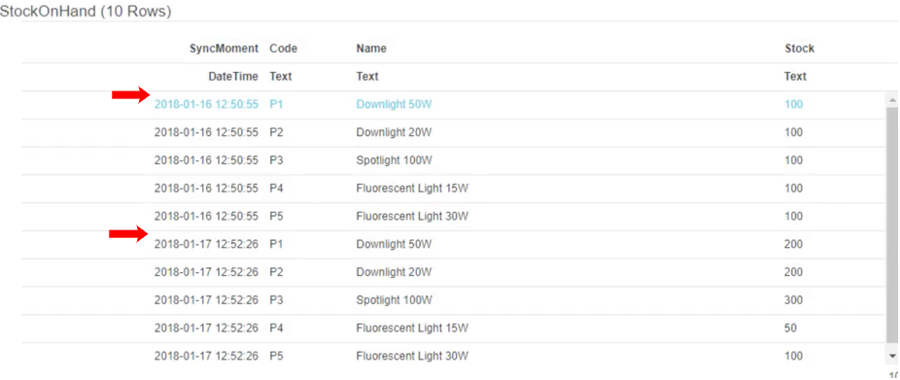
You can use snapshots in database designs to map to the date field of the database.
Step 5: Save the Sync file
The Sync file is like a package that contains the sync configuration, source, and data items. You must save your Sync file to preserve your sync setup. The Sync file name does not appear anywhere in Phocas; it is for reference only on your computer.
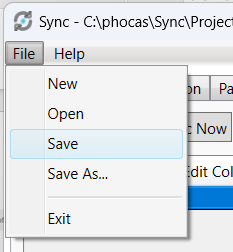
In Sync, click File > Save, locate and select the Phocas > Sync folder and click Save.
Step 6: Sync the data (manually)
The last step in the process is to sync your data to your Phocas site. Even if you intend to schedule the sync process, you still need to run the sync process manually at this point for the source and data items to appear in Phocas.
Select one of these methods:
To sync all the data items, click Sync Now.
To sync one or more specific data items, select their rows(s) and click Sync Selected Now.
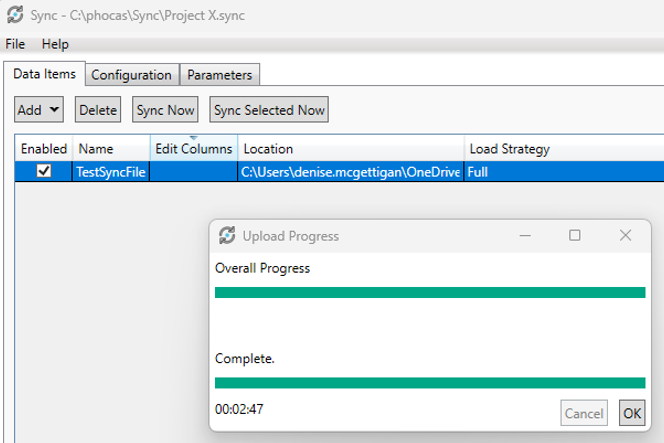
It might take a few minutes for the sync process to complete. The progress is displayed.
Next steps
After you complete the sync setup process, you can take the following actions:
View sync sources and items in Phocas: The data items will appear within the source directory in the data sources panel in Designer, ready to be used in database designs. You can also view the source (and access its data items) on the Administration > Sync Sources page.
Schedule the sync process to run automatically.
Only sync data items used in a database: This option only applies after the first sync process. That is, on your first use of Sync, all the data items will be synced, regardless of whether they are used in any Phocas database designs. Afterward, you can choose to only sync the data items used in database designs.
Sync self-updates whenever a new version is available, so you don't need to reinstall it manually. The only time you need to repeat the steps above are if you need to install Sync on a different machine.
Older versions of Sync (prior to 26 February 2025)
It's best to use the latest version of Sync as it has all the latest features, and behind the scenes, it's the most efficient, so the resource use will be lower, and sync times are likely to decrease.
If you're using an older version of Sync that doesn't have the self-updating feature, you'll get an alert message the next time you open Sync. Click the link in the message to download the latest version. See step 2 above, as the process for reinstalling Sync is the same. Please back up your Sync files first because if the upgrade causes any issues, the Sync file cannot be downgraded.
Versions of Sync before version 24 will not get the alert, so you need to manually update Sync using the installer link in Step 1 above. To check which version of Sync you have, open the Sync app and click Help > About.
Additional technical information
How Phocas Sync works
Sync is often the first step of our ETL (Extract, Transform and Load) process where we gather the required data, format it and add calculations and other fields as required and then load it into Phocas ready for you to use in the Designer.
It extracts the data items from your data source, divides it into manageable chunks, encrypts those chunks and send them securely via HTTPS to the Phocas servers.
Sync reads the data specified by the user - SQL, text file, spreadsheet etc.
The data is checked for changes via a MD5 hash match comparison with the previous Sync session:
If there has been no change, the file is skipped.
If the file has changed, only the changes are written to a .diff file.
The data is processed and validated where possible (for data types, consistent columns etc.), then written to .psv files.
The .psv and .diff files are zipped and sent to the server.
The server unzips the files:
.diff files are referenced and changes applied to the server copy of the .psv files
the .psv files are written to the PhocasSync database
Parameters and iterations
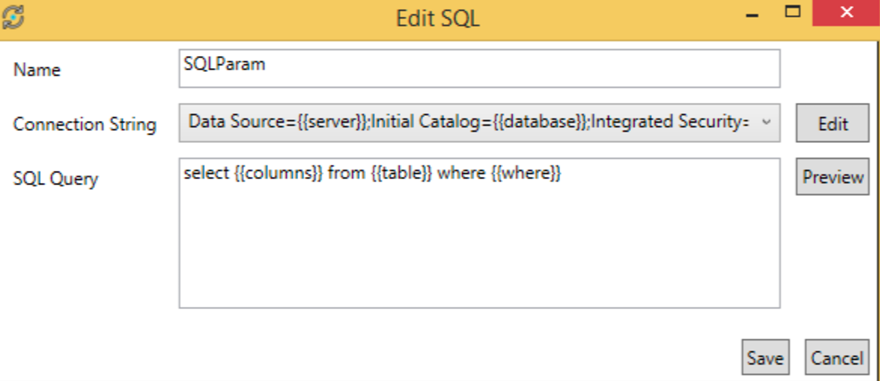
The Parameters tab in the sync file configuration provides an advanced technical option for files, directories, and SQL data items. It allows you to specify parameters to use the Sync file for multiple organizations in Phocas. The parameters define strings of text that can be used in multiple places, including in connection strings, SQL queries and Sync Sources, making it simpler to perform updates and changes. The parameters are passed to Sync and as a result, the information structure is sent to other organizations.
Select the Parameters tab and click Add.
Enter the parameter name. This must be alphanumeric only; you can't use special characters.
Enter a value. Values can not contain parameters. Double quotes cannot be used.
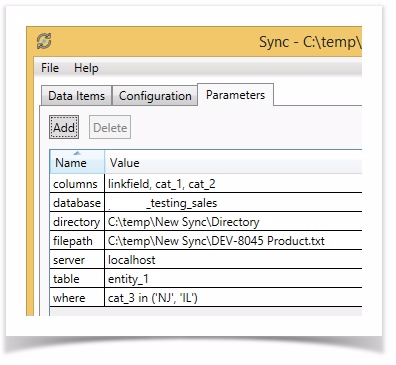
Using parameters as values in supported types
Example of use: Connection string
Example of use: SQL
Parameter substitution in scheduled Syncs
You can substitute different values for defined parameters via scheduled Syncs (SyncCLI).
Individual parameters: To substitute a parameter value, the “-p” switch is used, followed by the parameter name and quoted value. The quoted value is only used for the duration of the session, i.e. the original value defined in Sync remains unchanged.
Note if a parameter name contains spaces, it must also be quoted:
Example format for substituted parameters:
Multiple parameters: You can substitute several parameters for a range of data items.
These multiple parameters can be entered in the Arguments field in a scheduled task:
Iterations
Although basic information is provided here, the Iterations option is an advanced feature that we recommend you use in consultation with a Phocas consultant.
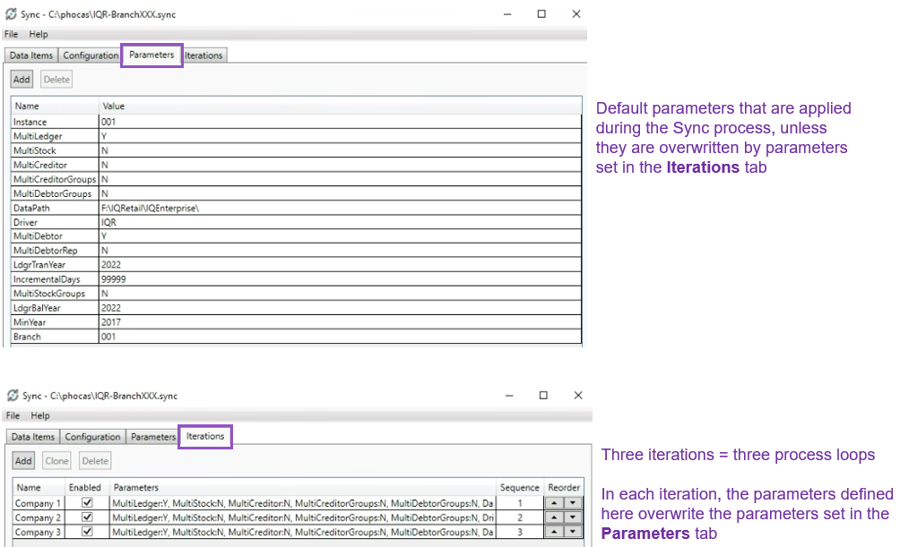
Iterations use the power of parameters to allow the sync process to be repeated with a new set of values in the parameters. Each time Sync is triggered, all items are processed for each iteration, in order, with the default parameters being overridden by the iteration parameters.
Iterations are useful in the following situations:
Where there are multiple data sources, particularly multiple ERPs, linked to one Phocas site. Typically, these data sources are identical, except for having unique credentials and one or more different parameter values. As the setup is almost the same for each source, you can add iterations to the Sync process. This iterative approach removes the need for separate configuration files and makes the Sync setup quicker and less complex.
Where the same queries are used for multiple databases or companies within a database.
To use Iterations:
Select the Iterations tab and click Add.
Enter a name for the iteration.
Add the parameters for the iteration.
You can click the Populate DataSource Parameters button to populate the iteration with the default parameters configured on the Parameters tab.
If a parameter isn’t defined for an iteration, the default parameter will be used.
If the same Sync Source name is used, each sync item will be added to for each iteration. Parameters can be used in the Sync Source name if separate Sources are required, and in Sync Item names if separate items are required.
SQL query best practices
Keep code simple and easy to read. If it’s complex, it’s likely to be wrong or there’s a better way to do it. Be consistent with styles. Add notes.
Include only the columns required.
Include any columns used in calculations for clarity and validation.
Ensure data type columns are consistent, i.e. ‘FLOAT’ for number columns, ‘DATE’ for date columns etc.
Limit column widths. For notes type columns is the whole width required? Can it be truncated with LEFT()?
Limit historical data. Use a WHERE clause filter to include only relevant data that is not fixed.
Use a consistent sort order: oldest to newest. Sync can skip uploading unmodified parts.
Avoid instances, subdomains and schemas where possible when listing tables to future-proof against changes and migrations.
Follow the hierarchy of data transformation: Source data, Extract, Phocas Views/Post Sync Actions, Transform Columns.
SyncCLI error codes
0: success.
1: Sync file doesn't exist.
2: incorrect service URL, username, or password.
3: all other exceptions.
Troubleshooting
If a sync fails, you can check the log files, which are stored in C:\Phocas\SyncFiles\Files\Logs.
The latest log is also available on the Phocas Sync Sources page.
Last updated
