Schedule calculations for a project
User permission: Rebates
You can schedule rebates within a project to calculate whenever the project's source database is updated.
Why you should schedule the calculations
Scheduling ensures the rebate calculations run automatically and consistently, providing timely rebate insights as soon as your source database is refreshed. This approach helps optimize visibility and planning, while eliminating manual errors or omissions.
Save time: Automate the process to run when your project’s source database updates. This keeps your Rebates Analysis database current without manual effort.
Get the latest results: Gain visibility of rebate estimates as soon as a month has ended, as databases are typically updated (or rebuilt) at the end of each month. Sales, finance, and other teams can see the results in your Rebates Analysis database at the start of each month, better supporting decision-making and reporting workflows.
Get consistent, reliable results: Automating the schedule removes the risk of forgetting to run or posting calculations manually. It enforces standard timing and eliminates human error.
Best practice
The scheduling of calculations is an important consideration when creating your project structure. Please read the best practices for creating projects to get the best benefit out of scheduling feature.
In the calculation schedule, the transaction range ideally should reflect the period you are paying or receiving rebates (Absolute > Amounts per setting in the rule setup).
Set a schedule
Open the project and click Schedule to schedule the calculation for the whole project. Alternatively, to schedule a calculation for a specific rule, select the rule and click Schedule.

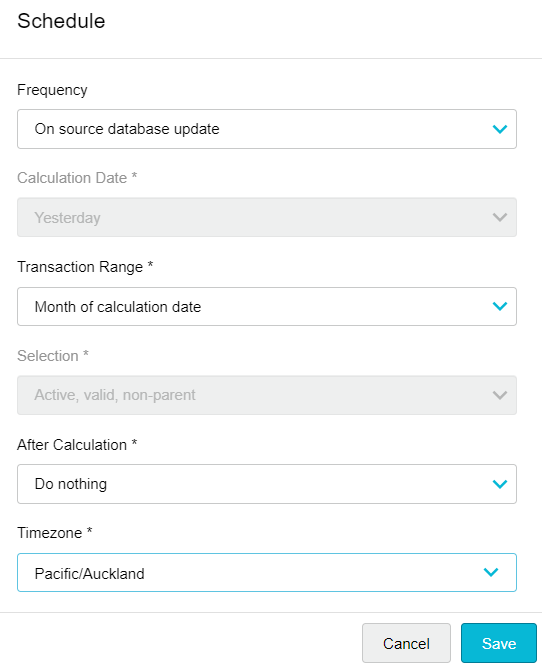
In the Schedule window, select Frequency > On source database update.
Configure the schedule settings:
Calculation Date: This defaults to Yesterday and you can’t change it. You can change the timezone (see below) to suit the timezone of the consumer of the calculation information. For example, to account for them behind or ahead of your local timezone.
Transaction Range: By default, the Month of calculation date is selected, which refers to the full calendar month in which yesterday falls. For example, if today is November 1, the calculation date is October 31st and the transaction range is the month of October. You can select a Custom range if required. See below for instructions.
Selection: By default, any Active, valid, non-parent rebates in the project are included in the calculation. You can’t change this.
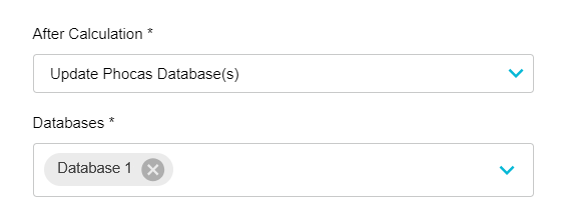
After calculation: Select Update Phocas Database(s) to trigger a database build after the scheduled calculation runs, then select the database(s) you want to update. These settings keep your Rebates analysis database(s) up to date. This option can only be applied to databases other than the project source databases and databases without a build schedule.

Timezone: The timezone defaults to your timezone but you can change it to the timezone of colleagues or other end users who need the calculation information. Changing the timezone here only affects the calculation schedule for this particular project. It does not affect your default timezone or anything else in Rebates or Phocas.
Click Save.

Select a custom transaction range
Rather than base the schedule on the default month of calculation date, specify a custom timeframe for the calculations.
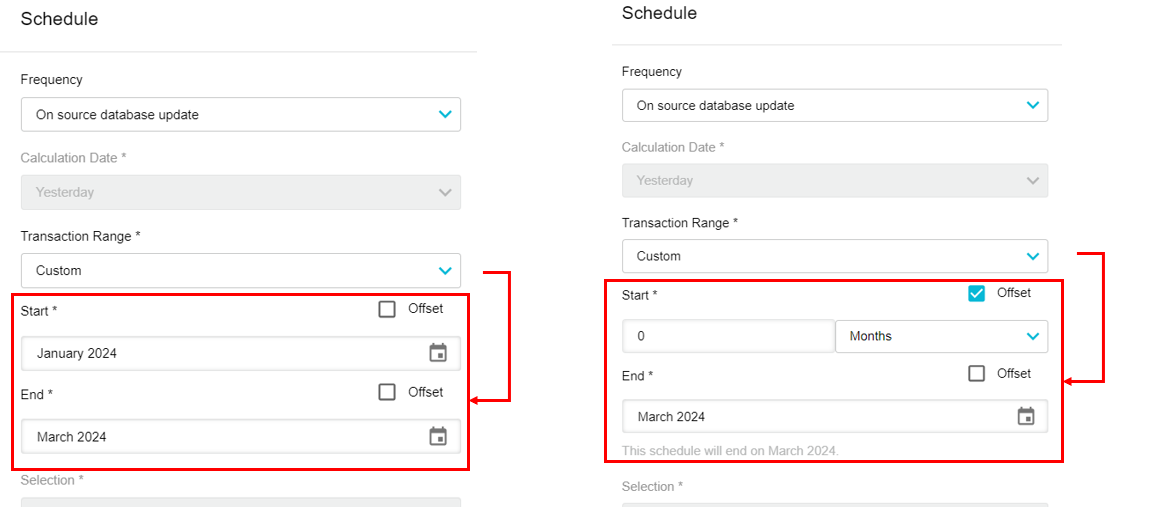
in the Schedule window, select Transaction Range > Custom. Two custom transaction range options are available:

Fixed date range - Select the Start month and End month in the range. For example, Start: January 2023 and End: March 2023.
Dynamic date range - Define a dynamic date range such as year-to-date or last month based on today's date, so the data continues to update. You can set both the start and end dates as offsets or just one of them. Select the Offset checkbox and enter the offset date as a number.
An offset of 0 months for the start date will start in the current month of the calculation date (which is always yesterday). For example, if today is 7 February 2024, and the calculation runs today, the start would be the start of February 2024.
Negative offset numbers go into the past and positive numbers into the future.
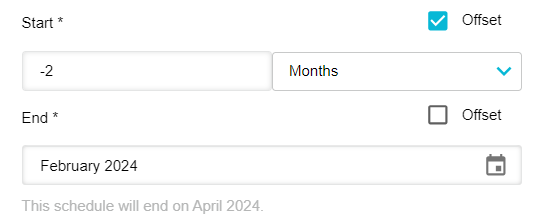
The message underneath the date range can be very helpful, as it tells you when the schedule will end. For example, in the following image, the schedule will end in April 2024 because in May the start date would be March (two months prior) but as the end date is set to February, it would not be valid.

Edit or remove a schedule
You can edit the schedule configuration later via the Schedule button on the project homepage.
To remove a schedule, in the Schedule window, select Frequency > Never.
Last updated
