Rules
A rule determines how the rebate will be calculated and to whom or what it will be applied.
User permission: Rebates
The rule is the logic that applies to the rebate; it determines how the rebate will be calculated and who, or what, the rebate is applied to.
You can create whatever type of rules you need, from a basic rule to a complex one.
Each rule belongs to a project, which determines the underlying database and stream upon which the rule is based. The rule is more detailed; it specifies the database’s dimensions and measures that are used in the calculations. Each rule is applied to the database's transactional data.
The Overview of Rebates page explains the general concept of rebates and the two types of rebates but in summary:
Receivable rebate rules describe the rebates that are receivable from your suppliers. They are typically associated with a Purchases database.
Payable rebate rules describe the rebates that are payable to your customers. They are typically associated with a Sales database.
It is unusual for payable and receivable rules to be in the same project, though technically possible.
On a project’s page, the Rules tab displays a list of the rules in the project (if any).

Create rules
There are two main ways to create a rule in Rebates: clone an existing rule or create a new one manually.
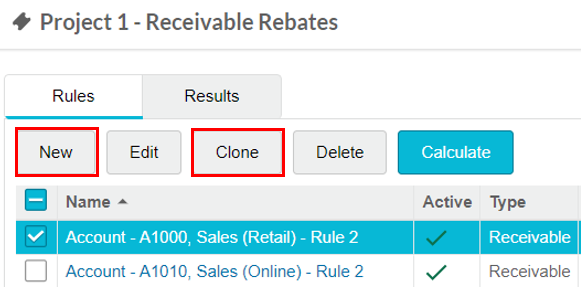
Open the project in which you want to create the rule(s). On the Rules tab, create the rule(s) using one of these methods: Clone one or more rules or create rules manually (single or multiple)
Clone one or more rules
If you want to clone all the rules within a project, it’s easier to clone the project than clone the rules. This saves time, for example, at the end of the year when you want to roll all the rules over into the next year.
Cloning a rule is the simplest and quickest option for creating new rules. You base the new rule on one that you already have set up, taking advantage of the existing configuration and brackets. You can clone multiple rules at the same time to quickly create a batch of new rules with the same setup, which you can then edit individually, as required.
Select the rows of the rules you want to clone and click Clone. The rules are cloned instantly. Proceed to edit each of the new rules.
Troubleshooting when the rule description doesn't match the rule: When you make changes to a rule (for example, remove an exclusion) the description is automatically updated to reflect those changes. However, if you manually edit the description, it will no longer update automatically. If you then clone a rule with an edited description, the clone (and any subsequent clones) will inherit that fixed description. Therefore, when editing a cloned rule, it's important to check that the description is still accurate, and if needed, update it to avoid confusion later.
Create rules manually
If you decide to create rules manually, you can save time by creating multiple rules simultaneously. You don't have to create these rules from scratch; you can use a template, taking advantage of specified configurations and brackets.
Learn more about templates...
Templates are based on an existing rules. They are useful when the new rule you want to create is similar to an existing rule. When you select a template, the corresponding settings in the new rule setup screen are automatically completed for you. Edit those settings to meet the needs of the new rule.
After you create a rule, it becomes available as a template when creating subsequent rules. So, if you are new to Rebates and have not created any rules yet, you will have no templates but as soon as you create one rule, you can use that as a template the next time you create a rule.
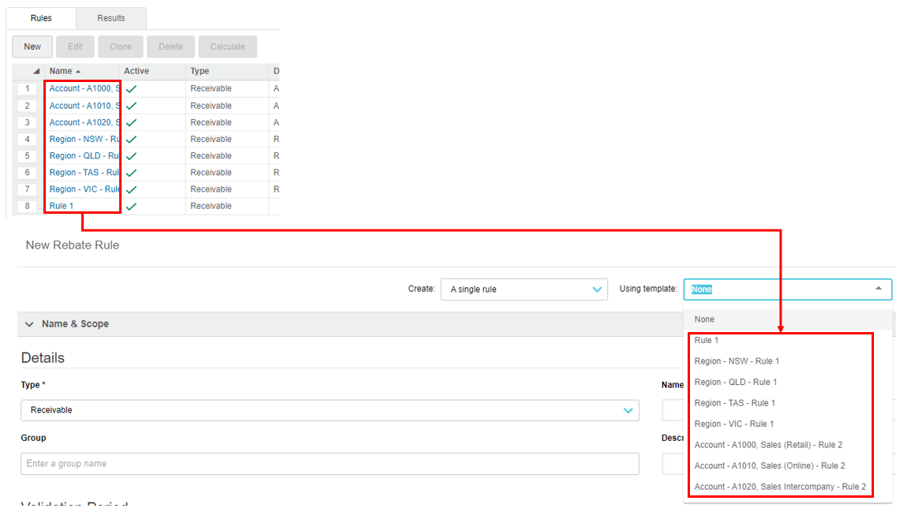
Create a single rule
Click New.
Leave Create > A single rule selected.
(Optional) Select a template from the list. The rule settings are updated to match those in the template.
Set up the rule(s) or edit the default template settings, as applicable.
Click Save and Close.
Create multiple rules in bulk
When you create multiple rules at the same time, each rule gets the same setup, and their names and descriptions are automatically generated.
Learn more about automatically generated rule names and descriptions
The names and descriptions are generated in the following way:
Name: DIMENSION name - ENTITY name - TEMPLATE name
Description: DIMENSION name - ENTITY name - TEMPLATE description
As you can see above, the names and descriptions of the rules are very similar, differentiated only by the entity name. This is illustrated in the following example, where the first rule is called Region - QLD - Rule 1, the second is called Region - TAS - Rule 1 and so on.
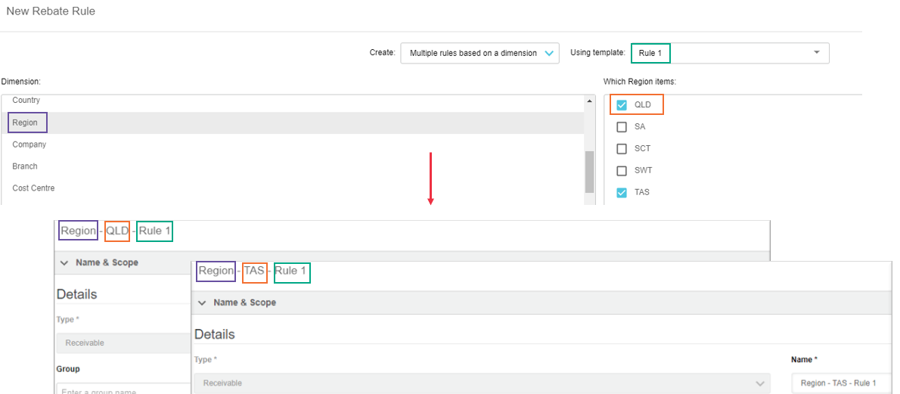
You can edit each individual name and description later, in addition to changing any of the original setup.
Click New.
Click Create > Multiple rules based on a dimension.
Select the dimension and items (entities) for which you want to create the rules. For example, you could create similar rules for different customers, suppliers, or branches. You can select the checkboxes of the entities one at a time, click and drag to select multiple entities at the same time or click the checkbox above the list to select all of the entities.

(Optional) Select a template from the list. The rule settings are updated to match those in the template.
Set up the rule(s) or edit the default template settings, as applicable.
Click Save and Close.
(Optional) Edit an individual rule or selection of rules. For example, you might want to change the rule name or validity dates.
View the new rules
Regardless of the method you use to create the rule, the project page updates to display the new rule in the grid. If you create multiple rules at the same time, those rules will have the same last modified date.

Set up a rule
The rule setup screen is organized into expandable/collapsible sections, as outlined below. This setup screen opens automatically when you create a rule. To open this setup screen later, on the project page > Rebates tab, click the blue rule name.
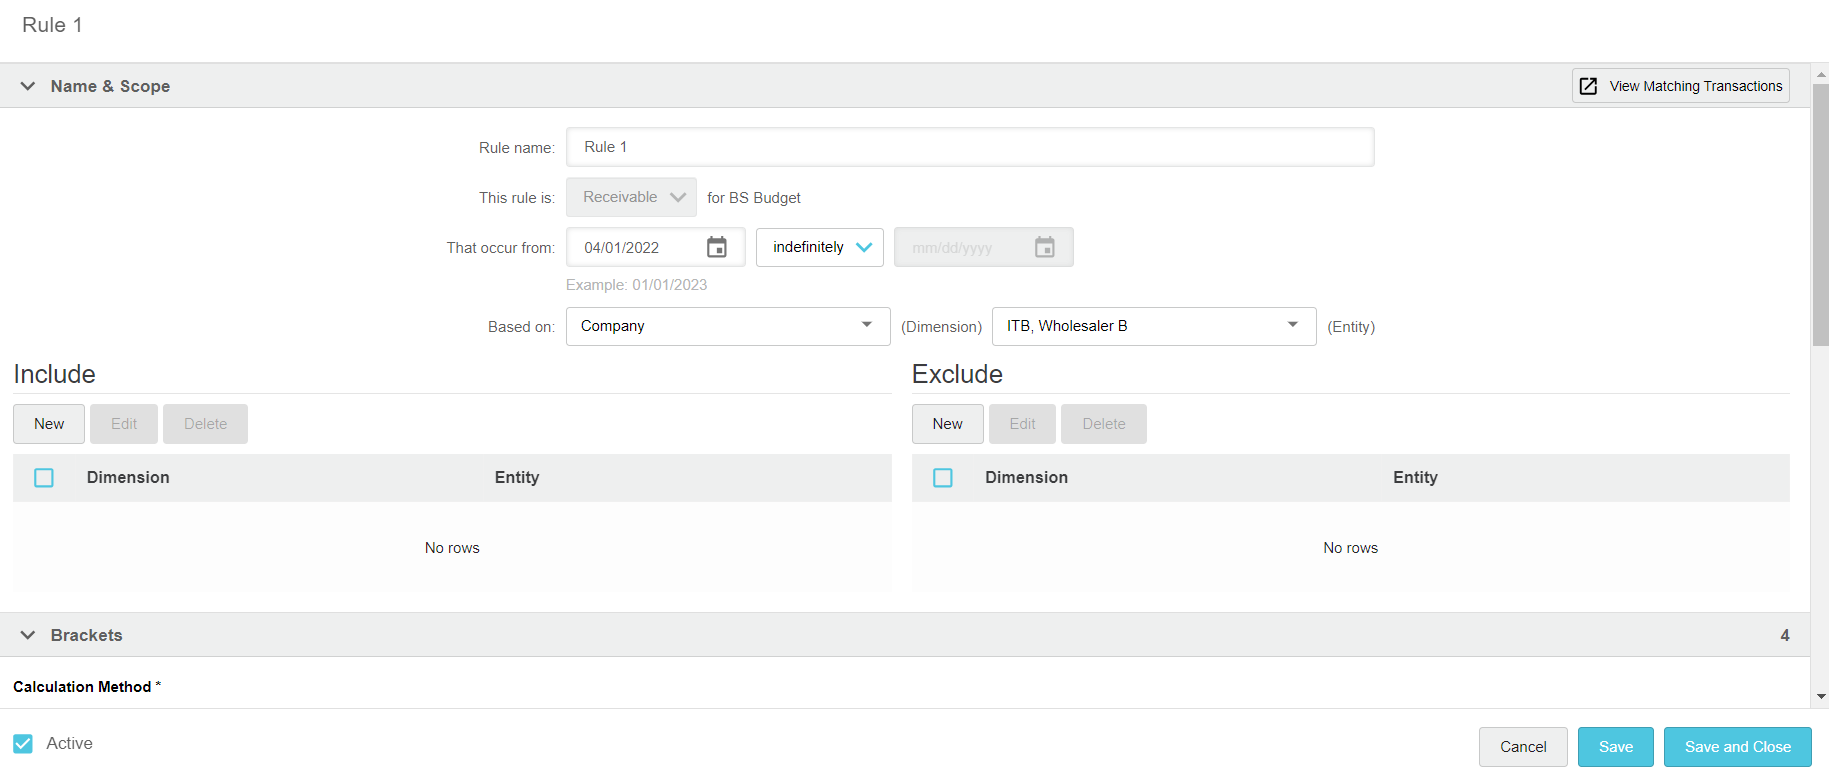
Active
Rules are active by default, as indicated by the selected Active checkbox at the bottom of the screen. You can only calculate rebates for active rules.
In addition to this setting, two other conditions must be met for a rule to be active: the rule type must be selected (Receivable or Payable) and the corresponding project must be active.
Name & Scope
The Name & Scope section defines the rule’s name, timeframe, and specific data items to which it applies.
Rule name
This is the name of the rule. It's displayed in the grid on the project’s page. It must be unique.
This rule is
This setting determines the type of rule. The available options come from the project setup.
Receivable: Typically based on a Purchasing database, this type of rule is used for the rebates that you receive from a supplier.
Payable: Typically based on a Sales database, this type of rule is used for the rebates that you pay to your customers, buying groups, and so on.
Child: This type of rule allows you to use a parent-child relationship, where the result of a calculation for one rule is applied to other rules but with additional conditions.
That occur from
Often referred to as the validation period, this is the timeframe that determines which source database transactions count towards the rebate calculation.
The dates typically come from the contract or agreement with the third party to whom the rule relates. For example, this could be a month, quarter, 12 months, or even an indefinite period of time.
The That occur from (start) date is mandatory. It defines the first date of the period for which transactions in the source database stream will count toward the calculation. This date is usually the same as the start date for the agreement.
The Indefinitely/Until option allows you to clearly specify if the rule is valid indefinitely or valid until a particular end date. This setting makes it explicit that the rule does or does not have an end date, removing any doubt. If you select the Until option, the end date setting becomes available so you can define the last date for which transactions will be included in the calculations.
Based on, Include, and Exclude
The Based on setting defines to whom or what the rule applies, and on what basis it applies.
If you used the Multiple rules based on a dimension option when creating the rule, this setting is prepopulated with your selected dimensions and entities, and you cannot change it.
Otherwise, you must specify:
The dimension that contains the entities on which the rule is based.
The entity within that dimension on which the rule is based. You can select the checkboxes of the entities one at a time, click and drag to select multiple entities at the same time or click the checkbox above the list to select all of the entities.
You can further define the dimensions and entities to get the exact data you need to calculate the rule by including or excluding specific entities, such as individual customers or products and so on. This setting acts as a filter. For example, you might want a rule to be based on the Item Class dimension but exclude certain products from that dimension.
Include: The dimension containing items to which you want to limit inclusions in the calculation. For example, you could set a restriction to include entities such as customers, product lines, brands, and so on. No limits apply if this setting is left blank.
Exclude: The dimension containing items you want to exclude from the calculation. For example, you could set a restriction to exclude entities such as customers, product lines, brands, and so on. If this setting is left blank, no exclusions apply.
Example of using the Based on and Include settings when creating multiple rules in bulk
Suppose you want to give your customers a rebate for buying from a specific item class but don't want to create a rule for each customer. This scenario involves two dimensions: Customer and Item Class.
When creating the rule, you select the Multiple rules based on a dimension option, then select the Customer dimension and the applicable customers (entities). This one rule creation process will result in the creation of multiple rules.
In the rule setup, you see the Based on setting is unavailable, as you have already selected the dimension and entities upon which the rule is based.

The Include and Exclude settings are available. Here, you specify the rebate's target. You can include or exclude specific dimensions and entities as required. In this case, you include two particular item classes.

Brackets
The Brackets section contains several settings that determine the bracket conditions, followed by a grid that sets out the bracket parameters. It is common to have a tiered schedule of rates for a rule. Together, they determine how the rebate is calculated.
Bracket conditions
The following settings determine the bracket conditions:

Calculation Method: This is the method used to calculate the rebate. You can select from Percentage, Fixed Amount, Fixed Amount per Qty and Percentage, and Fixed Value. Learn more about each calculation method.
Calculation Type: This is the type of calculation. By default, calculations are Absolute but you can switch to Growth. Expand the following sections for details on each type and its settings.
Absolute
Absolute rules are based on the absolute value of the transaction amounts for the period (current year). The rebate is paid if a certain amount (quantity or value) of a specific product is purchased. For example, for every unit the customer buys, you give them a $1.00 rebate. This rebate is typically calculated every quarter.
When you select the Absolute calculation type, the following settings become available:
Amounts Per: This setting allows you to select the period of calculation, which can be quarters, months, years, or the whole rule period.

Pro Rata: This setting becomes available when the bracket Amounts Per is set to Whole rule period and a Retrospective setting is selected (not No). You can select Off, Linear, or Seasonal. Learn more about pro rata rules.

Growth
A Growth calculation is based on the growth of the value of transactions based on a reference period (often the equivalent period in the previous year). This rebate is calculated once within a specified period, such as every 12 months.
The rebate is paid when a specified growth target or milestone is achieved. For example, you pay a 2% rebate to a customer if they grow between 5% and 10% year on year, and you pay a 3% rebate if they grow by more than 10%.
This type of rebate rewards customers for buying more than they normally buy, therefore, it gives them an incentive to buy more. For example, if a customer usually buys $10,000 worth of products each year, rather than giving them a rebate on what you expect they’d spend anyway, you can offer them a 5% rebate on everything over $10,000 this year.
This rebate is typically not used for new customers, as you have no spending pattern on which to base the growth estimates.
When you select the Growth calculation type, the following settings become available:
Previous Year based on: This setting allows you to select the variance period in the previous year. You can select the Validation Date, Transaction Start/End, or a Custom variance date range.

Retrospective: This is whether the bracket application is retrospective or not. There are several options for applying retrospective rebates: to the full amount, from the start of growth (growth rules only), from the lowest bracket, from a specific amount, or from a specific percentage of growth (growth rules only). Learn more about retrospective rebates.
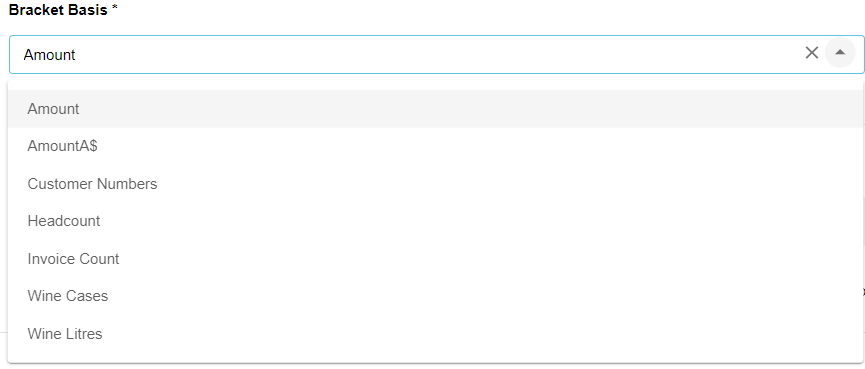
Bracket Basis: This is the measure that forms the basis of the given brackets. Brackets are typically based on cost, quantity, or value measures. For example, select Qty (quantity) if you want the bracket based on selling a number of something, such as 1000 to 10001 units.
Brackets grid
In the grid, you set the bracket parameters (tiers or levels) that apply to the rule. A higher rebate is earned as the purchase quantity or value reaches higher thresholds. The available settings depend on the selected bracket conditions. For example, in the image below, the overall range is $5,000 to $15,000 and there are four brackets, each assigned a different rebate amount.

Entering brackets
Enter the From (starting) value and an Up to and including value. This value corresponds to the Bracket Basis setting. For example, if you select a bracket basis such as Value or Cost, enter the monetary amounts, and if you select the Quantity bracket basis, enter the quantity amounts (a count of something).
Enter the rebate you receive (receivable rebate) or pay (payable rebate) into the We receive (pay) for this tier box. The rebate format depends on the calculation method, so this might be a percentage, fixed amount (quantity), or fixed value.
Click the Add button to add another row to the grid and repeat the above steps to configure the additional brackets, as required.
How individual transactions can affect brackets
If a transaction spans two brackets, the transaction is effectively split and the lower rate is applied to the portion within the first bracket, and the higher rate to the portion that crossed into the higher bracket. For example, looking at the image above, if total transactions were approaching the amount to of 10,000 (i.e., the running total stood at $9500) and a new transaction for $700 was processed, taking the total to $10,200, the lower rate is applied to the amount within the first bracket ($500), and the higher rate to the amount that crossed into the higher bracket ($200).
Results
The Results section displays the calculation results.
Categorization
The Categorization section displays extra information for reference purposes. It doesn't affect the calculation. For example, you might want to display who a rebate is paid to (or received from) and how often.
Categorization settings
Description: Optional, additional information about the rule. Brief descriptions are automatically generated based on selections you make in the Based on, Include, and Exclude sections. You can edit the description to provide users with more descriptive text, for example, Vendor ABC rebate for summer campaign 2023.
Groups: The groups to which the rule belongs. You can attach labels to rules for grouping purposes.
Frequency: Select from None, Monthly, Quarterly, Half Yearly, Yearly, or Other. Your selections here do not affect the bracket period selection in the Brackets section.
Dimension and Entity: Select the dimension and entity within that dimension. Your selections here do not affect the Based On selections in the Name & Scope section.
Audit details: Information about the rule, including who created it and when it was last modified.
Attachments and Comments
The Attachments section contains any files added against the rule. The Comments section contains any comments added against the rule. See Add attachments and comments to learn more.
Edit rules
You can edit rules individually or save time by editing multiple rules in bulk. You might need to edit rules for the following reasons:
If you make a mistake when initially setting the rule up.
If the rebate agreement changes.
To roll a rule over into a new fiscal year.
To deactivate rules.
After you clone a project, to make a change to all the rules.
When you edit a rule, its description automatically updates (unless it has been manually edited).
If a rule has no posted calculation results yet, you can edit all the settings in the rule setup screen. However, if a rule has any posted calculation results, there is a limit to what you can edit.
Learn more about editing rules that have posted results...
If a rule has any posted calculation results, there is a limit to what you can edit.
When editing an individual rule that has posted calculation results, a message displays in the header of the setup screen, telling you that you cannot edit the rule. In this case, you can only take the following actions:
Name and Scope:
Change the Active setting to Yes or No.
Change the Valid To setting to a different date.
Results: Delete posted results.
Categorization: Change the Payment Details settings.
Attachments: Add or delete attachments.
Comments: Post new comments.

If a rule has posted calculation results and you need to make more than the permitted changes, you can deactivate the rule and then recreate the rule. You can also delete the posted results, but you then need to recalculate and post the results again for all rules in the project.
On the Rebates tab, select the rule(s) you want to edit and click Edit. Edit the rule setup as required, then click Save and Close or Change, as applicable.
Add attachments and comments
When you create a rule or edit a rule, you can attach documents and add comments relevant to the rule, and view any documents and comments added by other users.
In the rule setup, expand the Attachments or Comments section, then make your changes and click Save and Close.
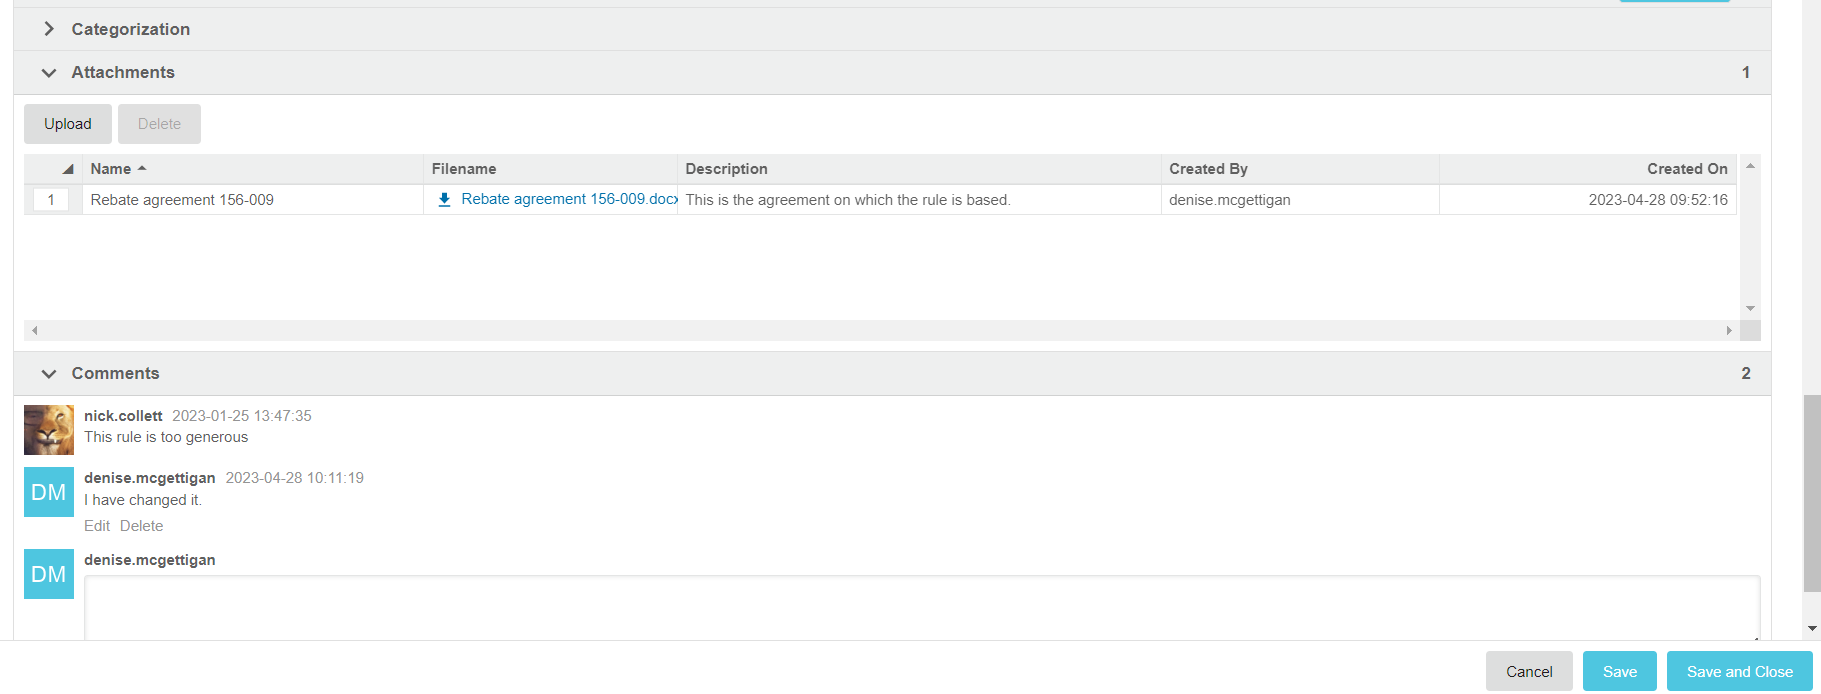
In the Attachments section, you can:
Attach a file: Click Upload, then select the file, enter a name and description and click Upload.
Open an attached file: Click the blue document name.
Delete an attached file: Select the attachment row, click Delete and click Yes.
In the Comments section, you can:
Add a comment: Type your comment into the box and click Post.
Edit a comment you added: Click the Edit link below the comment, make your changes and click Post.
Delete a comment you added: Click the Delete link below the comment and click Yes.
Delete a rule
The action of deleting a rule cannot be reversed. If you delete a parent rebate, that action also deletes all associated child rebates.
If a rule has posted transactions, you cannot delete it. However, you can set it as 'inactive', which means it won't be included in calculations.
On the project’s page > Rebates tab, locate and select the rule(s), then click Delete. Click Delete to confirm.
Deactivate a rule
Rather than delete a rule, you can deactivate it. You might want to deactivate a rule, for example, when a rebate is posted or after its validation period has expired. You can reactivate rules anytime. You can only calculate rebates for active rules.
Rules are active by default, as indicated by the selected Active checkbox at the bottom of the rule setup screen. To deactivate a rule, clear (deselect) the checkbox.
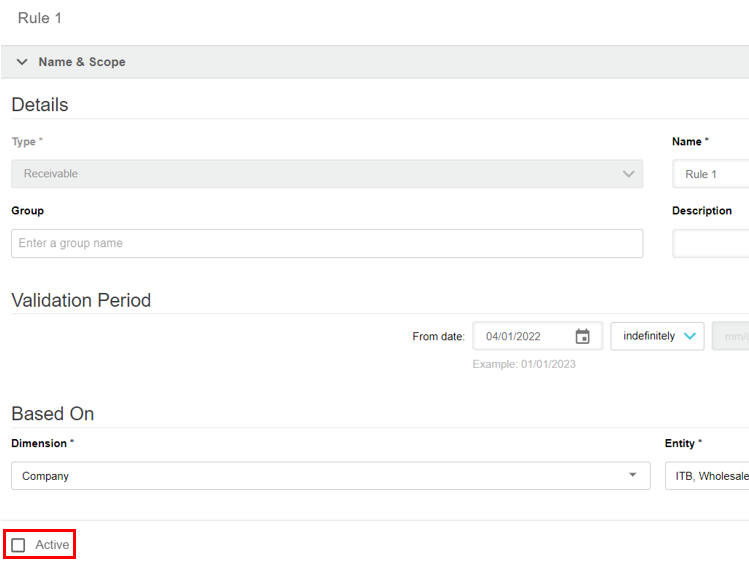
Troubleshooting inactive rules: If a rule appears to be inactive but its Active checkbox is selected, check that:
A rule type is selected (Receivable or Payable) at the top of the rule setup screen.
The corresponding project is active (the Active checkbox is selected in the project setup screen).
