Database tab
Add a Database tab in your financial budget workbook to connect to data in another database and drive budget values.
User permissions: Budgets & Forecasts and Manage Budgets & Forecasts
Database driver tabs are not available in operational budgets but you can define additional measures in those budget setups to drive the budget data.
The Database tab automatically drives the values in selected account rows on the Main tab. For example, you can use your Sales database to drive the Revenue accounts in the Main tab of your financial budget. You can also manually link to the data in the Database tab via formulas, which is a useful option if the new database does not easily map to the existing database.
How the Main and Database tabs are linked
The relationship between the Main and Database tabs is as follows:
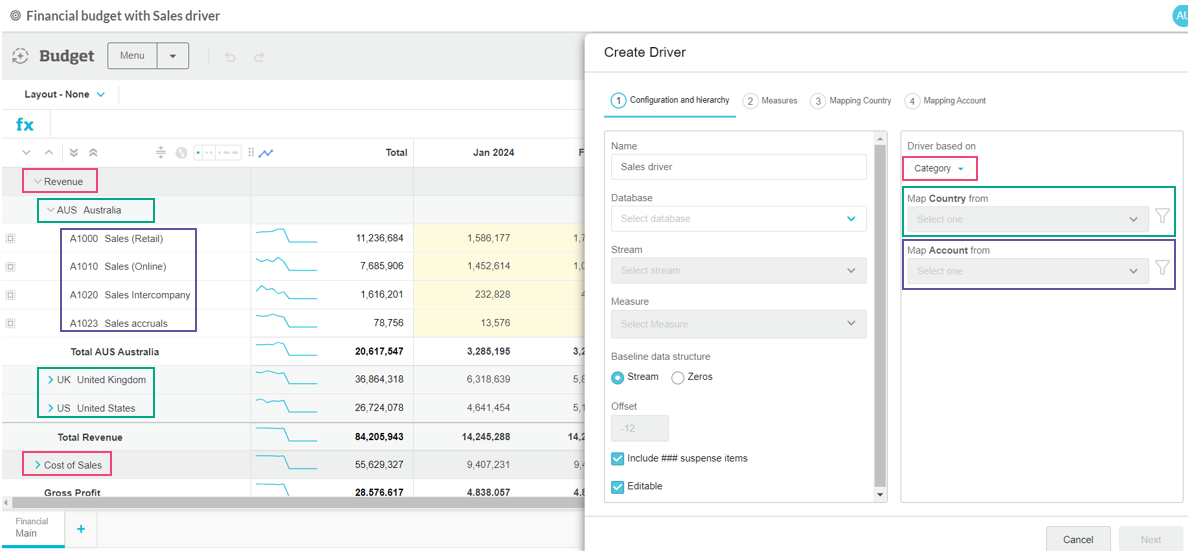
The Main tab setup impacts the Database tab setup. The hierarchy and layout of the budget’s Main tab is determined by its setup. In the case of a financial budget, the budget displays in the P&L template that you selected with the number of levels you set. The following image shows how the budget setup impacts the driver tab setup. You can see settings for the category and other dimension levels (Country and Account) in the budget. Later in the driver tab setup, the dimensions in the new database need to be mapped (matched) to those in the existing database.

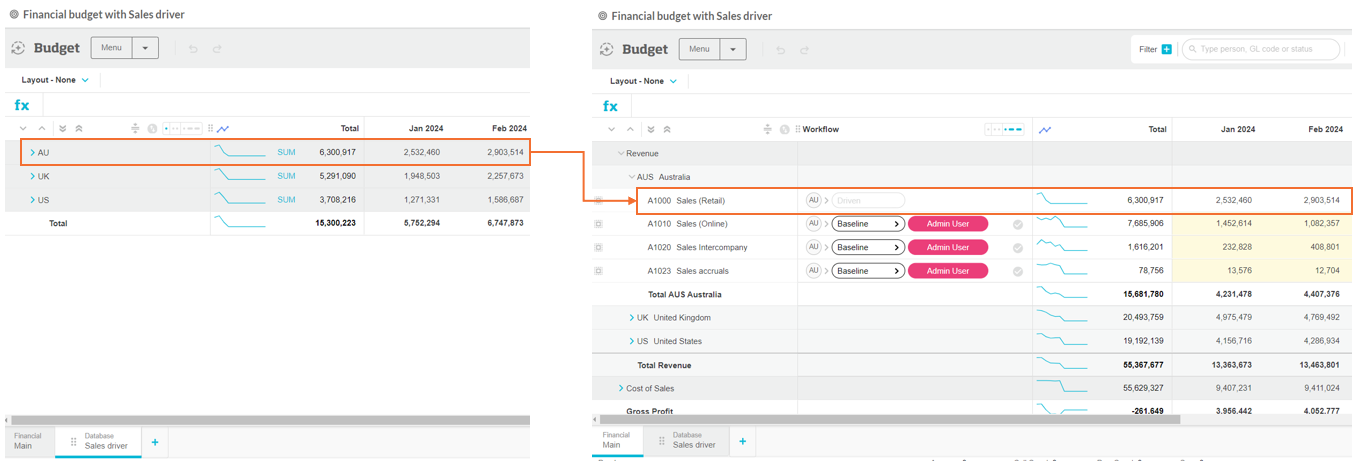
The Database tab drives the values on the Main tab. After the Database tab is set up, the values in that tab drive the values in the account row on the Main tab. There is no workflow for the driven rows.

Difference between the Database tab and Reference tab
The Database tab and Reference tab are very similar, as they both connect to another database to display additional data in the budget workbook. The two key differences are as follows:
Automatic driving of budget values: The purpose of the Database tab is to automatically drive budget values in the Main tab. This is achieved through the mapping step in the Database tab setup, where you match the dimensions in the two databases. As the Reference tab setup doesn’t have a mapping step, no dimensions are mapped, so no values are automatically driven. However, you can manually drive values by referring to the reference data in formulas.
Flexible hierarchy: As explained in the section above, the hierarchy of the Database tab is based on that of the Main tab. So, for example, if there are three levels in the Main tab, the Database tab will also have three levels. The Reference tab is independent of the Main tab, so you are free to determine the levels in the hierarchy to organize the data as required.
Watch this Phocas demo video: Sales budgeting and forecasting
Do you need to add a new Database tab? If there’s already one in the workbook, save time by cloning that tab and editing its setup.
Either click the Budget menu > Add tab or click the Add tab button (at the bottom of the workbook), then select the Database tab type. Then proceed to set up the Database worksheet tab. The setup process involves several steps and settings organized into tabs. Many settings are automatically selected for you to save you time but you can change them as required.
1. Configuration and hierarchy
The settings in the Configuration and hierarchy tab of the setup determine where the other data comes from, how it will be organized in the new worksheet, and what it will drive in the Main tab.
Configuration
Enter a name for the tab.
Select the Database from which to source the data, along with the corresponding stream and value measure.
The available databases and their stream and measure options depend on whatever is in your organization's Phocas site. The Budgets and Forecasts module is based on the Financial Statements module, so there will always be a financial database option. However, you might have other options, such as a Sales or Purchasing database.
Read Bring in data from another database to understand the two options you have here; link to the actuals stream or a published budget stream from another workbook.
Select the baseline data structure:
Stream: Fill the tab with values from the selected data stream as a starting point that you can adjust later. For example, you could use your current year's actuals or the previous year’s budget values.
Zeros: Fill the tab with zeros ($0.00) so you can start with a clean slate.
(Applicable when using stream values) Change the default offset if required. If you're budgeting by year, the offset defaults to -1, and if you’re budgeting by month, it defaults to -12.
Set the measure format to determine how the measures (numerical values) display in the grid.
Leave the Include ### suspense items checkbox selected if you want unclassified items to display in the Database tab. If you do not want to include those items, clear the checkbox.
Leave the Allow users to edit values checkbox selected if you want other users to edit the data in the Database tab. If you want to prevent users from editing the data (deactivate all workflows), clear the checkbox. You might want to do this at the end of the budget period to lock in the final budget values.
Hierarchy
(Applicable when linking to a financial database) Select the statement:
These are the Profit and Loss statements created in the Financial Statements module.
The statement determines the layout of the contents of the worksheet, along with the account mapping. It also applies the Reverse Sign setting (displays a negative number as a positive, or vice versa) from the corresponding financial statement.
For example, if you are bringing in data from last year’s Profit and Loss statement, you might want to use the same Profit and Loss template as you used in the budget setup, so the data is laid out the same in both the Main and Database tabs. The following images show the impact of a statement on how the data displays.

(Applicable when linking to a financial database) Show or hide nested calculations as required. This setting determines whether nested calculation rows are shown in the worksheet or not. These calculation rows come from the selected statement. By default, Show is selected, which means the calculation rows in the worksheet are expandable and you can see the nested derived rows underneath. If that's not desirable, select Hide to remove these rows and only see the top-level calculation values.
Leave the default Driver based on setting as it is if you want all the Profit and Loss categories in the Main tab to be driven by the data in the Database tab. If you want to drive only one or more specific categories, click the dropdown arrow and clear the checkboxes of the categories you don’t want to drive.
(If applicable) Change the default mapping applied to the data levels (hierarchy) if required.
By default, the levels in the Main tab setup are included in the Database tab. For example, if the Main tab of the budget has one level (Country dimension), it is also included in the Database tab setup. You cannot remove these levels, but you can change the dimensions in the database to which they are mapped. Select the required dimension from the dropdown list.
You can filter the dimensions to select one or more specific entities. Click the Filter dimensions button next to the level and select the entities you want to include, then click out of the entity list to apply your selection.
(If applicable) Select the dimension in the Database tab that you want to map to the account level in the Main tab.
By default, this is the lowest level in the budget at which you want to enter values, and this is where the workflow sits. For example, you might want to budget by Sales Rep instead of account.
If you selected a templated, this setting is unavailable, as the account mapping comes from the template. If you add other levels, you can change where the workflow sits.
(If applicable) Add levels to determine how the data in the tab is organized.
By default, the Database tab has the same levels as the Main tab, but you can add levels below the mapped account level. Then, you can select the level at which the workflow sits.
The number of levels you can add is limited by the number of levels in the Main tab (not including the Category). For example, suppose the Main tab has three levels: Category, Country, and Account. You do not count Category, so two levels will be inherited by the Database tab. You can add up to four more levels in the Database tab setup.
The additional levels you add are unmapped, which means they do not drive any rows in the Main tab.
Click Add level and select the dimension you want to add. Repeat to add more levels. Select the Workflow option on the applicable level.
(If applicable) Apply a tab filter: Select the Filter… checkbox > select the dimension that you want to filter (you can't select one that’s been added as a level) > select the entity you want to use as the filter > click out of the window to apply your selection. See Budget filter for more information, as the concept is the same.
Click Next.
2. Additional measures
The Measures tab allows you to define additional measures to drive the budget data. By default, one measure input row is included. You can either leave it as it is and click Next to proceed with the Database tab setup (see the next section below) or configure the measure and add additional measures.
Read the Include additional measures in the workbook page for more information.
Click Next.
3. Mapping - dimensions and account
Map (match) the dimension entities in the Database tab to:
The corresponding dimension entities in the Main tab. If the Main tab has multiple dimension levels, you need to do the mapping exercise for each one.
The accounts in the Main tab.
Map to a single dimension entity
This option allows you to quickly map all the dimension's entities to one entity in the Main tab. For example, you might want all sales rep values to drive the one sales account.
Select the Map to a single... option, then select the entity from the list.

Map to multiple dimension entities
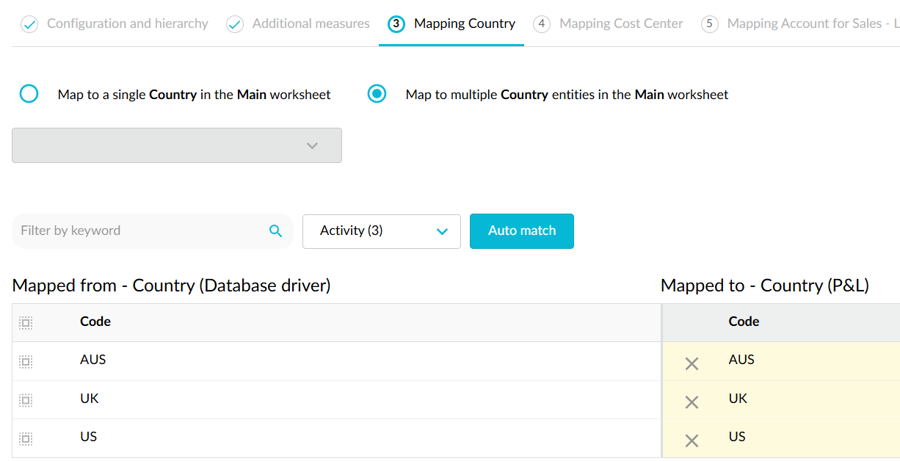
This option allows you to map individual dimension entities to different entities in the Main tab. For example, if you're budgeting your Sales database by sales channel and you have an online and offline channel, you might map them to different accounts (Sales-Online and Sales-Offline). Similarly, if you have the Country dimension in both tabs, you'll want to map Australia to Australia, the UK to the UK, and so on.

Select the Map to multiple... option, then either:
Click the Auto match button. The selected entities are automatically mapped to identical entities in the Main tab, where applicable.
Select one or more individual dimension entity rows, then select the corresponding entity from the list. Repeat to map all the entities in the grid.

Tips:
If there are many entities in the Main tab list, use the search box at the top to quickly filter the list. You can search by code, name, or other property.
If there are many entities in the grid, select the Not mapped option from the All dropdown list in the top right corner. This hides all mapped entities from the grid, so you can focus on the remaining mapping.
Note: While it's possible to click the Select all button in the grid and map all the dimension entities to one entity in the Main tab list, in this case this mapping method is limiting and might lead to issues when you want to roll the budget forward into the next period. There might be entities (such as new sales reps) with no activity that don't show up in the new budget. Read the troubleshooting section below to learn more. To avoid this issue and the need for additional mapping in the future, it's better to use the single dimension entity option above.
Click Next and perform the other mapping as required.
Click Save and finish. The new tab opens with the data from the other database or zero values if you selected that baseline data structure.
After you add the Database tab, you should review the contents of the new tab and the corresponding, automatically driven values in the Main tab. If required, edit the tab setup before editing any budget values.
You can then manually link to the new data via formulas in the Main tab and other tabs. This is useful if the new database does not easily map to the existing database.
You can also add rows in the Database tab for new entities (see below).
Troubleshooting: Add a dimension entity to a Database tab
If you don't use the single dimension entity mapping method (see expandable section 3 above), you might run into an issue later in the budgeting period. The scenario is you have a new dimension entity (such as a sales rep or product) that you want to budget against, but as this is a new budget item, it didn’t have any activity in the baseline period, so it doesn’t display in the budget. In this case, to budget for that entity, you need to manually add it into the budget by adding (injecting) a row in the Database tab.
If you have additional measures in the database tab, any new rows you add will get these additional measures by default.
On the Database tab, expand the rows to the applicable dimension, for example, UK > Sales Rep.
Hover over the entity row (UK), then click the blue Add button that displays.
Add the dimension entity. The new row displays in the budget with an Unmapped button (icon) next to its name.
Click the Unmapped button to open the mapping window for that dimension, then map (match) the dimensions in the new database to the dimensions in the main budget database and click Save and Finish. The budget reloads and the new row is no longer marked as unmapped.
Last updated
