Copy or export financial information
Copy or export the financial statement information for use elsewhere.
User permissions: Query > Export. To copy data, you need the Clipboard permission. To export data, specific permission is required for each file type.
Whether you need to quickly copy a few cells or export a full dataset, the Copy and Export features allow you share insights, build reports, or continue analysis in other tools.
Copy financial information
After you select data in a financial statement, you can also copy that data for use elsewhere, such as a Microsoft Excel worksheet, removing the next to export the whole statement.
Right-click an item in the selection, then click Copy. Paste the selection into the required external application.

Export a financial statement
User permission: Query > Export. You need specific permission to export each file format.
You can export a financial statement from within Financial Statements or a dashboard. Either way, there are three export format options and several other settings to meet your export needs.
Select one of these starting points:
In Financial Statements, click the Export button in the top right corner above the grid.
On a dashboard, hover over the financial widget to display the widget menu, then click the Export button.
Select your export format. By default, the New style XLSX export option is selected for you, but you can select the standard (old) Excel or PDF export format.
Customize the export - see settings descriptions and examples below.
Click Export.

Excel exports
Both Excel options download an XLSX file to your computer which opens in Microsoft Excel as an XLSX file (workbook) with two tabs:
Data tab: Contains the financial statement data including any formulas and hierarchies. In the header you can see who exported the report and when they did that. On the left-hand side, you have the ability to collapse and expand the account groups (rows). When you click a value cell, you can see the underlying formula in the formula bar; when you edit the values in the worksheet, the corresponding values automatically update.
Query tab: Contains information about what you were looking at in Financial Statements at the time of exporting, such as the date you exported the file, your name, the database name, and the period and columns that were selected.
Difference between the two Excel export options
The new style (version) of the Excel exports does everything the old one does, but it is faster and presents your data in a more similar way to how you see it on the screen. For example, if some levels are expanded but others are collapsed when you export the statement, it’ll look just the same in Excel.
The new style also supports cell comments, includes updated formatting, and offers a Values only export option. This removes formulas and keeps only the displayed values, which can improve performance and reduce the risk of Excel slowing down or crashing when working with large reports.
Cell comments
Cell comments are exported along with the data. The comments include the author and date and time of the comment.


Formatting
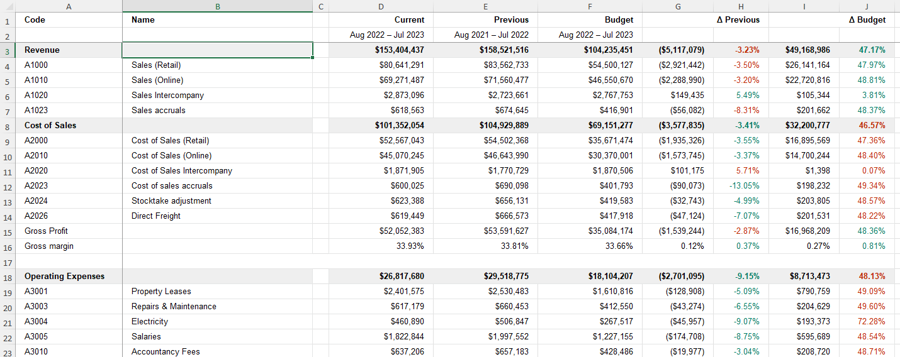
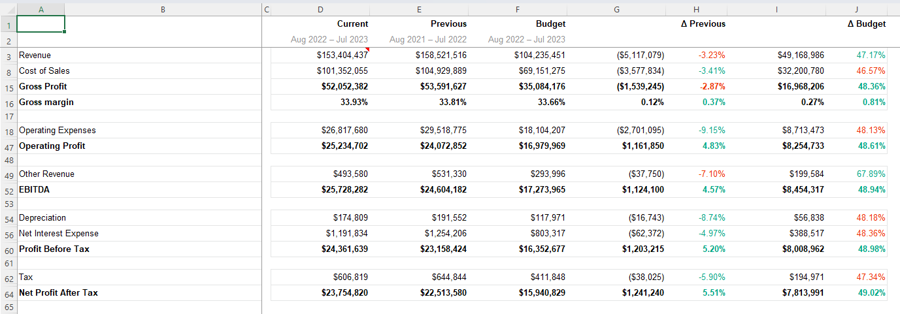
By default, all levels are expanded in the new style Excel exports. Therefore, the new export looks different from the old one, as illustrated in the images below. The formatting differences are as follows:
The Code and Name is removed from the column headers.
The dates display in grey.
The shading is removed from group rows.
The accounts are indented.
The column width is set off the account code and name length. Long names and headers will overflow cells.
Old Excel export formatting:
New Excel export formatting:
PDF exports
The PDF file opens in your default browser. You can see your headings in the top left and right corners and the statement information underneath. In the header you can see who exported the report and when they did that. On the last page you can see the query details.
Export settings
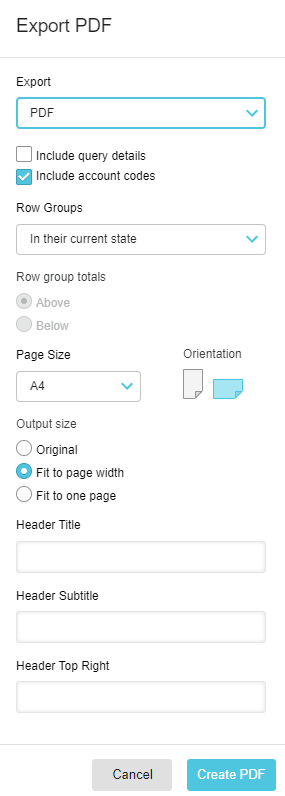
Expand the sections below for descriptions and examples of each setting. The settings that are available depend on the export format.
Include query details
Select the Include query details checkbox, if you want to get a snapshot of the data and query performed at the time of exporting. This option adds an additional tab in the XLXS file or page at the end of the PDF, as applicable, with details such as the date you exported the file, your name, the database name and the period and columns that were selected.
Include account codes
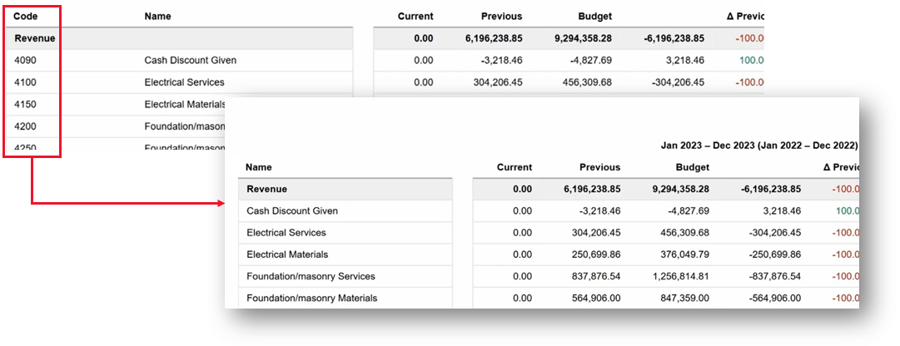
As account codes are used for internal reference purposes, they are often surplus to requirements in exported documents. Removing theses codes will make your exports more “report like”, particularly in PDF exports.
By default, the Include accounts codes checkbox is selected, which means the accounts codes are included in exported documents.
To exclude the account codes, clear (deselect) the Include accounts codes checkbox.
Values only (New style Excel only)
The Values only export option for New style Excel files removes formulas and keeps only the values, helping files open faster, perform better, and reducing the risk of Excel slowing down or crashing when reports contain many formulas.
Row groups (PDF exports only)
You have options for how you want the information to be laid out in the exported document.
All collapsed - Displays the information for the top-level groups only. All the rows in the statement, whether expanded or not, are collapsed in the exported document. This option produces a summarized view of the statement.
All expanded - Displays all the information. All the rows in the statement, whether expanded or not, are expanded in the exported document. This option produces a detailed statement down to the account level.
In their current state - Displays the information exactly as you see it in your current view of the statement. Any rows that are expanded/collapsed are also expanded/collapsed in the exported document.
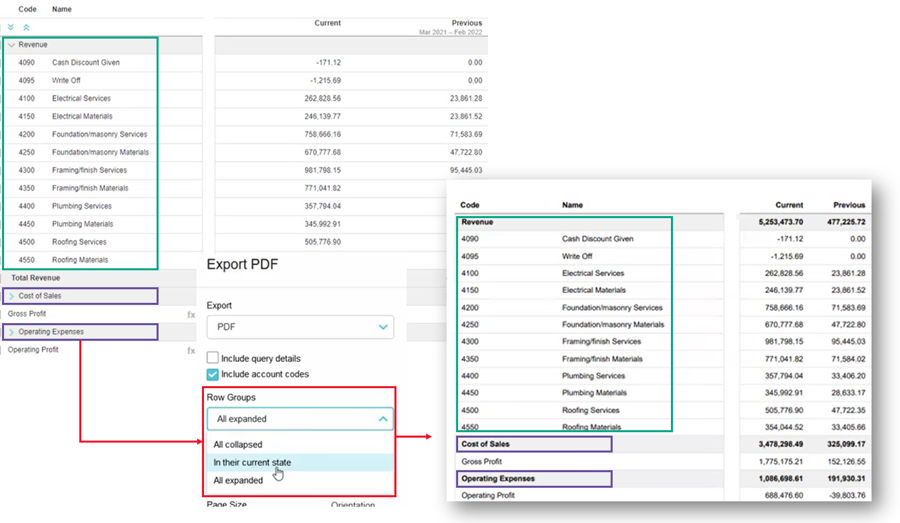
Row group totals
A “row group total” refers to a row that contains the sum of its child rows, such as Revenue. These rows display in bold font in the exported document.
By default, the Above the group option is selected, which means the row group totals are displayed above their respective child rows in the exported documents.

To display the row group totals below their respective child rows, select the Below the group option.

Last updated
