Customize a Cash Flow statement
In Financial Statements, the Cash Flow statement is derived from the Profit and Loss statement amounts and movements in the Balance Sheet for the selected period. This method takes amounts in the Profit and Loss statement and movements in the Balance Sheet and maps them to the relevant Cash Flow groups, for example Operating, Investing and Financing activities. General ledger accounts can only be mapped to one group, which makes the direct method Cash Flow presentation easier to achieve.
The Cash Flow statement contains the following items:
Group rows
Operating: Displays the business trading activity. The relevant Profit and Loss accounts are displayed along with movements in working capital balance sheet accounts. Investing: Displays the investing activity of the business, such as CAPEX. Financing: Displays the financing activity of the business, such as the extension or repayment of loans.
Calculation row
The sum of the above three groups to calculate the net cash movement for the period.
Cash balance rows
There are two Balance rows, one for the cash at the start and the other for the cash at the end of the period. You can move these Balance rows around, but you cannot delete them.

As with the other financial statements, you can add more groups and calculations, and reorder and rename the existing items. See examples below.
Manage the Cash Flow accounts
For completeness, all General Ledger accounts in the Cash Flow statement must be mapped to a Cash Flow group. Depending on your setup, the mapping might be done for you, in which case you should check it to ensure it is correct, as you might need to make some changes. Otherwise, you must map the accounts yourself. See Map accounts to a group and Common account mapping for Cash Flow statements.
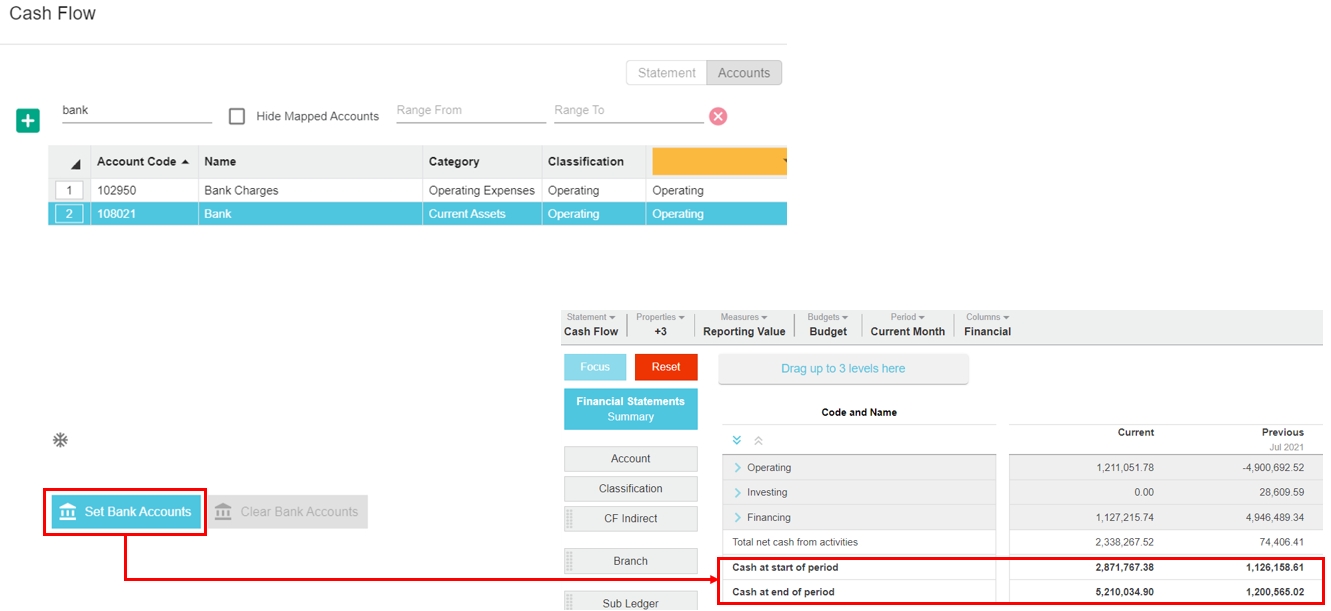
You must specify the General Ledger accounts that are cash balances. These accounts are not mapped. The value of these accounts display in the cash balance rows in the statement. See Set the bank account in a Cash Flow statement and Common account mapping for Cash Flow statements sections below.
The cash balances can equal your net debt (cash plus borrowings) Balance Sheet accounts, if you prefer to manage your business that way. You can have more than one setup, for example, one Cash Flow statement that displays your cash balances and another that displays your net debt balance. See Create a statement to learn how to create multiple statements.
When all the accounts are mapped correctly your Cash Flow statement should balance.
Set the bank account in a Cash Flow statement
You should set the bank account to enable your Cash Flow statement to have a starting and ending balance.

In the Statements menu, click the Cash Flow statement.
In the statement setup window, click the Accounts tab.
Search for the applicable accounts. You can search by code, name or other property, or enter an account range.
Select the applicable bank account(s) by clicking the number to the left of the name, then click Set Bank Accounts in the bottom left corner.
Click Save > Close > Yes to rebuild the database.
Example: Add a group for movements in Accounts Receivable
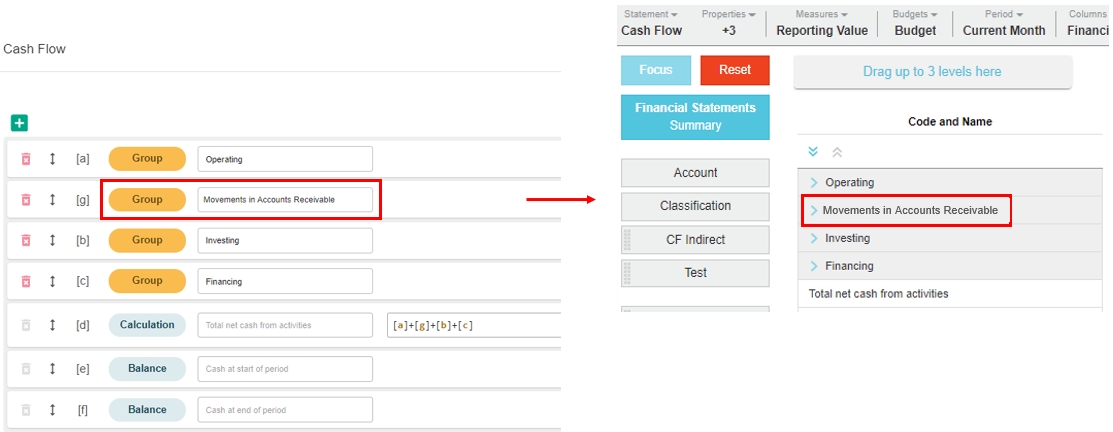
Suppose you want more visibility on how your Accounts Receivable are affecting your cashflow over the period. You can add a group for Accounts Receivable in your Cash Flow statement.
In the Statements window, click the Cash Flow statement (or if preferred, clone the Cash Flow statement and then click that to open it).
In the statement setup window, add a group for the movements in Accounts Receivable and drag it up to where you want it to be positioned, for example, just below the Operating group.
Edit the existing calculation to include reference the new group, then click Save.
Click the Accounts tab, then map the applicable accounts to the new group.

Example: Add subgroups for the accounts
Suppose you want to group your accounts into subgroups for easier analysis. You can add a dimension for the subgroups, then add that dimension as a level in your Cash Flow statement.
In the Statements window, click the Cash Flow statement (or if preferred, clone the Cash Flow statement and then click that to open it).
Create a new dimension for the subgroups.

Videos
Watch this PUG Training video: Cashflow - direct and indirect
