Spread totals
Use the built-in options for distributing a value over the period to save time when entering values.
User permission: Budgets & Forecasts
When working with budgets and forecasts, you often need to distribute a total amount across multiple periods or items. The Spread feature makes this process fast and efficient by automatically applying the distribution, eliminating the need for manual calculations, and ensuring quick, accurate data entry.
Getting started
You can initiate a spread from various locations in the worksheet, as explained in the next section. The impact of the spread differs depending on where you spread from and what method you use. Regardless of the starting point, there are two ways to access the spread feature:
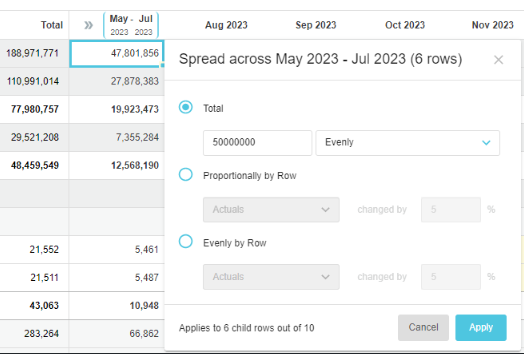
Hover over the right side of the cell (or selection of cells) and click the Spread button that displays.

Click the Cell menu > Spread.

In a forecast, the spread applies to the editable forecast cells only. For example, if you spread 5 million evenly, the system will deduct the actuals and apply an average of the remaining value evenly to the remaining periods to get the full year to 5 million.
Press Enter to submit your spread changes rather than click the Apply button. Use the keyboard shortcut of CTRL+Z to undo, or CTRL+Y to redo, bulk spread actions.
Where you can spread
The Spread feature is available in total rows throughout the worksheet, at the lowest level in the hierarchy (the account or entity rows), and in other special cases, as described below. While there are multiple spread options (described in the next section), the examples in this section use the Evenly option for basic demonstration purposes.
Total rows
When the budget hierarchy is not expanded, the total rows are clearly visible, identifiable by the grey background and blue expand buttons. In this state, the spread action impacts the other rows in the hierarchy (those underneath the total level).
Spread from the Total column
When you spread a value from a cell in the Total column, the value is spread vertically into the totals of the rows beneath it in the hierarchy first, then spread horizontally across each of those rows.
In this context, rather than having to hover over the cell to display the Spread button, the Spread window opens automatically when you start entering a value in the total cell. You can also right-click the total cell to access the Spread window.
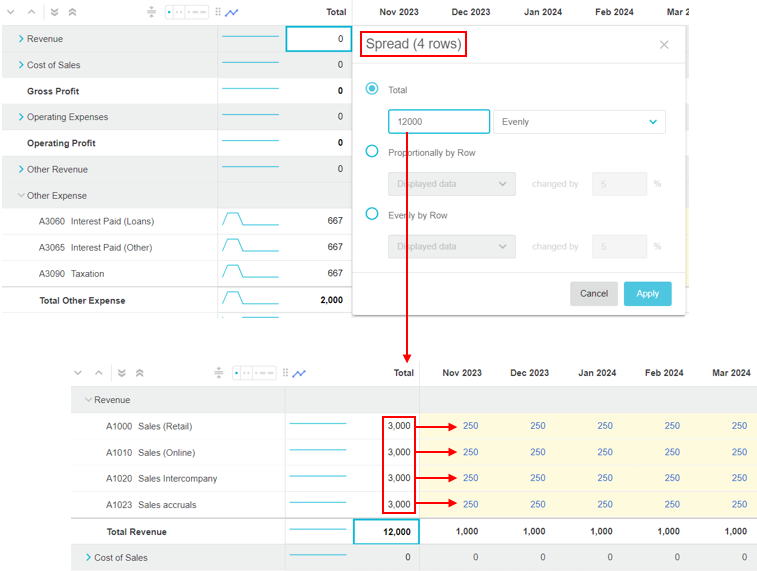
For example, suppose you want to spread 12,000 for Revenue evenly across the year. In the Spread window, you are informed that the spread will impact 4 rows. After the spread, when you expand the Revenue group row, you can see the 4 account rows underneath. The 12,000 is firstly spread vertically into the totals of those rows, so each one gets a subtotal of 3,000. Then for each of the 4 rows, that subtotal is spread horizontally across the budget period, so each month gets 250.
Spread from a period column
When you spread a value from a cell in the total row in a period column, such as a month, the value is spread vertically into the rows beneath it in the hierarchy.
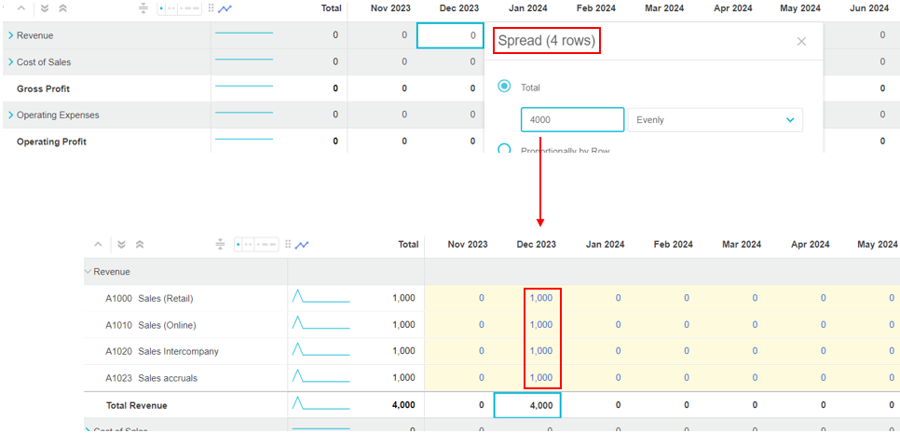
For example, suppose you want to spread 4,000 evenly for the Revenue accounts in December. In the Spread window, you are informed that the spread will impact 4 rows. After the spread, when you expand the Revenue group row, you can see the 4 account rows underneath. The 4,000 is spread vertically into those rows; each one gets 1,000.
Spread across a range of cells (partial spread)
When you spread a value across a selection of cells in multiple total rows and period columns, the value is spread vertically into the rows beneath the total row(s) in the hierarchy first, then spread horizontally across each of those periods. This action is known as a partial spread, as it impacts only a part (segment) of the total row(s).
Example 1: Partially spread in one total row
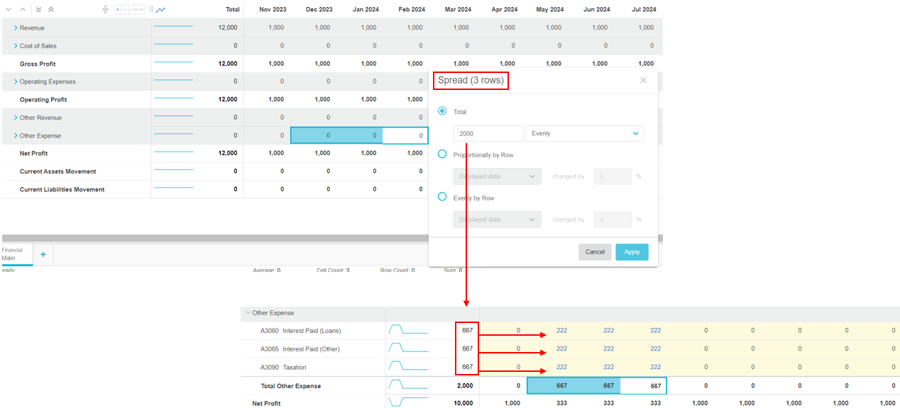
Suppose you want to spread 3,000 for Other Expenses evenly across the three months of December to February. In the Spread window, you are informed that the spread will impact 3 rows. After the spread, when you expand the Other Expenses group row, you can see the 3 account rows underneath. The 3,000 is firstly spread vertically into the totals of those rows, so each one gets a subtotal of 1,000. Then for each of the 3 rows, the subtotal is spread horizontally across the 3 months; each month gets 333.
Example 2: Partially spread in multiple total rows
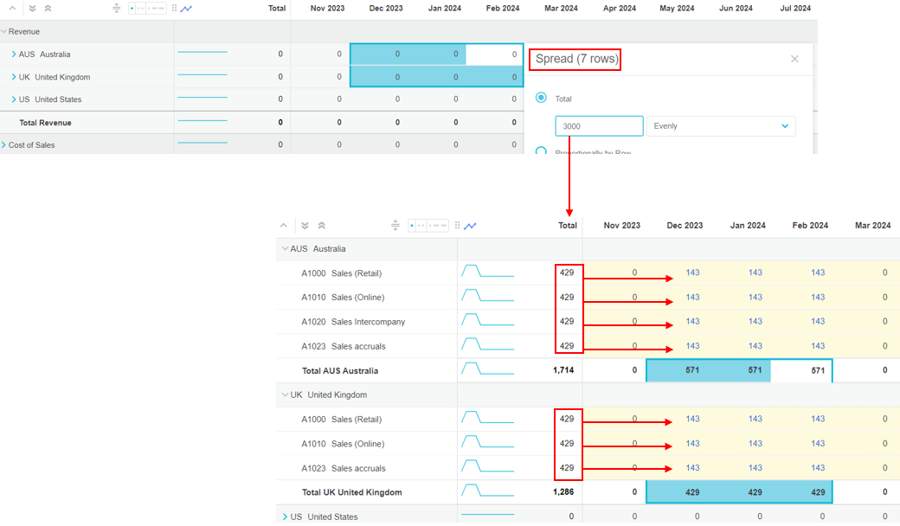
Suppose you operate in three countries and have added a Country dimension as a level in your budget. You want to spread 3,000 for Revenue evenly across the three months of December to February for both Australia and the UK. In the Spread window, you are informed that the spread will impact 7 rows. After the spread, when you expand the Revenue group row, and then expand the country group rows, you can see the 4 account rows underneath Australia and 3 account rows underneath the UK. The 3,000 is firstly spread vertically into the totals of those rows, so each one gets a subtotal of 429. Then for each of the 7 rows, the subtotal is spread horizontally across the 3 months; each month gets 143.
For other examples, see the Proportionally by row > comparison stream section below.
Workflow (input) rows
When the budget hierarchy is expanded to the workflow level, and you see the yellow editable rows (account rows in a financial budget and entity rows in an operational budget), there are two ways to spread a value.
Spread from the Total column
When you spread a value from a cell in the Total column of an editable row, the value is spread horizontally across the budget period.
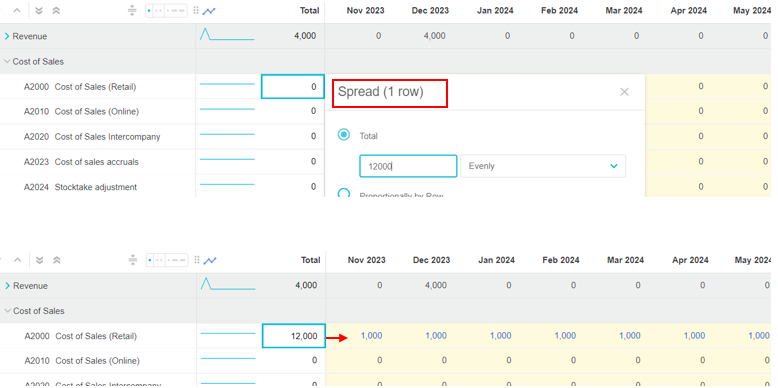
For example, suppose you want to spread 12,000 for your Cost of Sales (Retail) account evenly across the year. In the Spread window, you are informed that the spread will impact just 1 row. The 12,000 is spread horizontally across the 12 months; each month gets 1,000.
Spread across a range of cells
When you spread a value across a selection of editable cells spanning one or more rows and period columns, the value is spread into the selected cells only.
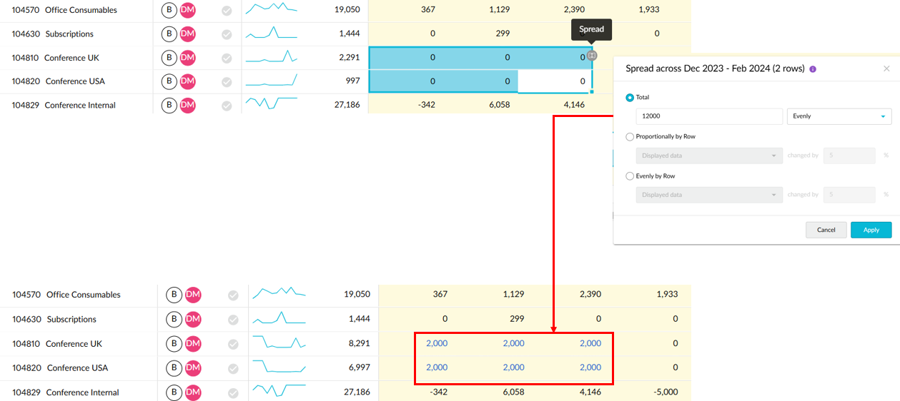
For example, suppose you want to spread 12,000 evenly for your Conference UK and Conference USA accounts in the three months of December, January, and February. In the Spread window, you are informed that the spread will be across Dec to Feb and impact 2 rows. The 12,000 is spread evenly across the 6 cells; each one gets 2,000.
Column group
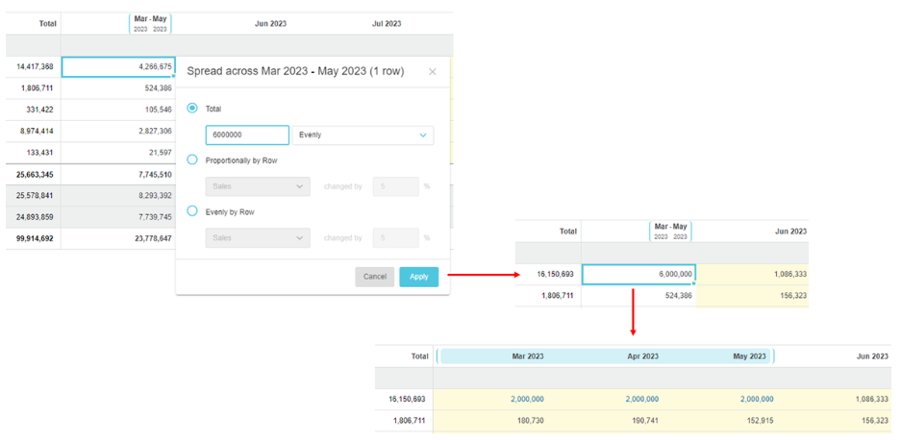
If you have grouped period columns, in the collapsed state, you can spread a value across the group. The spread is limited to the periods within that group, as identified in the spread window. You can spread at both the total row and account row level.
Calculated measures (driver-based budgeting only)
If you use driver-based budgeting and your budget contains input rows that are based on calculated measures, you can spread a target across those rows. This spread option is particularly useful for Sales budgets, where you need to budget sales margin percentages directly in conjunction with either the sales value or cost, rather than budgeting value and cost and having margin be calculated.
For example, suppose a sales rep sells several products and each product has a different margin. You want to set a target total margin for the sales rep but keep the proportionality of the margin between each product, so a high-margin product still has a proportionally higher margin that a low-margin product. You can do this using either of the spread a target options.
Example 1: Spread a target across displayed data proportionally
Spreads a target proportionality between the rows (products), then proportionally across the months. As a result, for each row, there’s likely a different target in each month.
Example 2: Spread a target evenly between periods
Spreads a target proportionality between the rows (products), then for each row, gives the same target each month.
Spread options
When you spread a value from any of the places outlined in the section above, you get several spread options to choose from, as described in the tables below. The available options depend on whether you have one or multiple rows selected, and if any comparison rows have been added to the worksheet.
Total
With the Total spread option, you enter a specific total value and spread it evenly, or in the same proportion as a data stream. This option is suitable when you know the specific total value you want to spread. You enter that defined total and select how you want to spread it.
Evenly by row
The Evenly by row option spreads the new total evenly down the Total column of each applicable row, according to the underlying proportionality of the original row values, then each of those subtotals is spread evenly across the period.
Enter the value, select the Evenly by row option, and click Apply.
For example, suppose you want to spread $120,000 across two Marketing expenses, evenly but proportionately by row. The first expense row initially has $64,664 and the second row has $82,054. After the spread, the rows get $52,888 and $67,112 respectively. Then those subtotals are spread evenly across each cell in the period. In the case of the $52,800 subtotal, each cell in that row gets $4,407 (52,800/12).

Based on [actuals or other comparison stream]
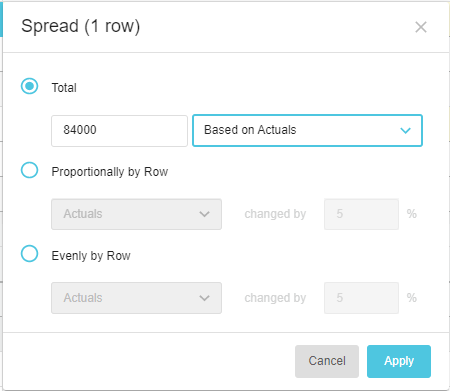
The Based on [actuals or other comparison stream] option references a selected comparison stream's values, such as the Actuals, Last Year’s Budget, Sales, and so on, and spreads the new total value across the period in the same proportion as the selected comparison data. The Actuals option is always available, as this is the data on which the budget or forecast was built. Other options might be available if additional comparison rows were added to the worksheet.
Enter the value, select the Based on [stream] option and click Apply.
For example, suppose you expect the Marketing expense to follow the pattern of last year, due to the seasonality of your business activities. If you base the 84,000 on Actuals, each month in the budget or forecast gets a proportion of the 84,000 based on the corresponding month last year.
![]()
Based on displayed data
The Based on displayed data references the currently displayed data and spreads the new total value across the period in the same proportion as that data.
Enter the value, select the Based on Displayed data option, and click Apply.
This option is useful when you want to fix the baseline values.
Date (working days)
The Date option uses the days in each period as the proportion for the spread.
Enter the value, select the date option to determine the number of days (see below), and click Apply.
Calendar Days: The number of days in each period in the budget. For example, if you have a monthly budget, you will get 30 days for November, 31 days for December, and so on.
Week Days: The total count of the number of Monday through to Friday days in the budget period. For example, you will see 20 days in the months that have 4 weeks and 25 days for the months that have 5 weeks.
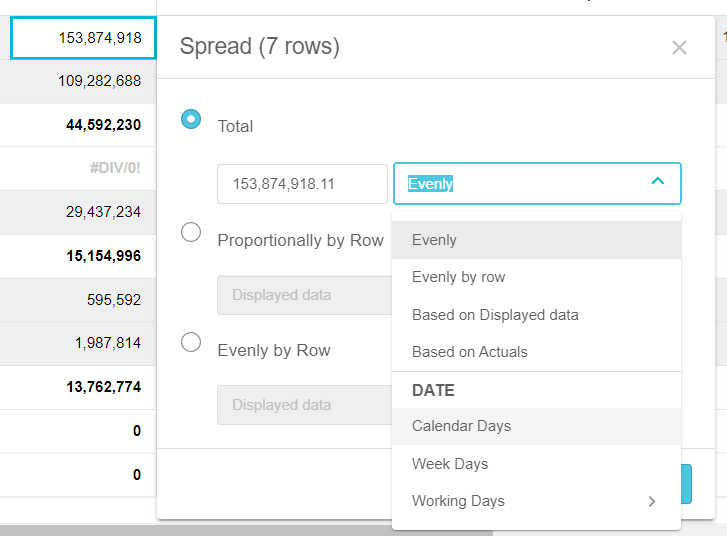
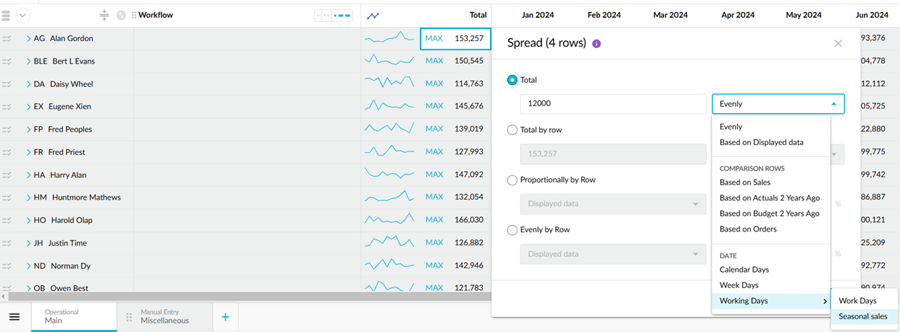
Working Days (calendar): The number of days based on a selected predefined working day calendar. For example, you might have a calendar for your region that excludes public holidays. This is also a great option if you operate a seasonal business where some specific times in the year are always busier than others. See a more detailed example below.
Example: Spread using seasonality
Suppose your Australian branches usually experience higher sales in the summer season, with the highest sales in February. You want to spread a total across the budget period, taking that seasonality into account.
First, you need to set up a working days calendar. This must be done by a Phocas administrator, so if you don't have the required permission (Administration > Working Days), you'll need to ask your administrator to do this on your behalf. You can set up the calendar however you like, starting on any day throughout the year and using values to specify each time period's proportional value (weight) compared to the other.
In this example, a new working days calendar called Seasonal sales was set up to start in January, then all the default days were deleted and relaced by specific months that are proportionally weighted against each other. The busiest month for sales is February, so it gets the highest value and the values decrease in the subsequent months. Some months are no sales in the winter months (zero values), then they start to increase again from November.
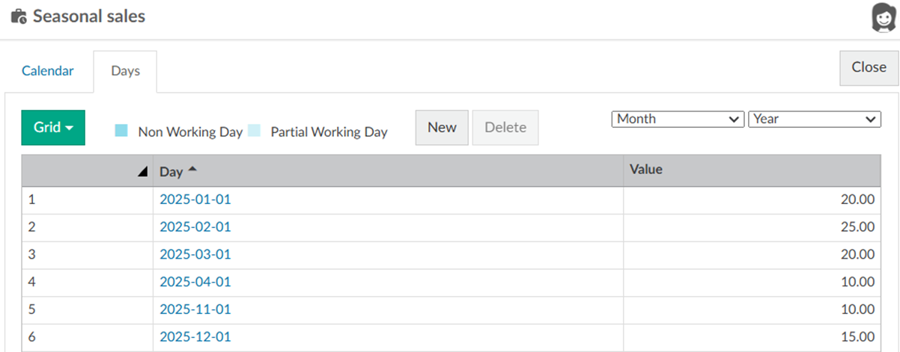
When the working days calendar is set up, it becomes available as an option in the Spread by Days menu. As you can see in the image below,
Proportionally by row or Evenly by row
Each by row spread option references other data, then inserts a total value (either as it is or changed by an amount you specify) and spreads it across the period, either proportionally according to that other data’s phasing (proportionality) or evenly across the period.
These spread options are suitable when you do NOT know the total amount you want to spread. For example, suppose you want to take last year’s actual values and uplift those values by 5% or take last year’s budget and reduce the values by 10%.
In the case of a total row:
Using the Proportionally by Row option, the total is firstly spread into the Total column of each of the rows underneath the hierarchy, according to the underlying proportionality of the original row values. Then the phasing of the selected data is taken into account when the subtotal is spread across the period. As expected, the values typically differ each month.
Using the Evenly by Row option, the total is firstly spread evenly into the Total column of each of the rows underneath the hierarchy, according to the underlying proportionality of the original row values. Then the subtotal is spread evenly across the period, so each month gets the same value.
Prerequisite: You must customize the comparison setup if you want to spread proportionally using a comparison data stream.
Select the Proportionally by Row or Evenly by Row option.
Select the data you want to reference - the displayed data, your actuals, or a comparison stream, such as Sales.
Enter the percentage you want to change the values by.
Click Apply.
Example 1: Proportionally by Row - Spread into one or more rows
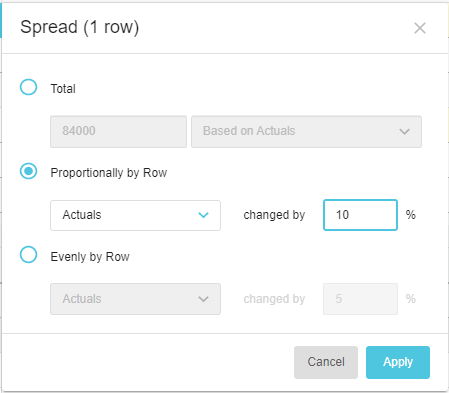
Suppose you expect the Marketing Expense to be proportionally higher this year compared to last year, due to rising costs. If you select last year’s Actuals and enter 10% as your expected increase, last year’s budget or forecast values multiplied by 10% are spread across this year’s budget/forecast period.
Spread into one budget row:
![]()
Spread into multiple budget rows:
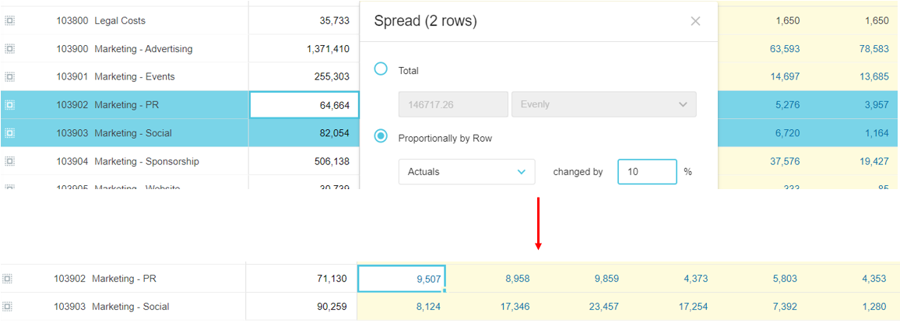
Example 2: Proportionally by Row - Use partial spread across multiple periods
Suppose the budgets for July, August and September this year are 5% higher than last year.
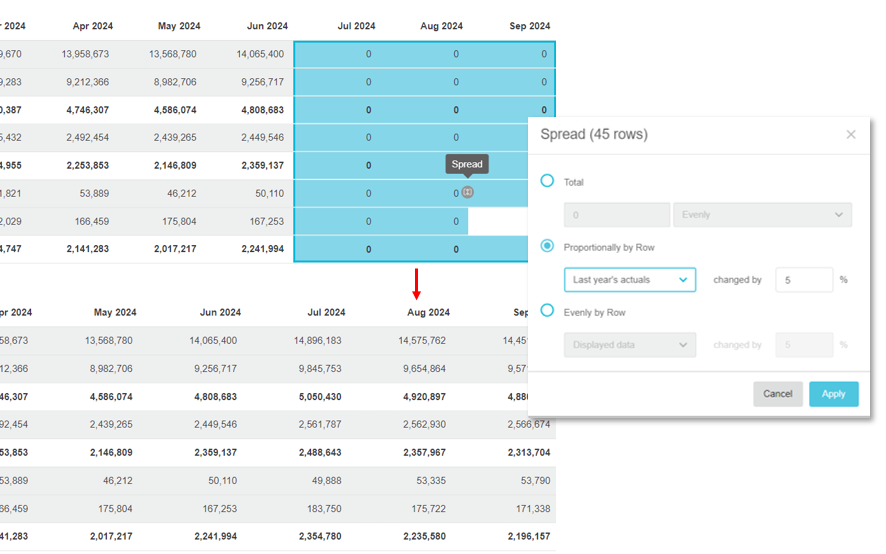
Example 3: Proportionally by Row - Use partial spread to fill in zero values
The partial spread option is particularly useful when you create a budget for the next period based on the current year’s actuals and as a result, the last few months in the new budget have zero values (as the months have not happened yet). In this case, you can spread a value from another comparison row (using the proportionally by row option described below) into those zero cells to fill in the gaps and get a better baseline on which to start the new budget.
Example 4: Proportionally by Row - Fix the baseline values
See the Fix the baseline in a budget page to learn how this spread option used with a 0% change is one way to disassociate a budget from its baseline values, so those values no longer update automatically.
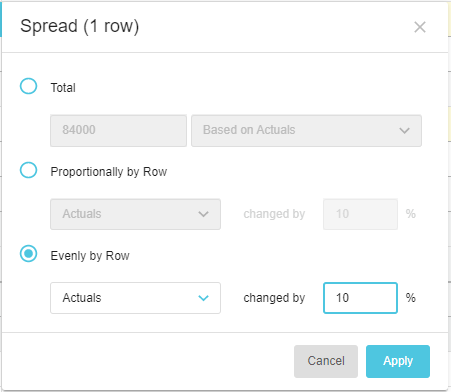
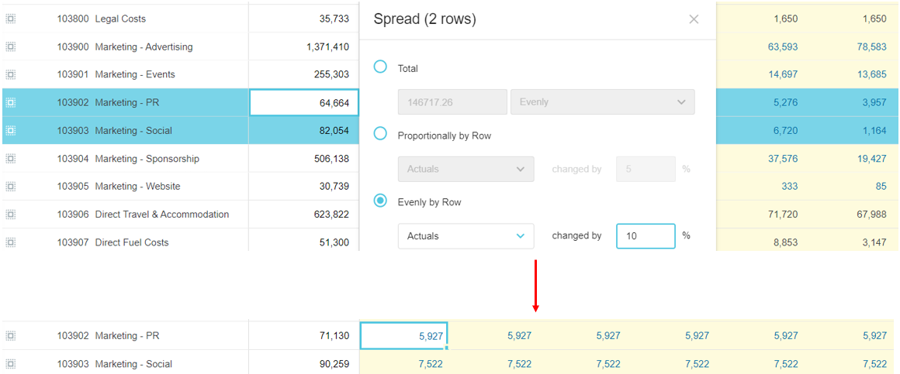
Example 5: Evenly by Row - Spread into one or more rows
Suppose you expect the Marketing Expense to be proportionally higher this year compared to last year, due to rising costs. If you select last year’s Actuals and enter 10% as your expected increase, last year’s budget or forecast values multiplied by 10% are spread across this year’s budget/forecast period.
Spread into one budget row:
![]()
Spread into multiple budget rows:
Target (calculated measures only)
See Calculated measures (driver-based budgeting only) above.
Snap to budget (forecast only)
Watch these videos:
Phocas Academy: Explore the forecast workbook (includes how to spread)
PUG Training: Tracking performance + re-forecasting (jump to 17:47 to see how to use the spread options in a forecast)
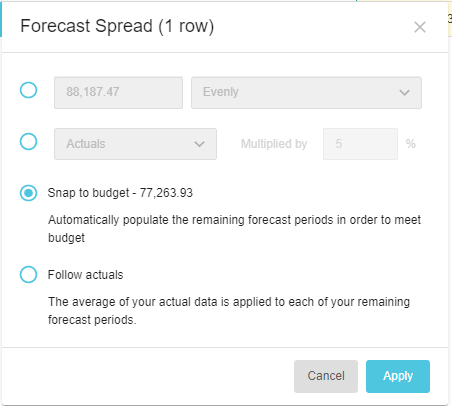
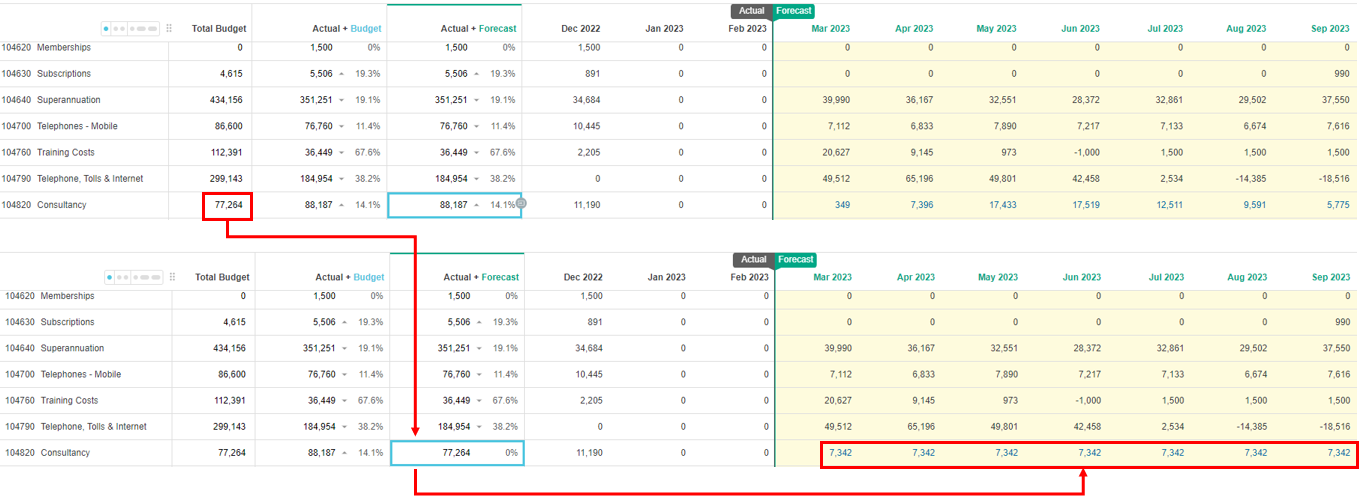
The Snap to budget spread option is available in forecast worksheets only. It aligns the forecasted values with the original budgeted values. This spread option is useful if you know you are going to spend a specific amount per month for the remaining periods.
For example, suppose you usually spend around 6,400 a month on Consulting fees and therefore, have a budget of 77,264 for 12 months. You have already spent 11,190 in the first month, so you might want to snap back to budget, to keep on track. The actuals are subtracted from the budget total (77,264 - 11,901) and the remaining 66,074 is divided by the number of forecast periods (9), so each month in the forecast period gets 7,342.
In the Forecast Spread window, select the Snap to budget option and click Apply.
Follow actuals (forecast only)
The Follow actuals spread option is available in forecast worksheets only.
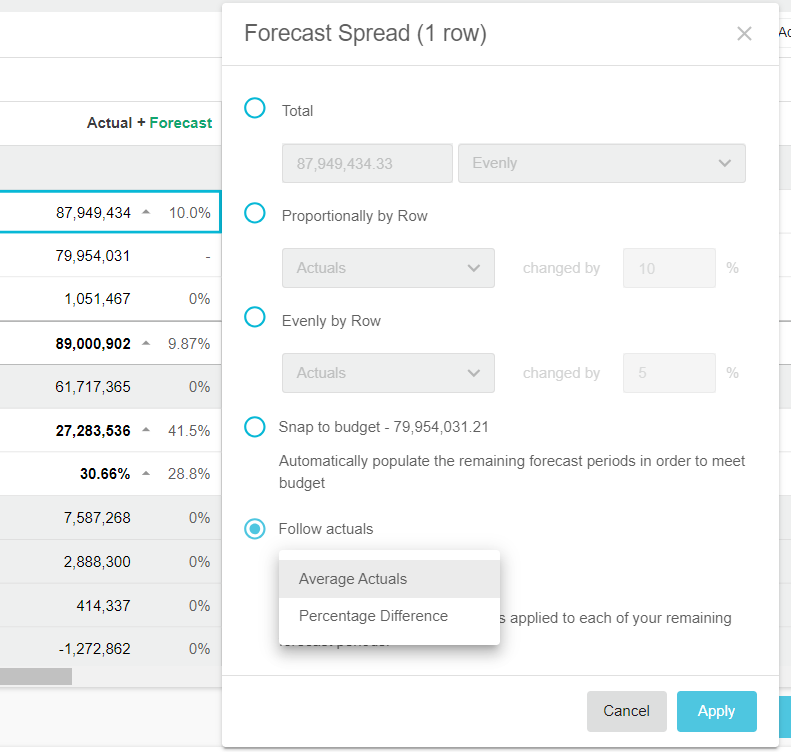
There are two ways to follow the actuals:
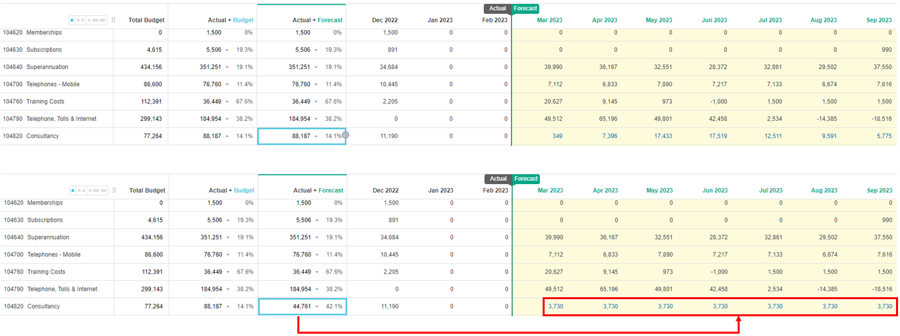
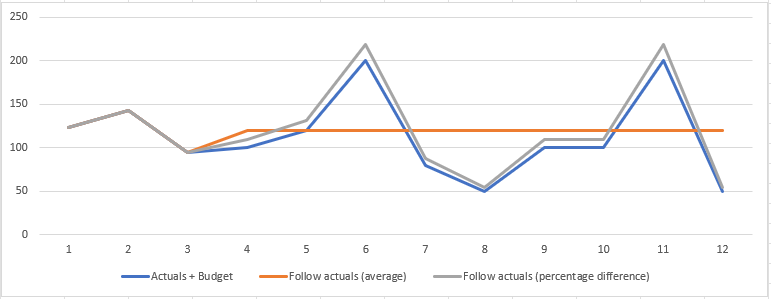
Average Actuals: Similar to the Evenly by row spread option, this takes the average of the actual values and applies that average equally to each of the forecast periods. As a result, each month in the remaining forecast periods gets the same value. This option is suitable for flat expense lines, such as subscriptions or training, where past spending typically predicts the future.
Percentage Difference: Similar to the Proportionally by row spread opinion, this takes the percentage difference between the actual and forecast values and applies that proportionally to each of the forecast periods. As a result, each month in the remaining forecast periods will likely have a different value. As this option takes the budgeted values into account (which might account for seasonality) it is suitable when you want to adjust your forecast figures following the same pattern. You might refer to this as adjusting the run rate.
The outputs of each method are illustrated in the following graph:
In the Forecast Spread window, select the Follow actuals option, then select either Average Actuals or Percentage Difference and click Apply.
Last updated

