Additional measures for driver-based budgeting
User permissions: Budgets & Forecasts and Manage Budgets & Forecasts
A measure allows you to see different elements of the underlying data. For example:
In a Sales database, it is common for a Sales item to have different measures for Price, Quantity, Cost, Margin, and so on.
In a finance database, it is common for General Ledger transactions to have different measures for Local and Reporting Currency.
You can also have statistical items as additional measures, such as FTEs, quantities, and so on.
By default, each worksheet row contains only one measure (such as Sales), but you can include additional measures. For example, you can add the Quantity and Price measures to calculate the sales value.
The option to include additional measures is available when you create an operational budget or add a Database tab or Reference tab, where you define the additional measures by adding rows in the setup. The following row types are available:

Input rows are initially populated with data from the selected stream, measure and offset (time period). This data can be edited during the budgeting process, then published to a measure in the underlying database.

Calculation rows are populated with the result of a formula that references other rows. The results can be published to a measure in the underlying database.

Working rows are blank rows that have no measure attached. Data can be entered into these rows during the budgeting process, then published to a measure in the underlying database.

Reference rows are set up the same way as an Input row (populated with data from the stream) but the data is for reference purposes only, so it cannot be edited during the budgeting process. Reference rows are an alternative to Comparison rows.

Days rows are populated with the number of days in the budget period, according to the type of days you want select. The results can be published to a measure in the underlying database.
![]()
Opening rows allow you to take an opening balance into consideration, similar to what a Balance Sheet does, to track movement in values across the budget period. Depending on your circumstances, this movement might be the quantity of customers, staff, or stock. A common use case for this row is for demand planning as part of inventory or fund management.
![]()
Lookup rows contain data from the Lookup tab. Data can be entered into these rows during the budgeting process, then published to a measure in the underlying database.

Property rows are populated with data about one of your properties (static information stored about dimensions, such as a unit of measure or price list for a product), giving you a way to reference the properties in your database directly within your budget. As the data is for reference purposes only, it cannot be edited during the budgeting process. This option is only available when a dimension has a numeric property. An alternative to using this type of measure is to use the Lookup tab.
Before you start - key concepts and example
Before you start adding additional measures, take a minute to learn about some of the key concepts that might be new to you.
Measures and calculated measures
The Measure dropdown contains a list of the measures you can add as rows in the worksheet. The available measures depend on the selected stream in the underlying database. In Input and Calculation rows, you can only use a measure once. When you select a measure in one of those rows, it becomes unavailable for selection in subsequent rows. It is possible to select the same measure in a Reference row because the data is not published back to the stream.
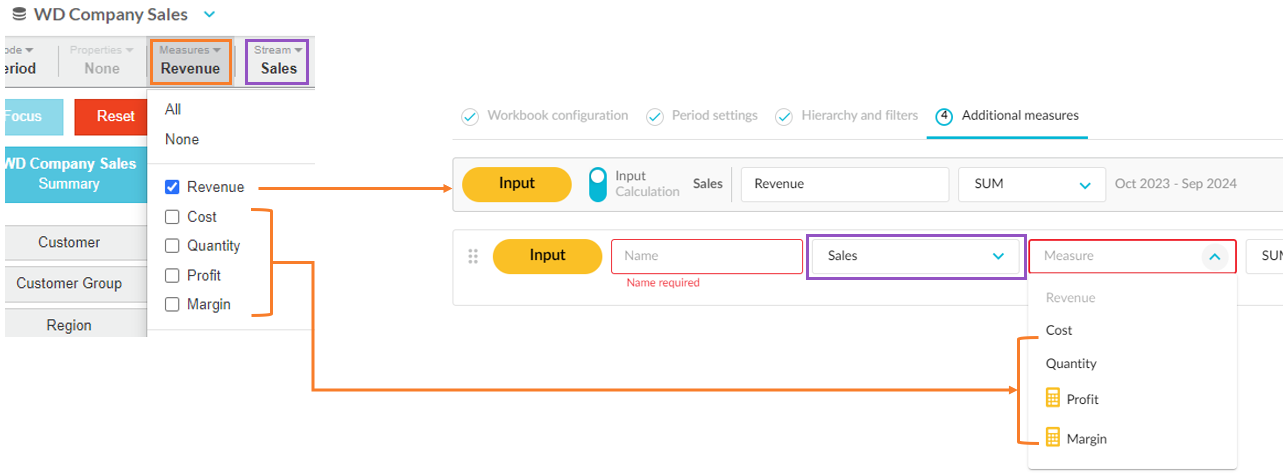
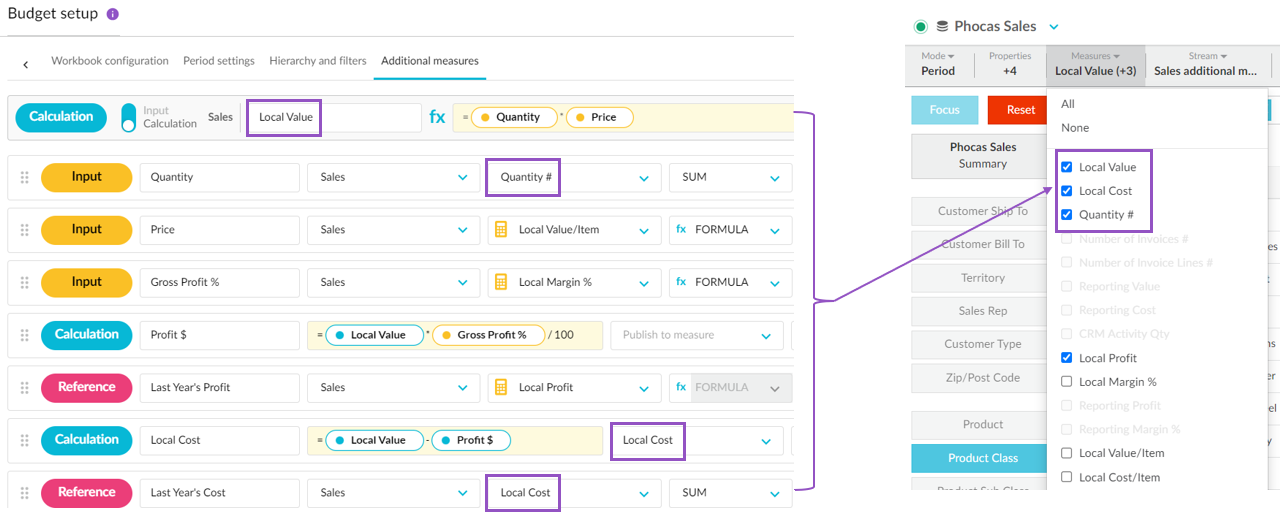
Some measures have a yellow calculator icon next to them to signify they are a calculated measure in the underlying database. Calculated measures are not published to the underlying database. For example, in the image below, you might input the profit when budgeting, however, as this is a calculated measure (Local Value - Cost), it will NOT be published back to the underlying database.
Hover over the icon to view the underlying formula.

Aggregation
The Aggregation setting determines how the value is aggregated in the Total rows in the worksheet.
Learn more about aggregation
You can select SUM, MIN, MAX, MODE, MEDIAN, FORMULA or NONE.
Some aggregation methods are more suitable than others, depending on the selected measure. For example, for a total, such as local value or quantity, SUM is the most suitable, whereas the FORMULA option is more suitable for margin %, as it calculates the value.
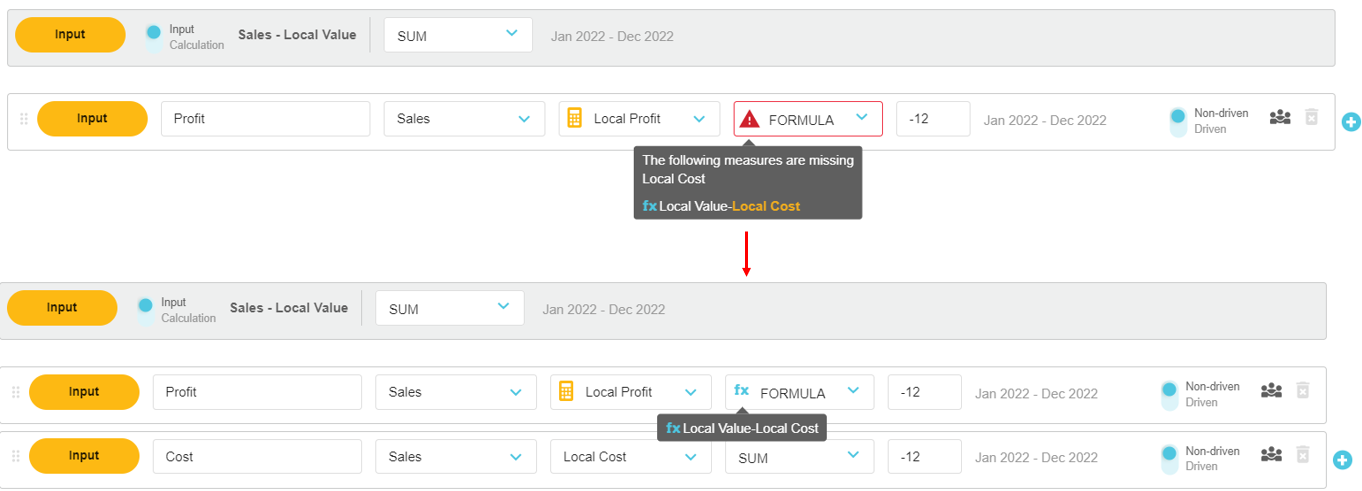
The FORMULA option is selected by default in Calculation rows and Input rows that use a calculated measure. If a red error displays, it means one or more of the formula elements are missing, so you need to either select an alternative aggregation option or add row(s) for the missing element(s). The image below illustrates the latter - the Local Cost measure was missing from the formula, so another Input line was added for that measure.
Example of the process
The following example shows how to create a Sales budget with multiple drivers (Input, Calculation and Reference rows), enter values, and publish the budget. It includes resolving the warning message that displays when elements of a calculated measure formula are missing, and entering some budget values to derive other values automatically.
Example
The context of this example is a Sales budget that is organized by Sales Rep > Product Class.
Step 1: Add the measures
On the Additional measures tab in the budget setup, firstly calculate the Sales Local Value (the quantity that you are going to sell multiplied by the price):
Add an Input row for Quantity and select the Quantity measure.
Add an Input row for Price and select the price measure, which in this database is a calculated measure, Local Value / Item.
Convert the primary Input row to a Sum row and enter the formula: = Quantity * Price.

Next, calculate the profit:
Add an Input row for Gross Profit % and select the local margin measure, which in this database is a calculated measure, Local Margin %.
A warning message displays in the FORMULA aggregation box to inform you that the database does not have the information to calculate this measure - one or more of the formula elements are missing. In this case, the Local Cost value is missing.

You can ignore this warning message if you are using this row for display purposes. However, if you want to use this row to enter data, you cannot publish that data to the calculated measure. You need to publish both the data to the Local Value and Local Cost measures. You have the Local Value (primary row) but you do not have the Local Cost, so you need to add other rows to obtain that measure. As the cost is determined by the local value minus the profit, you need to add a row for the profit and another for the cost.
Add a Calculation row for Profit $ and enter the formula: = Sales Local Value * Gross Profit % / 100. There is no need to select a measure in this case.
Add a Calculation row for Local Cost and enter the formula: = Sales Local Value - Profit and select the Cost measure. As soon as you complete this step, the warning message disappears, as the Gross Profit formula now has all the required elements.

Next, include reference data:
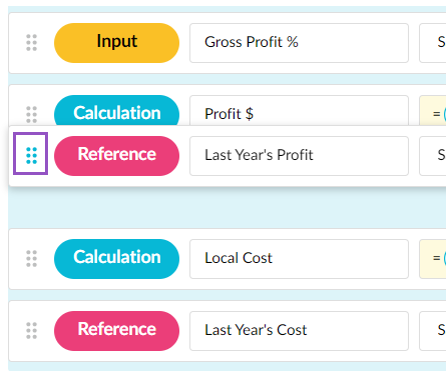
Add a Reference row for Last Year’s Profit and select the Local Profit calculated measure, then move the row up to sit below the Profit $ row.
Add a Reference row for Last Year’s Cost and select the Local Cost measure.

Then, review the additional rows that will be added to the budget and note that when the budget is published to a stream in the database:
The following data will be published: Local Value, Quantity and Local Cost.
The following data will NOT be published, as they are calculated measures: Price (determined by Local Value / Quantity), Local Margin % (determined by ((Local Value - Local Cost) / Local Value)*100) and Local Profit (determined by Local Value - Local Cost).
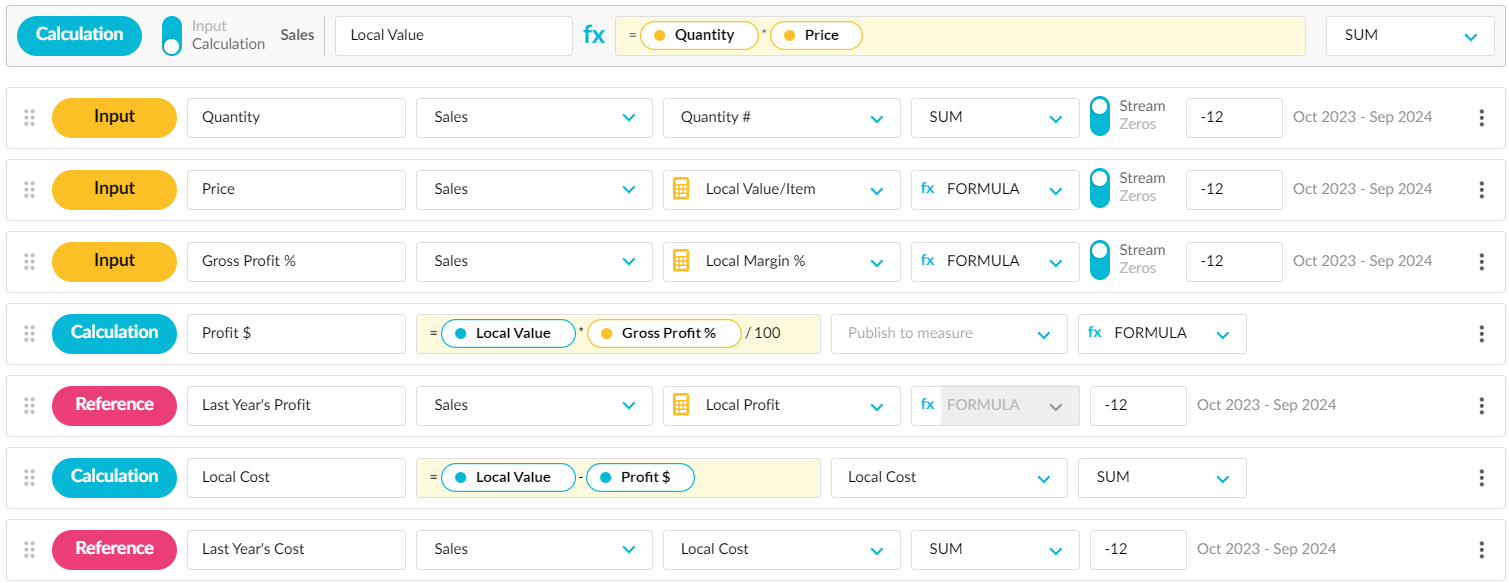
Lastly, click Save and Finish.
Step 2: Review the measure rows, enter the budget values, and publish the budget
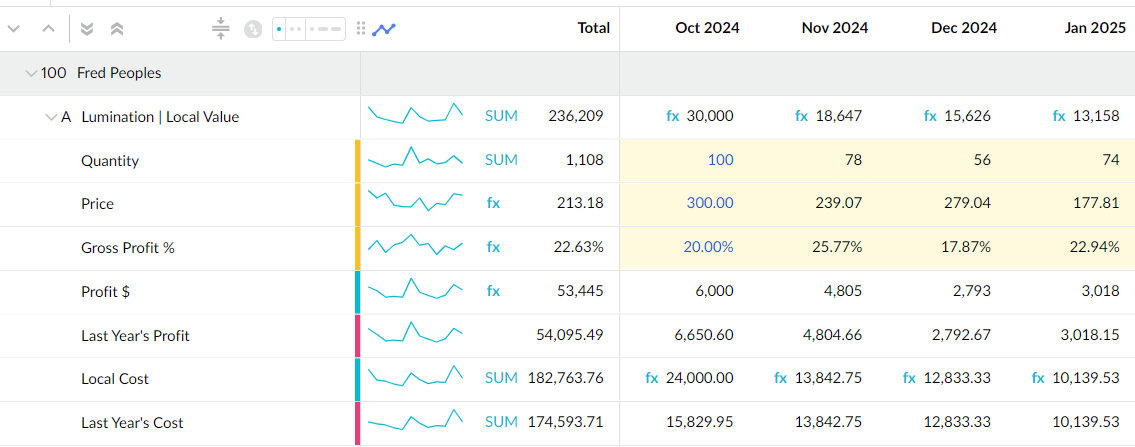
Review the additional rows that were added to the budget. Note that the data in the Reference rows should match the data in the Calculation rows, except for some rounding errors.
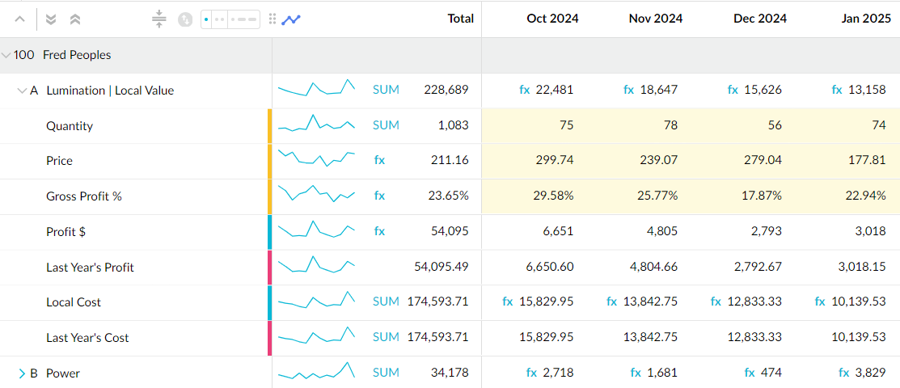
Enter the budget values into the three yellow Input rows. For example, suppose you enter a quantity of 100, price of 300 and the margin of 20% for the first month, the local value (30,000) and the local cost (24,000) are automatically derived.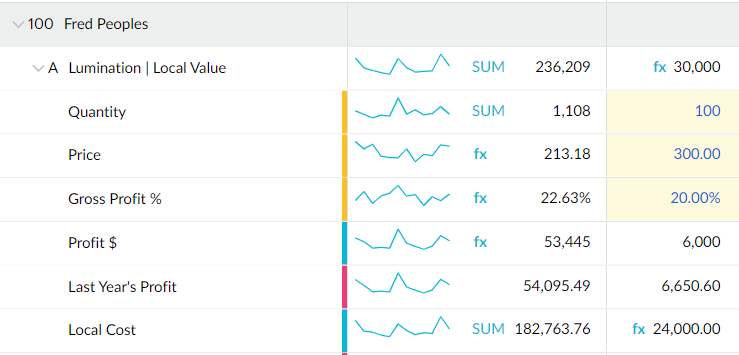
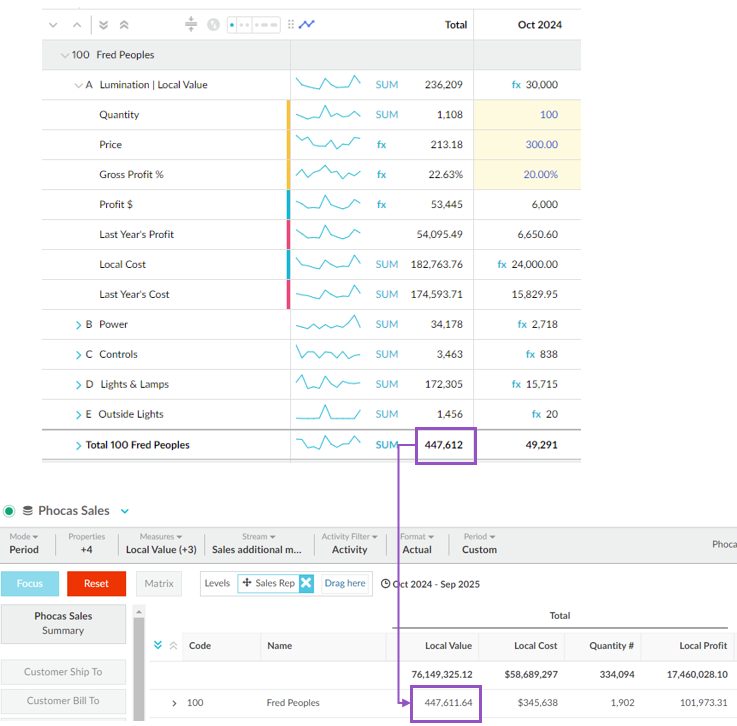
Publish the budget to the stream, then open the database and add the measures to view the published data.

Configure the additional measures
In the setup screen:
There is one primary input row that corresponds to the measure you define in the previous step (screen) in the budget or tab creation process. You can't edit the setup of this input row here; if you need to edit it, go back to that previous step and make your changes there. However, you can change the default label that’s applied to this row to help users identify what the values in the represent.
The primary input row becomes the top-level row in the workbook, under which the additional rows (measures) sit.
You can convert the primary input row to a calculation row (see steps below).
You can add other rows as outlined below.
Add a row
Add an Input or Reference row
Click the blue Add button on the right side of the screen and select Input or Reference as required.
Enter a name for the row.
Choose whether to use Custom or Baseline streams. This option is available if you have multiple baseline value streams in the workbook setup:
Custom (default): Allows you select a stream and use the budget period with an offset.
Baseline: Uses the baseline streams to automatically populate the additional measure.
Change the default stream (data source), if required. This option is unavailable if you're using baseline streams.
Select the measure.
Change the default aggregation method, if required.
(Input row only, when using custom streams) Select the baseline data structure:
By default, this is the same as what was selected for the budget, either a stream or zeros but you might want to select a different baseline for this input row.
For example, you can populate the top-level rows in the budget with data from a stream but then add an input row that contains zeros instead of that stream data.
Change the offset (baseline period), if required. This option is unavailable if you're using baseline streams.
Customize the display format of the measures, if required: Click the menu button (three dots) at the end of the row and switch to Custom format, then define your format.
Lock the row for editing by certain users, if required (see section below).
Add a Calculation row
See the Use formulas page to learn about the functions you can use in the calculations.
Add the other rows that you want to include in your calculation.
Click the blue Add button on the right side of the screen and select Calculation.
Enter a name for the calculation.
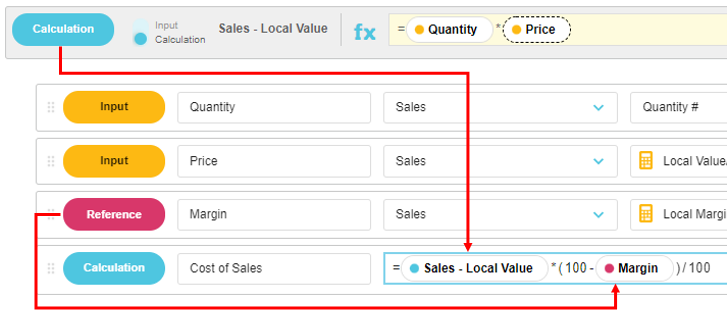
Enter the calculation formula: Click in the calculation box to activate it, then click the header of one of the other rows to insert a reference to that row in the formula. Enter mathematical symbols and reference to other rows, as required. See the following images and watch the video (see link in right panel) for further explanation.
Select the measure in the underlying database to publish the calculation result to, if required.
Change the default aggregation (FORMULA) method, if required.
Customize the display format of the measures, if required: Click the menu button (three dots) at the end of the row and switch to Custom format, then define your format.
Add a Working row
Click the blue Add button on the right side of the screen and select Working.
Enter a name for the row.
Select the measure in the underlying database to publish the data to, if required.
Select the aggregation method.
Customize the display format of the measures, if required: Click the menu button (three dots) at the end of the row and switch to Custom format, then define your format.
Lock the row for editing by certain users, if required (see section below).
Add a Days row
Click the blue Add button on the right side of the screen and select Days.
Enter a name for the row.
Select the type of days you want to use:
Calendar Days: The number of days in each period in the budget. For example, if you have a monthly budget, you will get 30 days for November, 31 days for December and so on.
Week Days: The total count of the number of Monday through to Friday days in the budget period. For example, you will see 20 days in the months that have 4 weeks and 25 days for the months that have 5 weeks.
Working Days calendar: A selection of working days calendars which you can use to calculate the number of days. You administrator sets up the working days calendars for your organization.
Select the measure in the underlying database to publish the data to, if required.
Change the default aggregation method, if required.
Change the offset (baseline period), if required.
Customize the display format of the measures, if required: Click the menu button (three dots) at the end of the row and switch to Custom format, then define your format.
Add an Opening row
The following steps outline how to use the Opening row for inventory demand planning across the year. The monthly opening balance value allows you to monitor your stock levels and see if you're at risk of running out of stock.
First, add the Opening row:
Click the blue Add button on the right side of the screen and select Opening.
Enter a name for the row, such as Stock On Hand.
Change the default stream (data source), if required.
Select the measure that determines the opening value, such as Stock on Hand Quantity.
Select the reference row that determines the movement in values. In other words, which additional measure row will cause the opening value to change. Typically, you need to add other measure rows to set up the reference row, so you can come back to this setting after you complete the steps below.

Next, set up the reference row:
Add an input row for the Sales Quantity. This is the number of items you expect to sell.
Add an input row for the Purchase Quantity. This is the number of items you’re going to buy.
Add a calculation row for the end of month stock value (EOM Stock). This is the quantity of stock you expect to have at the end of the month, starting with the opening balance (Stock on Hand Opening row), taking away the sales (Sales Quantity Input row) and adding in purchases (Purchase Quantity Input row). In other words, this is the movement of stock over the month. You're left with a closing balance, which becomes the opening balance for the next month.
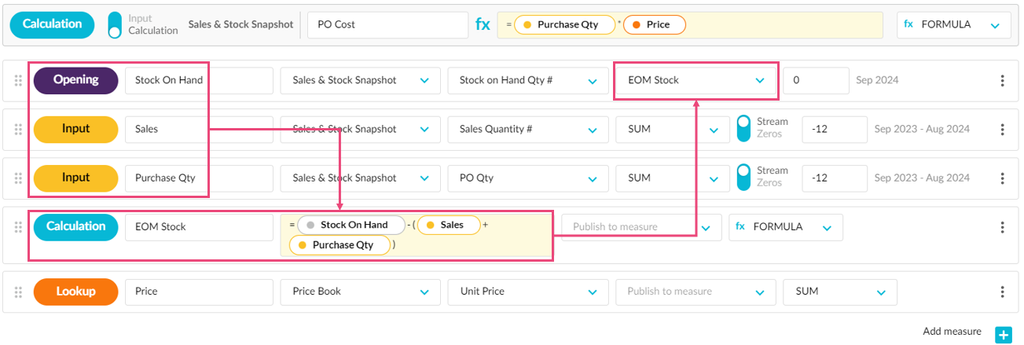
Lastly, return to the Opening row and complete its setup:
Select the reference row (EOM Stock).
Change the offset (baseline period), if required.
Customize the display format of the measures, if required: Click the menu button (three dots) at the end of the row and switch to Custom format, then define your format.
Add a Lookup row
See Add a Lookup tab for more information, steps and videos.
Add a Property row
Click the blue Add button on the right side of the screen and select Property.
Enter a name for the row.
Select the budget dimension, then select the property within that dimension.
Mark a row as driven (Database tabs only)
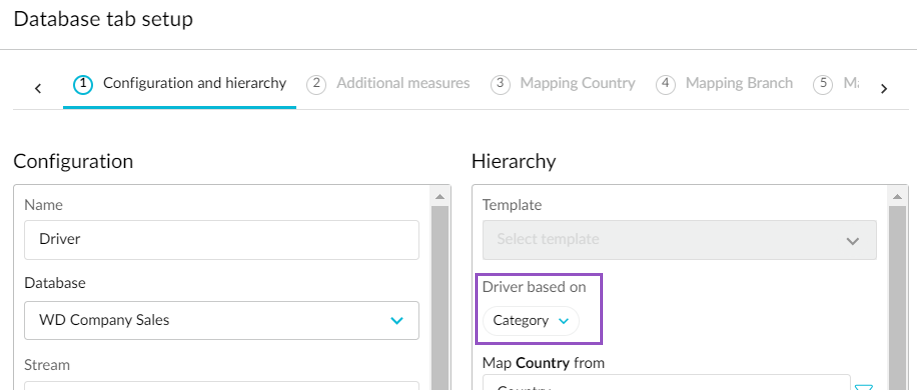
If you are adding rows in the setup of a Database tab, you have the option to configure which of the rows drive the corresponding categories in the Main tab of the budget workbook. Select the Driven toggle button as required.

If you do mark a row as driven, ensure you have selected the appropriate category on the first screen of the Driver setup.
Lock a row for editing by certain users (Input and Working rows only)
You can manage who can edit individual Input and Working rows. This action allows you to add a layer of security around budget values, as you can be sure that only the appropriate people can edit certain budget values. You can change this setting at any time, as your budget workflow progresses.
For example, in an Input row, you can allow the data, such as product price, to be initially input by the pricing manager (administrator), then lock that row, so that budget contributors cannot edit the price data.
Three editing options are available, in order of full to restricted access:
Everyone (default) - all budget contributors can edit the values in the row.
Budget administrators - only the budget administrator(s) and owner can edit the values in the row (and change this setting).
Budget owner - only the budget owner can edit the values in the row (and change this setting).
Click the menu button (three dots) at the end of the row, then select the required role.

Watch this video (note the UI is out of date but the context is the same):
Reorder the rows
The order of the rows on this screen corresponds to the order in which the rows display in the corresponding budget worksheet.
Click and hold the Move button on the left side of the row (a blue background displays), then drag the row up or down to its new position.
Convert the primary input row to a calculation row
In the primary input row, click the blue Input button. To convert back to input format, click the button again. See the Add a calculation row section above for information on how to enter formulas.

View the additional measures rows in the worksheet
When you exit the setup screen, expand the dimensions rows in the worksheet to view the measures rows you added, along with the data that is pulled in from the selected streams. Colored bars help you to identify and differentiate the types of measures, for example, the input measure has a yellow bar. You can hover over these bars to view the measure type name. The format of the measure values, such as percent or decimal place, comes from the underlying database. Where the formatting is not specified in the database, values are rounded to the nearest whole number.
View driver-based budget data in the underlying database
When the budget data entry is complete and you publish the budget workbook as a stream in the underlying database, you will see the published data for the measures.
You need to wait for the database to be rebuilt before you see the measures.
Last updated
