Perform an advanced search
Use a rules-based search to locate very specific data in Analytics.
Whereas a basic search is suitable for quick, ad hoc analysis, an advanced search is typically used for creating a report or favorite. For example, you might want to identify customers whose sales have declined by more than 5% over the last 3 months.
You can continue your analysis while an advanced search is active. If you switch between dimensions, the rules are retained and applied to the other dimensions.
Watch the videos at the bottom of the page for demonstrations and example use cases.
Access the advanced search
Use one of these methods:
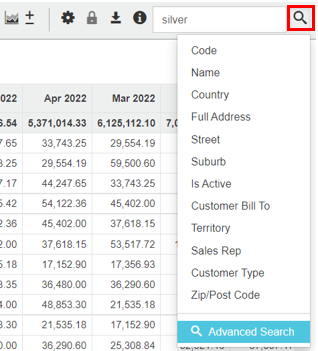
Type a keyword into the Search box, click the Search button, then select the Advanced Search option.
When the Search box is empty, click the Search button or press Alt+S on your keyboard.
Create an advanced search rule
Advanced searches are based on rules that you create. Each rule has two key elements:
Rule type (purple boxes in the image below): There are five types of rules you can create for a selected entity: Entity, Property, Measure, Variance, and Calculation. You can use these rules individually or combine multiple rules for a more detailed search. There's detailed information on each rule type below.
Search type (red boxes in image below): For each rule type, several search types (operators) are available: Equal To (default), Not Equal To, Less Than, Greater Than, Like, Not Like, Between.
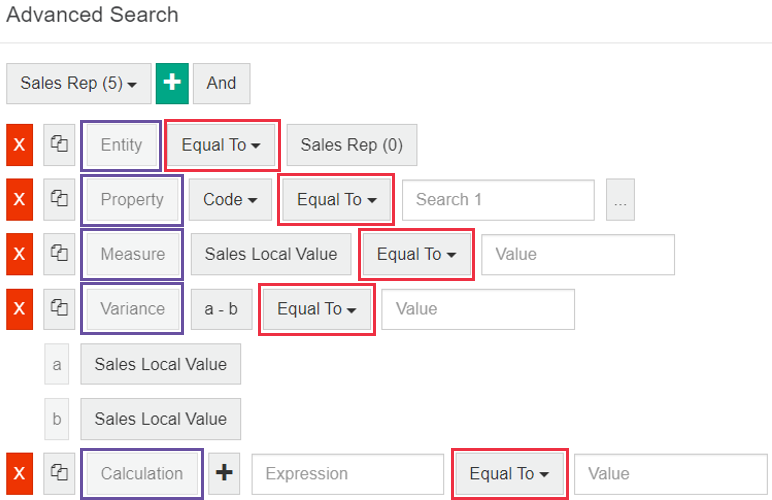
Rules can range from a simple property rule, such as ‘city = Newcastle’ to multiple rules involving more than one dimension, such as ‘customers whose sales have declined for the last three consecutive months, who spent more than $10,000, who are located in the North region and who buy brand X’.
Detailed instructions are below but the basic process for performing an advanced search is as follows:
Select and focus on the data as usual. It is recommended that the advanced search is the last step in your analysis.
Access the advanced search (see above).
In the Advanced Search window, change the default selected dimension, if required.
Click the New
 button and select a rule type. A blank 'rule' displays. Repeat this step to add more rules as required.
 If you are creating multiple rules, select the condition (AND or OR) you want to apply. Use AND when you want the search result to match all the rules. Use OR when you want the search result to match at least one of the rules.
Configure the rule(s) as required, then click Apply.
Save your advanced search as a favorite. If you do not save an advanced search as a favorite, it will remain active until you clear it, reset the data or exit the database.
Entity rule
An entity is a row of data within a dimension, such as customer, sales rep, product, vendor, account, and so on.
The Entity rule is based on a selected entity (or multiple entities) and it returns the same result as the action of selecting and focusing on data in the grid. The Entity rule is the most basic of the advanced search rules, as you are not entering information, just making selections. For example, Brand = ACME, or Rep = Harry and Daisy. Therefore, the search type options are restricted to Equal To and Not Equal To. Typically, you use an Entity rule to supplement other rules; you would not use it in isolation.
If you select and focus on data before starting your advanced search, the Entity rule is already populated for you, which is faster than manually creating it.
After adding the rule, start by selecting a search type. Next, click the dimension button to display an alphabetical list of all available entities within that dimension. You can filter the entity list by typing a keyword into the text box or browse the list of entities, then select the required entities.
Example: View data for all territories, except for the seven territories in Australia:

See the example in the multiple rules section below to learn how to use the Entity, Measure and Variance rules together to locate declining customers who have spent a particular amount.
Property rule
A property is a type of information stored about a dimension. Properties display as columns in the grid when you select a dimension.
The properties that are available in the Properties rule depend on the dimension that you select. For example, the Product dimension might have the Code and Name properties only, whereas the Customer dimension might have Code, Name, Address, Sales Rep, Customer Type and more.
After adding the rule, click the default property button (usually this is Code) to view a list of the available properties and select the required property, then select the search type and enter a search term or value.
Example: Get a list of all customers whose zip (post) code is between 2000 and 2100.

Measure rule
A measure is a type of numerical data, such as value, quantity, profit, margin.
The Measure rule allows you to create a rule based on the measures in your current database. This rule contains various settings you can use to define the measure, including the ability to select a period type and specify dates. As it includes period information, the Measures rule is more advanced than the Property and Entity rules.
After adding the rule, click the default measure (usually something like Sales Local Value) button to open the Measures window and proceed to define the measure. Then select the search type and enter a value.
A common mistake is to assume that a measure-based advanced search is automatically filtered by selections made either before entering advanced search or subsequently. For example, using a measure rule to find all customers with a sales value greater than $1m will return all customers with sales over that value. If you then focus on another dimension, such as Product Group and display the customers, it is quite probable that the list will include rows where the sales value is less than $1m. This is because the selection of customers based on their total sales is acting independently of the filtered display. If you want to only see the customers with total sales greater than $1m for a specific Product Group, you need to edit the rule and add the selection via the Selections tab. See Define the measure to learn how to do this.
Example: Identify the sales reps who earned sales revenue of less than $100,000 in the financial year to date.

See the example in the multiple rules section below to learn how to use the Entity, Measure and Variance rules together to locate declining customers who have spent a particular amount.
Variance rule
The Variance rule uses a simple algebra to make a comparison between two variables, ‘a' and 'b’. The Variance rule allows you to compare two different measures. For example, you might want to find sales reps who are performing below the budget level.
After adding the rule, click the measure button for variable a to open the Measures window and define the measure. Repeat for variable b. Next, create the rule to determine the difference between those variables. By default, the operation a - b (the value of measure a minus the value of measure b) applies but you can click the a - b button to switch to a % b (the value of measure a minus measure b expressed as a percentage of measure b). Then select the search type and enter a value.
Example 1: Identify sales reps who are performing better than budget
This basic example uses one Variance rule to identify sales reps whose sales were more than 10% over the budget.

Example 2: Identify declining customers
This more complex example uses three Variance rules with offset dates to identify customers whose sales have declined at least 5% per month for the last three months in a row, not including current month. Firstly, create one rule, using the a % b operation and the Less Than search type. In the Measure window, for both variables a and b, select the required stream and measure, and the Custom (Month) time unit and Offset option. Enter the start and end offset of -1 for variable a and -2 for variable b. Copy that rule two times, then edit each rule, so that the start and end offset in the second rule is -2 for variable a and -3 for variable b, and in the third rule, is -3 for variable a and -4 for variable b.
After applying the rule, apply a custom period to the grid to reflect the search results.
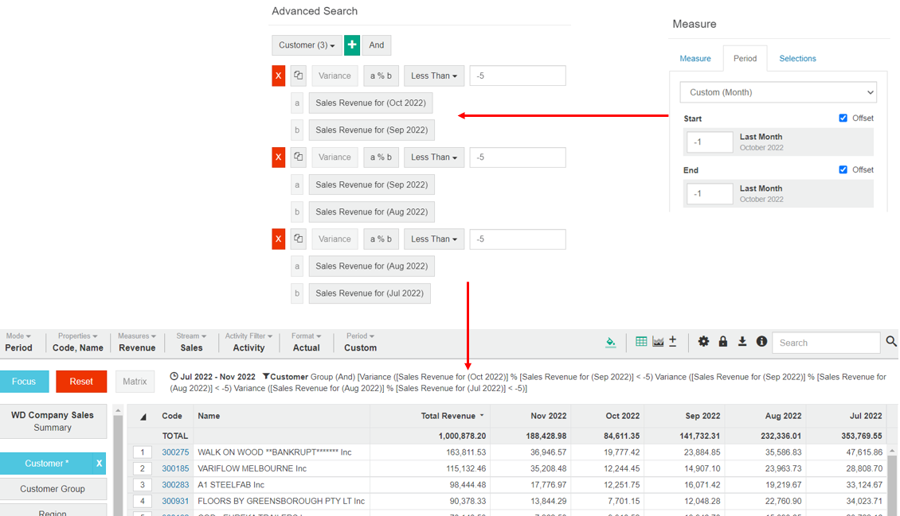
See the example in the multiple rules section below to learn how to use the Entity, Measure and Variance rules together to locate declining customers who have spent a particular amount.
Calculation rule
The Calculation rule allows you to use basic mathematical operations to write your own rule based on a number of variables ('a',' b', 'c' and so on) that you define as measures or numerical properties.
After adding the rule, click the Add (plus) button > Measure to add a variable, then click the measure button to open the Measures window and define the measure. Repeat this step to add and define the other measures. Next, enter the relevant mathematical expression, in which you can use plus, minus, multiply, divide, brackets and numbers. The standard order of operations is followed, where multiplication and division operations are processed before addition and subtraction, regardless of position in the expression. You can use brackets to override that order. Lastly, select the search type and enter a value.
Example 1: Identify customers whose average profit for a period is more than a certain amount
This example uses one Calculation rule with two variables to identify the customers whose average profit for January (variable ‘a') and February (variable 'b’) is more than $1000.

Example 2: Identify products that exceed the sales target
This example uses a Calculation rule with three variables to identify products that exceeded a promotional target. Suppose you are planning a new promotion and want to have a look at the results the promotions you ran this time last year. There were promotions on three separate weekends in December, in which you want to identify all products that exceeded the target of $10,000 in sales.
In the Sales database, select the Product dimension, then access the advanced search and create a Calculation rule as follows:
Add one variable (measure) and select the Stream > Sales and Measure > Value. On the Period tab, set the time unit to Day and set the start date as 2nd December and the end date as 4th December.
Next, copy that variable two times. Edit the date of variable b to start on 12th December 2021 and end on 13th December. Edit the date of variable c to start on 23rd December 2021 and end on 26th December.
Then, to add up the sales on all the promotional days, enter the formula a+b+c into the Expression box.
Lastly, select the Greater Than search type drop and enter 10000.
Your set of rules should appear similar to the image below. Click Apply.
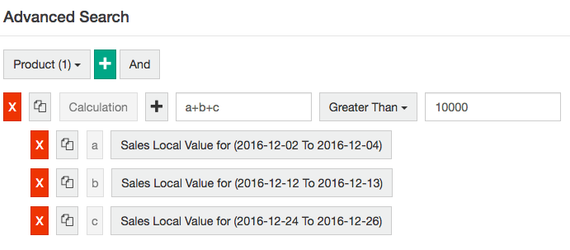
A list of products that have exceeded sales of $10,000 on promotional days will appear and a summary of your advanced search rules will appear in the Status bar.
Note: Your grid settings might not match your advanced search settings. For this particular example, the results will be best viewed in the product dimension, period mode, measures set to value, with Periods set to show days in December.
Use multiple rules together
Use a combination of rules to perform more complex searches for different kinds of information.
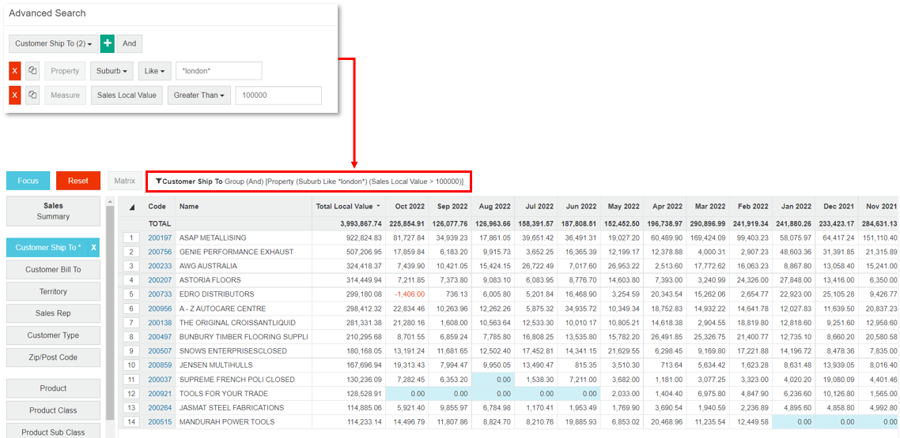
Example 1: Identify customers located in London with revenue more than $100,000
In this basic example, a property and measure rule were created for the Customer dimension using the AND condition. It returns a result of 14 customers located in London who generated revenue of more than $100,000.
Example 2: Locate declining customers who spent a particular amount
This example combines several search rules to locate Harry’s declining customers (over the past 3 months) who have spent more than $1000 this year.
Step 1 In the Sales database, access the advanced search.
Step 2 Set up rule 1:
Select 'Reps' from the dimension dropdown box.
Select Plus > Entity.
From the Entity button choose 'Harry' from the list.

Step 3 Set up rule 2:
Select the 'Customer 'dimension.
Select Plus > Measure.
Set the measure to Stream = 'Sales' and Measure = 'Value' (see Define a measure) and Apply, then choose Greater than and enter '1000 'in the box. Note: Because we did not specify a period in this rule, the active period will apply.

Step 4 Set up rule 3 (actually a set of three similar rules)
Stay in 'Customer' dimension.
Select Plus > Variance.
Set the measure to Stream = Sales and Measure = Value (see Define a measure) and in the period tab, choose offset dates, and set a to be last month (-1), and b to be two months ago (-2). Apply.
Clone this rule, and in the period tab, change 'a' to be two months ago (-2), and b to be three months ago (-3). Apply
Clone this rule, and in the period tab, change 'a' to be three months ago (-3), and b to be four months ago (-4). Apply.
Results: A list of Harry’s declining customers over the past three months (not including current month) who spent more than $1000 for the year will be displayed in the grid and a summary of the advanced search rules will appear in the status bar. An asterisk will appear on the 'Customer' dimension.
It would be useful to save this as a favorite. Because offset dates were used, you can use this favorite in the future and it will automatically update.
Note: Your grid settings may not match your advanced search settings. For this particular example, the results will be best viewed in the customer dimension, period mode, measures set to value, with periods set so that the year to date (months) are visible.
Copy, edit or delete a rule
You can edit the rules you apply to an advanced search, for example, if you make a mistake or want to try a different scenario. If you need to create a number of similar rules, you can copy one an entire rule or a variable within a calculated rule. This will add a new rule directly below the current rule with exactly the same settings, which you can edit as required.
In the Advanced Search window:
To copy a rule, click the Clone button.
To edit a rule, make your changes to the existing rule elements.
To delete an individual rule, click its Delete button. To delete all rules, click the Clear button in the bottom left corner. Alternatively, see the Clear the search results section below.
Click Apply to continue with your analysis.
View the search results in the grid
As with the other ways to search for data, when you perform an advanced search, in effect, you filter the grid to display only the data that meets your specified criteria, which in this case, is your search rules. Any totals or averages that display in the grid then relate only to the filtered data. The status bar above the grid identifies the filters (search rules) and an asterisk displays on the corresponding dimension to signify that a filter (search) has been applied.
Save the advanced search results as a favorite
When you are satisfied with the returned search results, you can save your advanced search as a favorite. This action saves the rules you applied to get the results, not the actual list of results returned, to ensure that the results are dynamic. For example, an advanced search set to show declining customers might return a list of 45 declining customers. Saving this search as a favorite saves the search rules, not the 45 customers. The next time this favorite is opened, a different list of declining customers is likely to appear, as the data has changed in the meantime.
Clear the search results
As mentioned above, when you perform an advanced search, an asterisk displays on the corresponding dimension button. Click the X on the dimension button to clear the search results (remove the filter).
To completely reset the data, click the Reset button.
Videos
Watch these other videos:
Phocas demo: Track profitability of sales
PUG Training: Advanced search + Phocas extras
Last updated
