Add more detail to a budget or forecast
Add more levels, entities, accounts, and categories to a budget or forecast.
User permissions: Budgets & Forecasts and Manage Budgets & Forecasts
The information below refers to budgets but the same process applies to forecasts.
When you create a budget workbook, it has one worksheet tab, the Main tab, where your budget sits. During the budgeting process, as time progresses and circumstances change, you can add worksheet tabs and the following items to the budget: level, entity, account, and category.
Read the Best practices for efficient budgeting page before you start adding more data into a workbook. The addition of more data into a workbook might negatively impact its performance.
Add a level
To budget at a more detailed (granular) level, you can add additional levels (dimensions) to the Main tab. For example, if you have a budget set up to budget by Country and Branch, you could add a level for Product Class underneath each Branch.
You can have up to six hierarchy levels in the Main tab. However, levels work differently in the two types of budgets (financial and operational).
Financial budget levels
In a financial budget setup, you can add up to four levels in addition to the two default levels of Category and Account (2+4=6). The levels are visible on the top right of the worksheet, and you can see the hierarchy when you expand the worksheet. For example, in the following image, you can see one level was added for County, bringing the total levels to three.
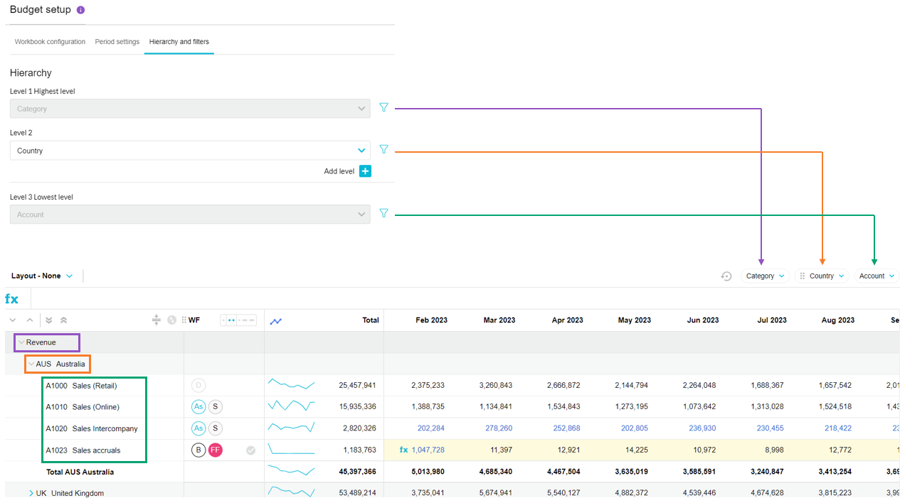
You can return to the budget setup to add more levels at any time. It's best to do this before you start budgeting, in other words, before you edit any values in the worksheet, as there'll be little impact. While you can add levels later in the budgeting process, it'll likely result in the loss of entered data as you've changed the underlying structure of the budget. You'll get a warning message about this.

Operational budget levels
In an operational budget setup, you can add up to six levels of your choice. The levels are visible on the top right of the worksheet, and you can see the hierarchy when you expand the worksheet. For example, in the following image, you can see three levels were added: County Region and Sales Rep.
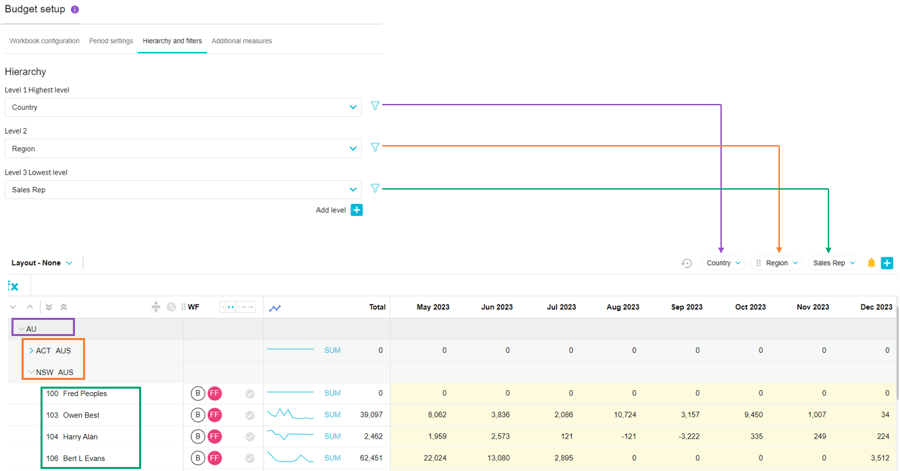
You can return to the budget setup to add more levels, or you can do it within the worksheet via the blue Add button next to the levels on the top right of the worksheet. For example, if you initially added four levels in the budget setup, you can add two more in the worksheet (4+2=6).
After you add the level, the worksheet page reloads. You can then expand the lines to view the additional levels of data.
The level you add displays in blue, to differentiate it from the levels that were added during the workbook or worksheet setup.
If you change your mind or make a mistake, to remove the new level, click the blue Delete button next to the level name, then click Delete to confirm.

Add a dimension entity or account
There might be times when you expect a specific dimension entity (such as a country, branch, or product), or General Ledger account code (such as 805 Conference Expense), to be in the budget but it isn't there. The most likely reason for why the item isn't there is that it had no activity in the baseline period upon which the budget is based. In other words, the item isn't in the transactional data coming from your ERP system.
When you want to include a new dimension entity or account in a budget or forecast, the best thing to do is add it into your ERP system because then it'll flow through to Phocas. However, sometimes it's not possible to do this. One reason is you don't have the required information to add the item to your ERP today, but you want to do your budgeting today (for a future time period).
Examples of why you might need to add a dimension entity
When the item is in your ERP:
Your organization now receives interest income from a new source in the UK. Previously, such income was only received from the USA. To reflect this change, the UK has been added as an entity within the Country dimension in your ERP system. You now need to include the UK in your financial budget, under the Other Income category.
You prepared an operational budget based on your Sales database. Later in the year, your organization opened a new sales branch in Australia. The new branch has been added as an entity within the Branch dimension in your ERP system. You now need to add this branch to your budget, under the appropriate Country dimension.
Your organization is releasing a new product, which is being sold exclusively by Sales Rep (Sam). The new product has been added as an entity within the Product dimension in your ERP system. You now need to add this product to your Sales budget, under Sam, who belongs to the Sales Rep dimension.
When the item isn't in your ERP: Your business is opening a new branch in Australia. You want to include that branch in next year's budget, but as it hasn't opened yet or started trading, there's no transactional data for it, so it doesn't exist in your ERP. As a result, it doesn't exist in Phocas either.
Examples of why you might need to add an account
Suppose that due to the Coronavirus restrictions in the previous period, your organization had no entertainment expenses but this year, things are returning to normal, so you want to budget for those expenses. You need to add the Entertainment account.
Suppose your organization holds a conference every second year and therefore, incurs additional expenses every second year. The related expense accounts will only display in your budget for those years, so you need to add them into the other years.
You can add these items into a budget in Phocas, however, the steps differ depending on the circumstances:
If the item had transactions in the past and is mapped to a category in the underlying financial statement, you can manually add it to the budget using the steps below (dimension entity or account).
If the item has never had any transactions, you first need to create a dummy transaction file that contains that missing item, then add and map that file in Designer. You might want to contact our Support team for help with this task. Below is an example of a file you'd use to add a dimension entity to Phocas. The Date column has the first day of the year. The other column is called the dimension name (Trading Entity) and it contains the name of the new trading entity.
 When the dimension entity is in Phocas, you can manually add it to the budget using the steps below.
Add a dimension entity
On the Main tab, expand the rows to the applicable dimension, for example, the Other Income category in a financial budget.
Hover over the dimension row, then click the blue Add button that displays.
Select the dimension entity you want to add. You can select multiple entities.
Select the applicable option:
If you are in a financial database, either:
Select the Add selected entities directly option to add the dimension entity row to the worksheet without any account (child) rows. You can manually add accounts later.
Select the Clone revenue accounts from option, then select the dimension entity from which you want to clone the accounts, for example, the USA.
If you are in an operational database, select the dimension entity from which you want to clone the structure, for example, if you are adding a Sales Rep, you can clone the product class entities from another Sales Rep.
Click Add Selected.
View the new row in the worksheet.
Example of adding a dimension entity row with no accounts (worksheet is in unpruned view):
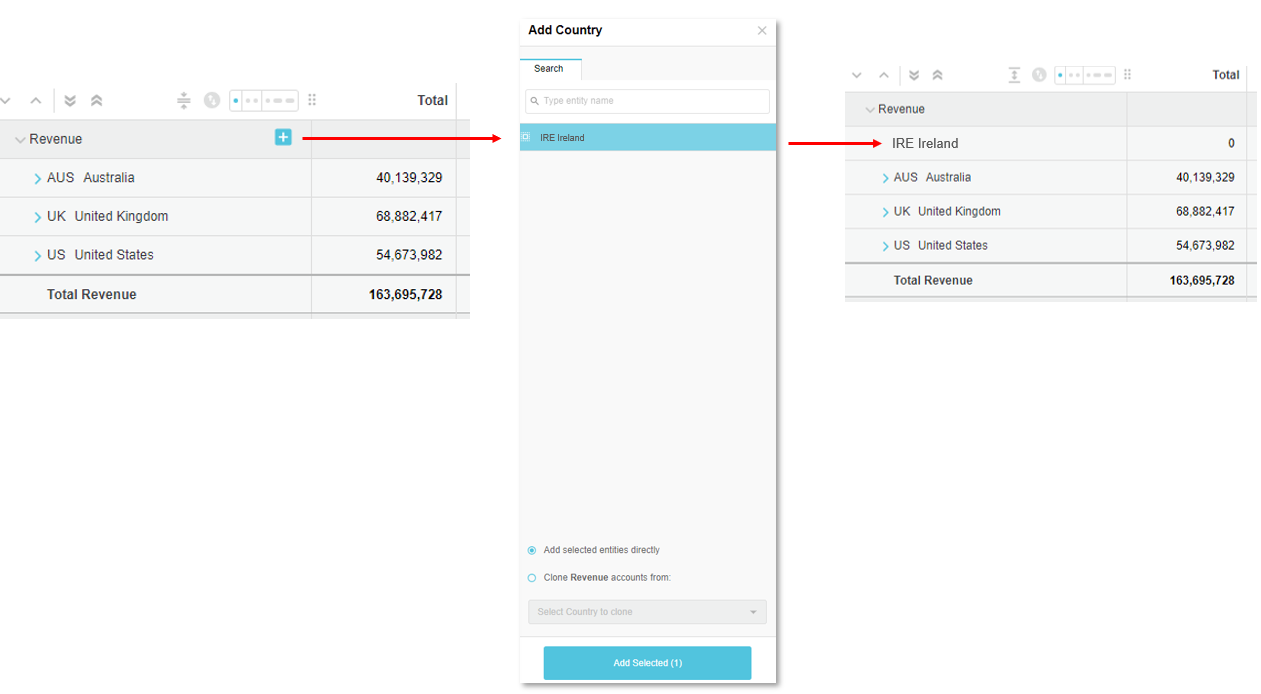
If you added the row without accounts, you need to switch to the unpruned view to see the row. Example of adding a dimension entity row with accounts copied from another dimension entity:
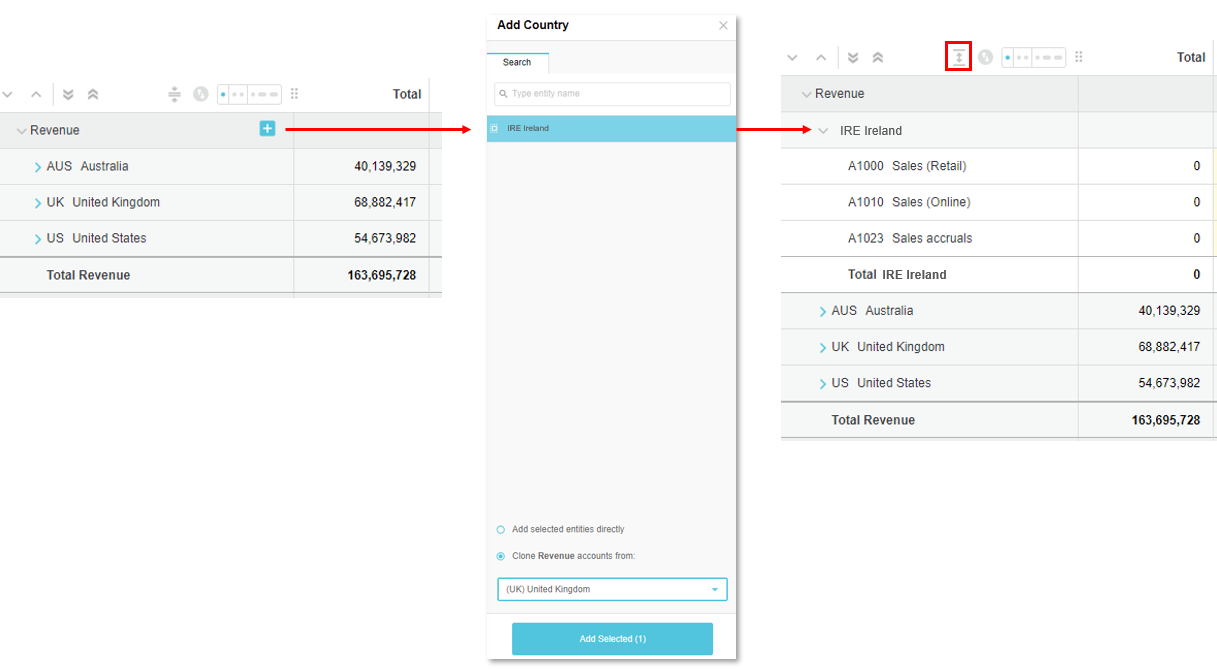
Add an account
Ensure the account is mapped to a group in the financial statement in the Financial Statements module. The account will only become available to be added after you add it to the applicable category in the Financial Statement, and you can't do that until there has been some activity against the account.
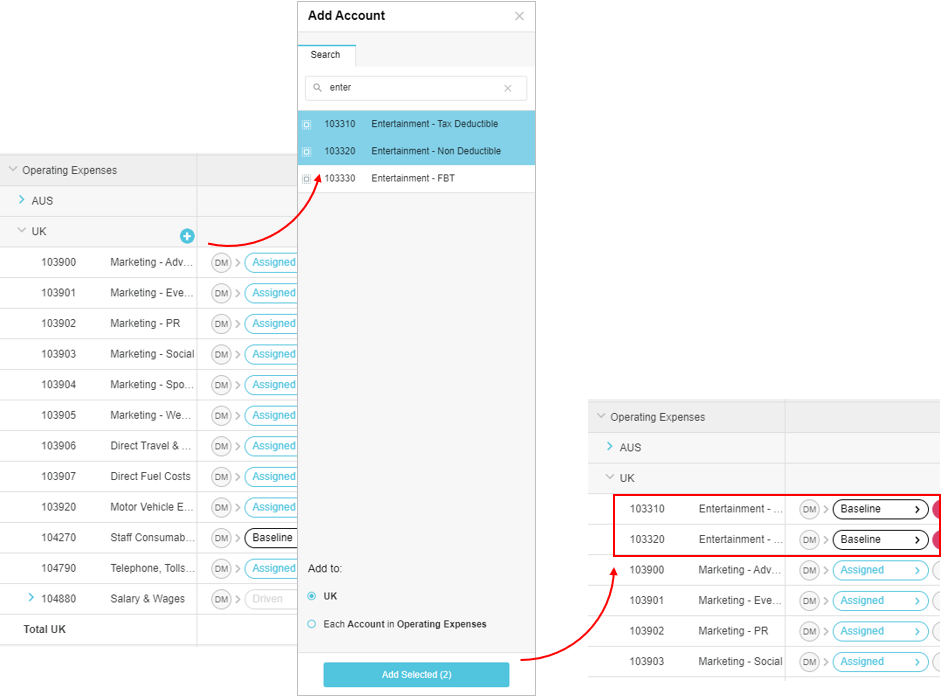
In Budgets & Forecasts, on the Main tab, expand the rows to the applicable category and dimension. For example, Operating Expenses > UK.
Hover over the dimension entity row (UK), then click the blue Add button that displays.
Select the account you want to add, for example, Entertainment. You can select multiple accounts. If you don't see the required account in the list, it means the account is not available to be added, as it has not been mapped to a category in the financial statement.
Take the applicable action:
To add the account to the selected dimension entity only (UK), leave the default option selected.
To add the account to each dimension entity in the category (UK and USA), select the “Each Account in…” option.
Click Add Selected. Additional rows for the new accounts(s) display in the budget.
Delete (remove) a dimension entity or account
You can delete specific dimension entities or accounts directly from your budget or forecast. This is one way to filter out items that are not required or are no longer relevant.
For example, suppose you have a customer for whom you no longer prepare a budget or forecast. You can remove that customer from the workbook, avoiding the need to apply a filter in the workbook setup. The problem with applying a filter in the workbook setup in this scenario is that any new customers would have to be manually added to the filter in the setup, which can lead to confusion, omission and additional administration overhead.
When you delete an item, it is removed from the setup of the workbook and therefore, it won't display for any user, won't contribute to any total, and won't feature in any filter menu. You can add the item back again (see above), however, any changes to the baseline value including workflow, cell comments and cell history, are lost when the item is deleted.
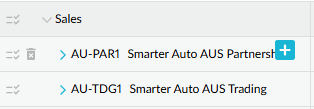
Hover over the left of the item's name and click the Delete button that displays, then click Delete to confirm.
Add an account group (category)
If you add a new account group (typically a category) to your Profit and Loss statement in Financial Statements and you map accounts to that group, the group won't automatically display in the corresponding budget until there is activity in those accounts in the underlying actual Profit and Loss stream.
However, you can display this group in the budget by switching to an unpruned view. You can then add the appropriate accounts under the new group (category). In the image below, a new group called Example was added in the statement setup. In the budget, this new group is only visible in the unpruned view.
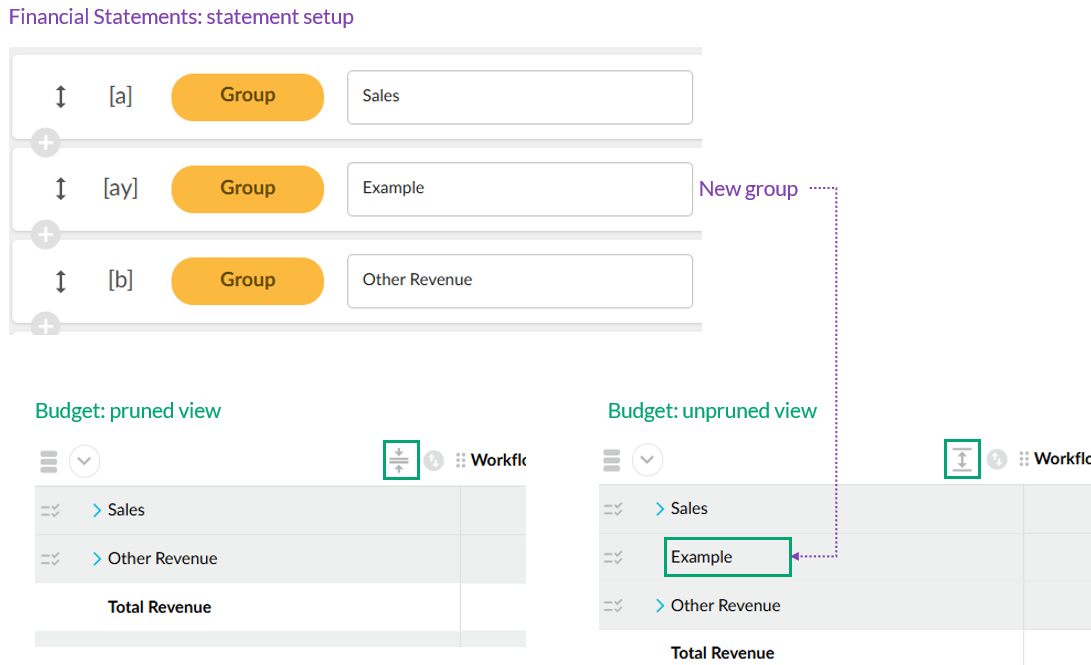
For example, suppose you have not previously had any loans, but you take out a new loan and add Interest Paid as a separate group in your Profit and Loss statement. As the account(s) in this group did not have activity in the prior year, which is used as the baseline for the budget, the group will not show in the budget workbook by default. You need to add it into the budget.
On the Main tab, switch to the unpruned view to view those groups that have no account rows.
Locate the row of the new group, hover over it and click the blue Add button that displays, then proceed to add the dimension entity.
Watch this video for a demonstration (note the UI is out of date but the context is the same):
Last updated
