Headcount tab

Add a Headcount tab in your financial budget workbook to budget employee-related costs and automatically drive expense accounts in the Main tab.

User permissions: Budgets & Forecasts and Manage Budgets & Forecasts

The Headcount tab allows you to budget employee-related costs, such as wages, commissions, and employee benefits, to drive expense accounts in the Main tab that are per-head dependent, such as travel costs, software licenses, and so on.

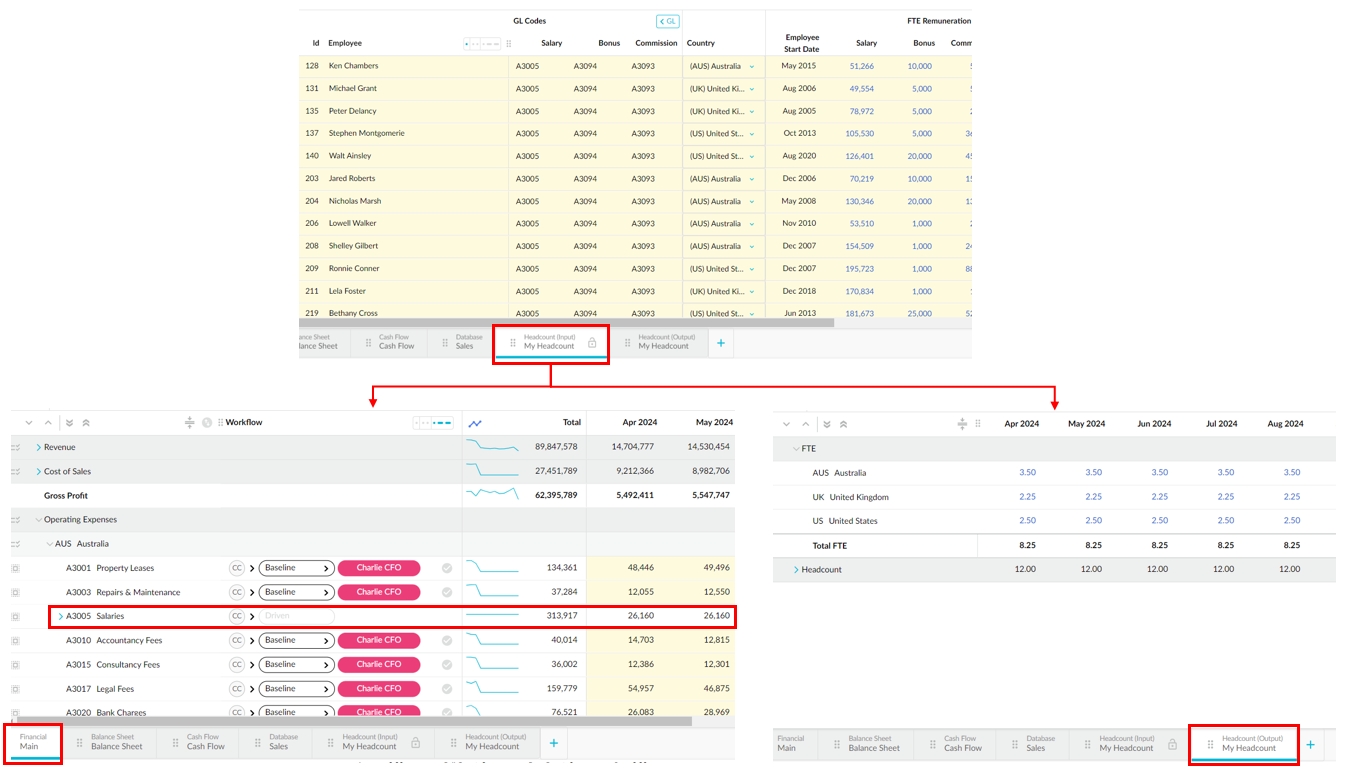
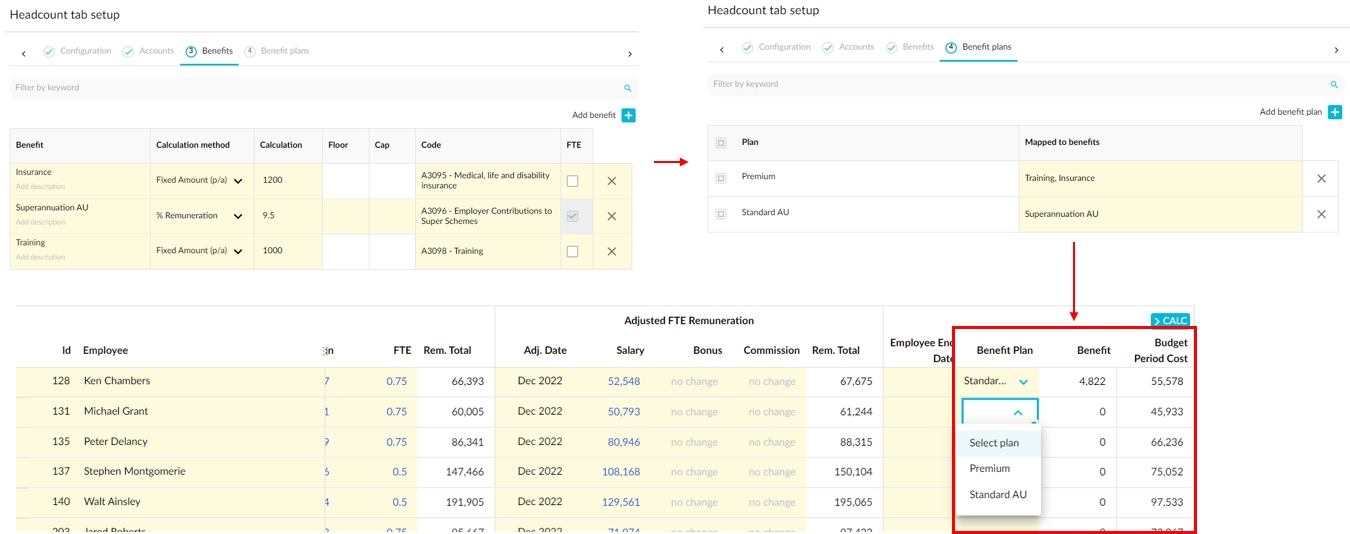
The Headcount tab is different from other tabs you can add to the workbook in that it requires an additional level of user access and is more complex to set up, as illustrated in the following diagram.
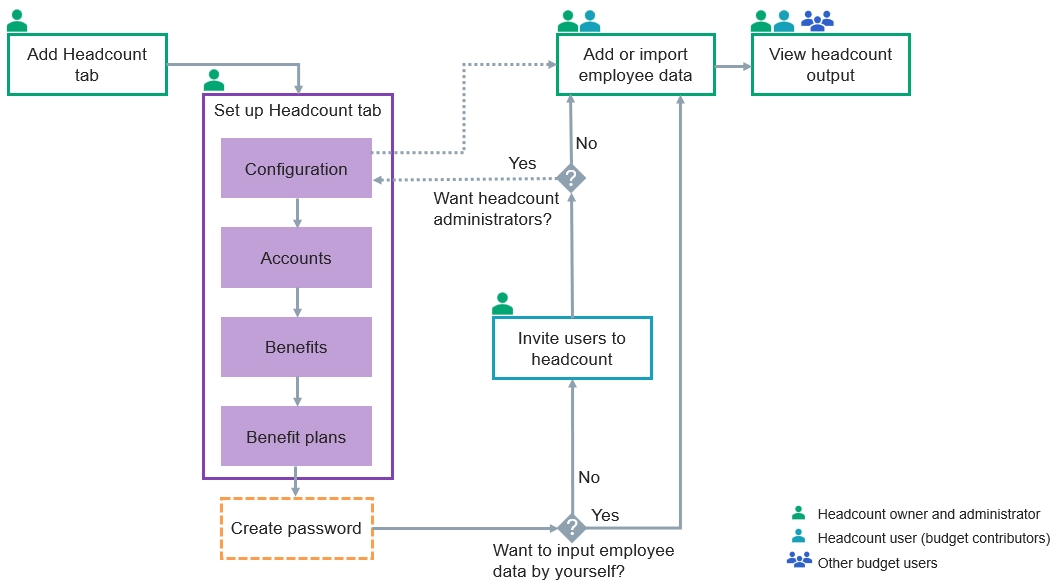
In the headcount setup, you add benefits that are mapped to your accounts and add benefit plans that are mapped to those benefits. Then in the Headcount Input tab, after you add the employee data, you select the applicable benefit plan for each employee. The system automatically calculates the employee’s benefit value, along with how much it will cost over the budget period (taking the employment end date into account), and displays those values in the Benefit and Budget Period Cost columns respectively.
Add the Headcount tab

First, add the tab using one of these methods:

  • Click the Tab menu > Add tab > Headcount.

  • Click the Add button at the bottom of the workbook, enter a name for the tab, select the Headcount tab type, and click Add.

Then, proceed to set up the Headcount driver tab. This is where you select the accounts you want to drive with the headcount data and add benefits and benefit plans that are mapped to those accounts. This process involves several steps and settings, which are organized into tabs:

1. Configuration

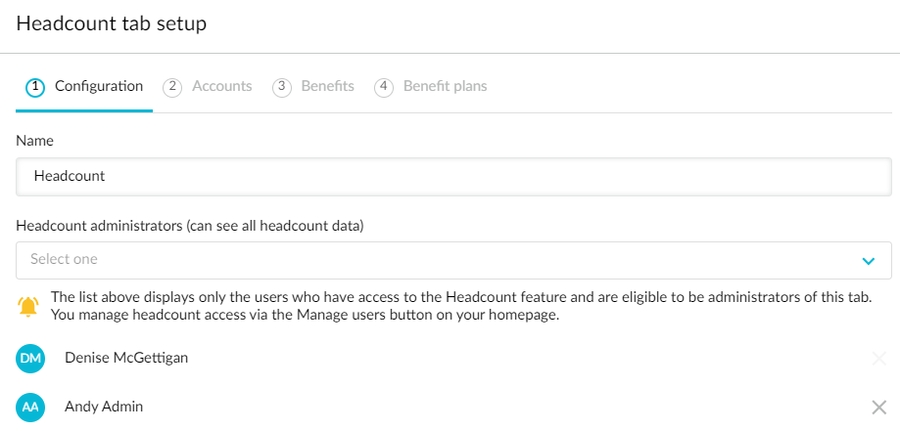
Edit the name of the new tab, if required.

  1. Add other headcount administrators, if required. By default, as you are the headcount owner (creating the tab), you are also a headcount administrator. You can add other administrators to help you manage the workflow on this tab. Ensure the selected administrators have full access to the database on which the budget is based. If you do not see the required user(s) in the list, check they have access to the headcount feature.

  2. Click Next.

2. Accounts
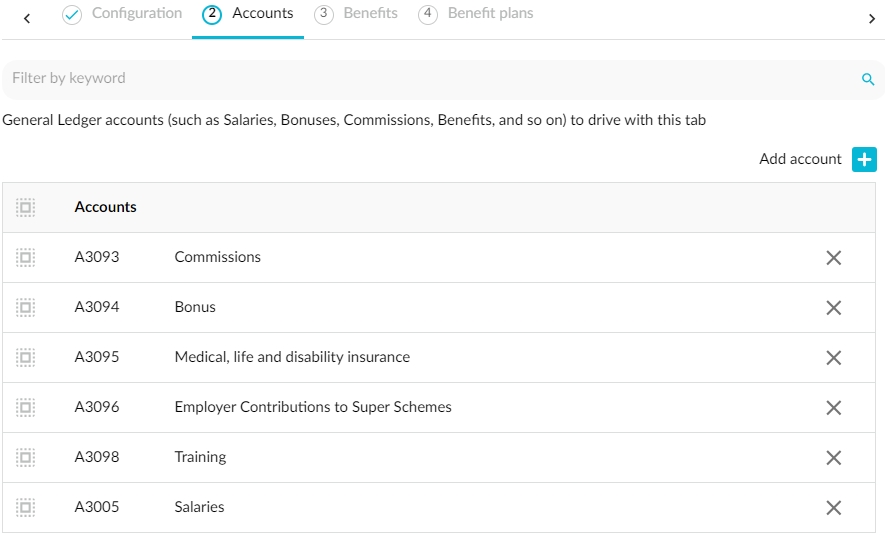
  1. Click the blue Add account button.

  2. Select the General Ledger account(s) you want to drive with this Headcount tab. Common accounts include Salaries, Wages, Commissions, Bonuses, and Benefit Plans.

  3. Click out of the account list to apply your selection.

  1. Click Next.

3. Benefits
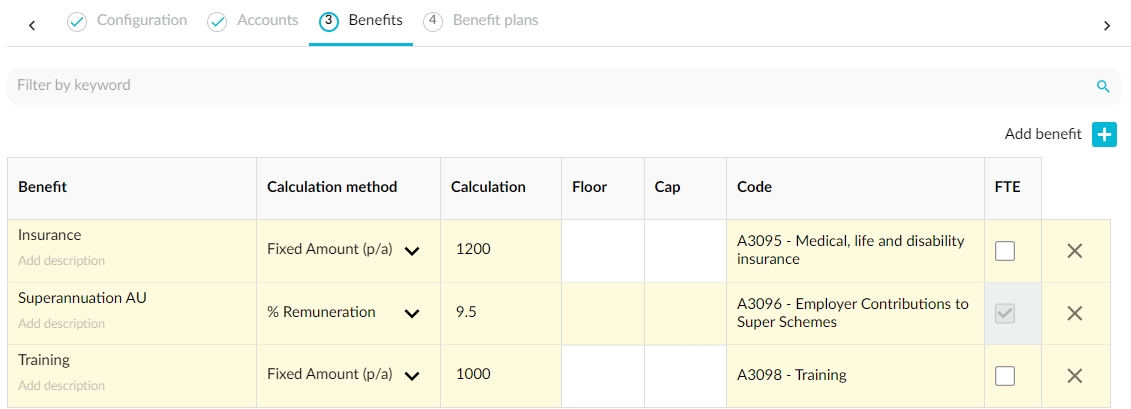
  1. Click the blue Add benefit button.

  2. In the grid, enter a name for the benefit, and a description, if required.

  3. Set up the benefit calculation:

    • Fixed amount per annum: select Fixed amount p/a as the Calculation method and enter that amount in the Calculation box.

    • Percentage of the employee’s remuneration: Select % Remuneration as the Calculation method and enter that percentage value in the Calculation box, then enter the Floor (minimum) and Cap (maximum) values, if required.

  4. Select the General Ledger account applicable to this benefit, such as Employee Benefits. If you do not see the required account in the list, you need to go back to the Accounts tab (click Previous) and add it there.

  5. Clear the FTE checkbox, if applicable.

    • This checkbox is selected by default, indicating that this benefit applies to full-time employees only.

    • This setting is used to prorate the benefit for non-FTE employees. For example, if an employee works part-time and is 0.5 FTE in the Headcount worksheet, only 0.5 of the benefit is applied. This setting only applies to fixed amount benefits because the percentage of remuneration benefits already factors this in (the remuneration is at a part-time rate).

  6. Repeat the above steps to add more benefits, as required.

  7. Click Next.

4. Benefit plans
  1. Click the blue Add benefit plan button.

  2. In the grid, enter a name for the benefit plan.

  3. Click the yellow cell, then select the benefit(s) you want to map to this plan, and click Save. If you do not see the required benefit in the list, you need to go back to the Benefits tab and add it there (click Cancel, then click Previous).

  4. Repeat the above steps to add more benefit plans, as required.

  5. Click Save and finish.

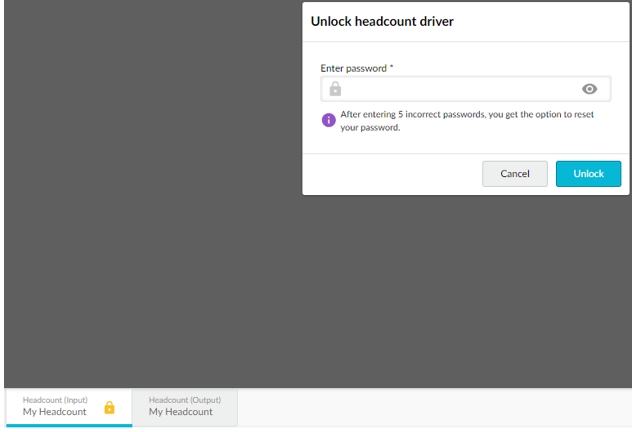
Finish the setup by adding a password to unlock the headcount tab. The password is required to protect the privacy of your employee headcount data. Enter a password (something you will easily remember) and click Unlock.

  • It is important to use a password that you will remember, as it cannot be recovered or reset if you forget it.

  • In the event you forget your password, you will be locked out of the Headcount Input tab and unable to access your headcount data. Contact us to discuss your options.

  • To limit the risk of losing your headcount data, we recommend you add one or more administrators to this tab.

After you complete the setup and enter a password, two worksheet tabs, Headcount Input and Headcount Output, are automatically generated for you. Both tabs are blank initially. The next step is to add or import the employee data (see next section). If you want help to do so, you need to invite users to the headcount tab before you can assign them to tasks in the workflow.

Add or import employee data

While you can manually enter your employee data row by row, it is more efficient to import this data. You can import a file that you exported from your payroll system or use the Phocas template file. Either way, Phocas automatically calculates the employee’s total remuneration value and displays it in the Rem. Total column.

You might want to assign this task to other users in the workflow. See the Manage headcount users section below.

Before you import data - things to consider and do

To avoid issues later on, ensure you consider the following points and take any required action:

  • Ensure the corresponding General Ledger accounts have been added to the headcount tab setup. If your import file contains accounts that are not in your headcount setup, you will get a message requiring you to validate the accounts, which means map them to your headcount accounts. If you don’t have any accounts to map to, you'll need to cancel the import, add the accounts to the headcount setup, and then restart the import.

  • The employee ID needs to be a unique identifier, such as an employee code. If you currently use a position description as the ID and that description is duplicated, for example, Sales Rep, you need to create a unique ID for each employee instead. To do so, you could concatenate the position and name, or add a sequential number to each position, for example, Sales Rep 1, Sales Rep 2, and so on.

  • If your organization uses hourly rates, you need to convert them to a salary equivalent because the headcount works on an annual salary basis. You can do this in two ways:

    • (Recommended) Before you import the file: In the file, multiply the hourly rate by the hours worked.

    • After you import the file: In the Headcount Input tab, enter formulas in the salary cell. You could enter the formula directly, for example, =1800*25, or include a reference to a cell in the Manual Entry tab. The latter option is useful if you have the hourly rate and hours worked for different types of employees in a single place.

Import employee data
  1. Prepare the import file, using one of these methods:

    • Use your own file: Export the file from your payroll system and save it to your computer.

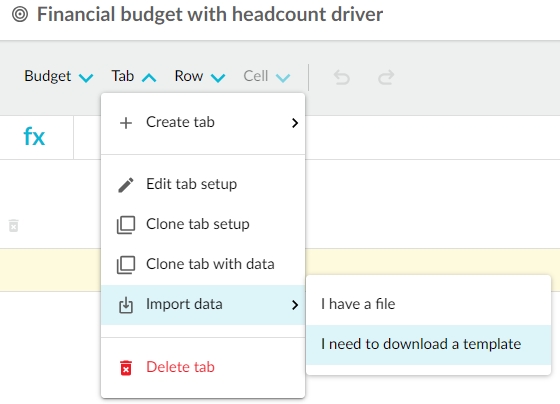
    • Use the Phocas template file: On the Headcount Input tab, click the Tab menu and click Import data > I need to download a template. Open the template and enable editing, then enter your employee data and save the file to your computer.

  2. On the Headcount Input tab, import the file using one of these methods:

    • Click the Tab menu and click Import data > I have a file, then select the file you want to import.

    • Drag and drop the file into the worksheet.

  3. In the Import window, review the imported data that is automatically mapped to the database and make any required changes, then click Import.

  4. (If validation required) Select the matching item(s). This step is required when an item in your import file, such as a dimension or account, cannot be automatically mapped to items in your database. In the case of accounts, refer to the Before you start section above.

  5. Click Import. The Headcount Input tab updates with the imported data. You can see a list of your employees, along with information such as which region they belong to, when they started, and their base bonus and commissions.

  6. Review the imported data and calculated totals.

  7. Proceed to add additional headcount details (see below).

Add employee details manually

On the Headcount Input tab, manually add or edit the details as required. You might need to scroll to the bottom of the grid to find the blank row.

  • Employees: Enter the data as required. For example, type New Hire in the Employee column as a placeholder for a new employee that you plan to recruit during the year.

  • Employment end dates: Click the employee’s Employee End Date cell and select the month they are planning to leave the company.

  • Benefit plan: Click the employee’s Benefit Plan column and select the applicable benefit plan. The system automatically calculates the employee’s benefit value and its cost over the budget period (taking the employment end date into account) and displays these values in the Benefit and Budget Period Cost columns, respectively.

  • General Ledger account codes that you are driving: You selected these accounts during the headcount setup and they were automatically applied to the employees, but you can change them. In the GL Codes column group, click the employee’s Salary, Bonus or Commission column and select the applicable account.

Proceed to adjust the salary, bonus, and commission values (see below).

Adjust the salary, bonus, and commission values

In the Adjusted FTE Remuneration section of the Headcount Input tab, you can adjust an employee’s salary, bonus, and commission. The system automatically adjusts the employee’s total remuneration value accordingly and displays the new total in the second Rem. Total column. You can refer to these values in formulas on the Main and other tabs.

For example, if you want to give an employee a 5% pay increase, enter the formula =Fte_salary*1.05.

Update headcount details

Quickly update headcount details using the export-import method. Export the tab, make your changes, save and close the file, and then import the file (using the same steps above). The existing data is overwritten with your changes.

You can manually delete headcount rows you no longer need, either individually or in bulk.

  • To delete one row, hover over the row to display the Delete button, then click the button.

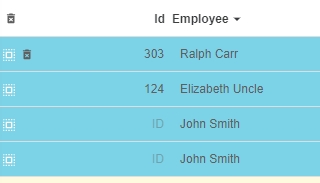
  • To delete multiple rows at once, select the rows you want to delete (they turn blue) and click the Delete button at the top left of the grid.
View headcount output

The result of all your work setting up the Headcount Input tab is summarized in the Headcount Output tab and reflected in automatically driven budget values in the Main tab.

You can't edit the headcount values in either the Main or Output tabs; you need to return to the Headcount Input tab to do so.

Manage headcount users

All Budgets & Forecasts users (contributors) can view and use the summary headcount data in the Headcount Output tab. However, due to the sensitive nature of your organization’s headcount data, the Headcount Input tab requires an additional level of user security.

Before you start - learn about headcount access and users

To protect the privacy of your employee headcount data, each user needs:

  • Access to the headcount. The Headcount Input tab is locked with a password that is used to encrypt the data. Each user who is invited to use the tab needs to create their own password.

  • Access to the data. Even if a user has access to the Headcount Input tab, they can only see the rows to which they are assigned in the workflow.

There are three types of headcount users. These users are similar to (but not the same as) the types of users in the Budgets & Forecasts module.

Headcount owner

User permissions required: Budgets & Forecasts and Manage Budgets & Forecasts

Only the budget owner can add a Headcount tab, so by default, the budget owner is also the headcount owner and the baseline for the headcount workflow. Initially, the headcount owner is also the only headcount administrator, and the only user who can view the Headcount Input tab. The headcount owner can invite other users to the headcount and add them as headcount administrators.

Headcount administrator

User permissions required: Budgets & Forecasts and Manage Budgets & Forecasts

The headcount owner can add headcount users as headcount administrators. Headcount administrators can view all the rows in the Headcount Input tab (not just the rows to which they have been assigned in the workflow).

The key reason for having a headcount administrator is to ensure that someone in your organization (other than the headcount owner) has full access to the Headcount Input tab. In the event that the headcount owner loses their password and gets locked out of the tab, the administrator can unlock the tab and retrieve the headcount data.

In addition to the above safeguard, the headcount administrator can help the owner by completing these tasks:

  • Import, add, and adjust headcount data.

  • Add headcount users (and other administrators).

  • Assign users to rows in the headcount workflow (the baseline remains assigned to the headcount owner).

Headcount user

User permission required: Budgets & Forecasts

The headcount owner and administrators can add budget users (contributors) as headcount users and then assign them to rows in the workflow. In the Headcount Input tab, headcount users can view only the rows to which they have been assigned.

Invite a user to the headcount (give them access)

You manage headcount users at a global level, separate from the individual headcount tab in a workbook. You invite a budget user to be a headcount user, and when they create a password, they can access the headcount tab in which they've been assigned tasks in the workflow.

See Manage user access and notifications > Manage access to the headcount feature.

Example of how headcount user access works

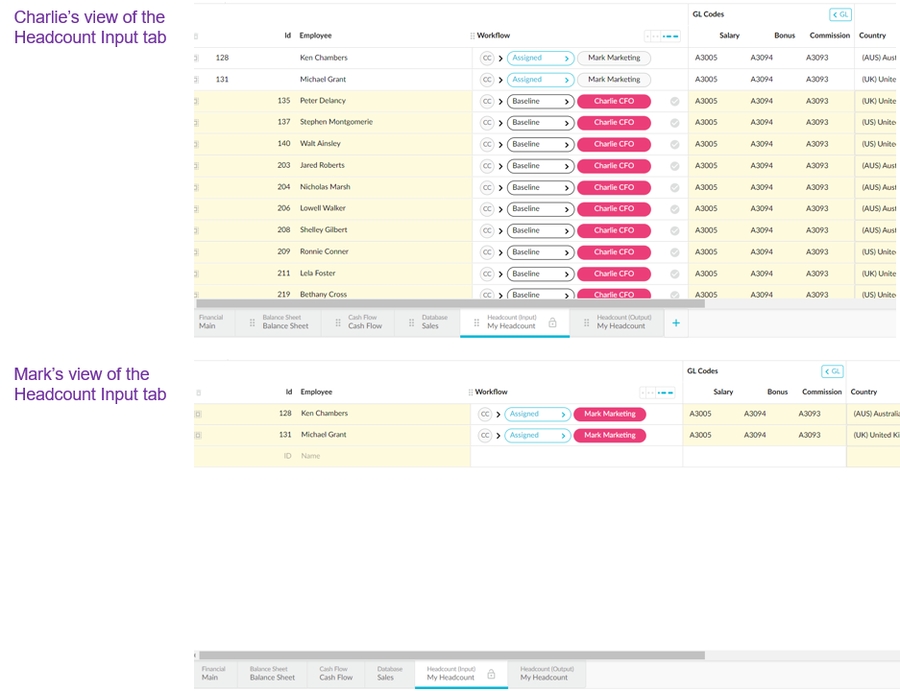
Charlie has just added a Headcount tab and now wants Mark to enter data for the employees in his team. In the Manage users window, Charlie invites Mark to the headcount. Mark’s headcount status is now pending.

When Mark opens the corresponding workbook and clicks the Headcount Input tab, he is asked to create a password to unlock the tab.

When Mark unlocks the Headcount Input tab, he gains access to the tab but not the data. His access to the data depends on the workflow; he can’t see any data because he hasn’t been assigned to any rows in the headcount workflow. In the Manage users window, Charlie can see that Mark now has access to the headcount and, therefore, is eligible to be assigned some tasks in the workflow.

Charlie assigns Mark to two rows in the workflow. Mark can now see those assigned rows in the Headcount Input tab and proceed to complete the data entry for those rows.

Add a user as a headcount administrator

When a user has access to the headcount (has been invited and created a password), their names display in the list of potential administrators in the headcount setup.

Open the headcount tab setup, select the user’s name from the Headcount administrators list and click Next > Next > Next > Save and finish.

Troubleshooting: If a user is still in pending status, you can’t add them as an administrator. Contact the user to remind them to create a password.

Edit the headcount setup

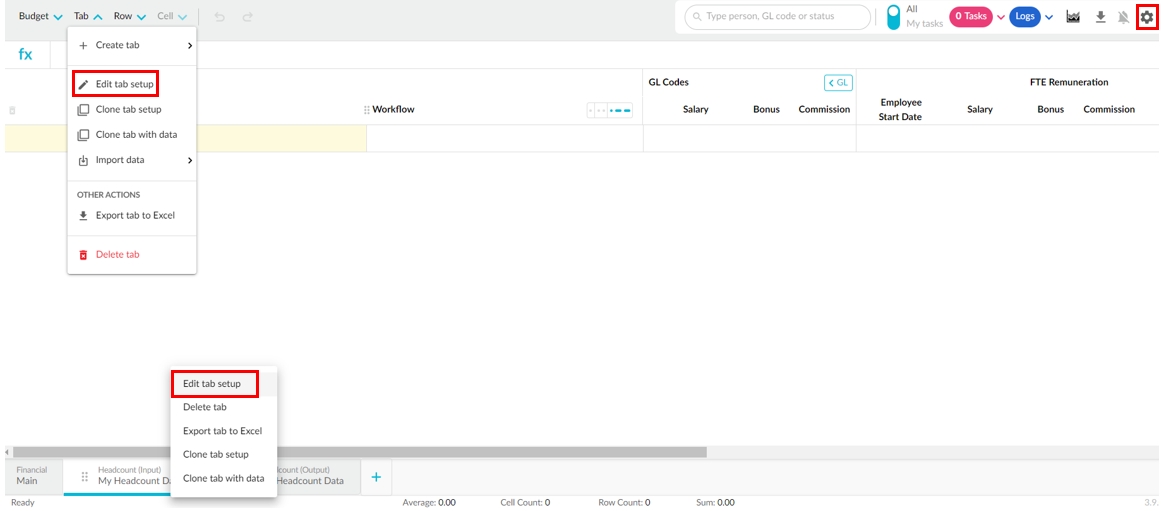
You can edit the setup of your headcount tab as your needs change. You return to the setup screen in the same way you edit any other tab setup. You can also use the Headcount settings button in the top-right toolbar.
Delete the Headcount tab

As explained in the View headcount output section above, the headcount rows drive rows in the Main tab, so you end up with child rows in the Main tab under each mapped account.

When you delete the Headcount Input tab, these rows remain in the Main tab by default but you have the option to delete them. The Headcount Output tab is also deleted.

  1. Either click the Tab menu and click Delete tab or right-click the Headcount (Input) tab and click Delete.

  2. Select the checkbox if you want to delete all rows in the main tab that are driven by this tab.

    • The following image shows what happens in the Main tab if you don't select this checkbox (default behavior). A sum row remains under the account row and it is editable.

    • The following image shows what happens in the Main tab if you do select this checkbox. There’s no headcount-related sum row under the account row. It’s as if there never was a Headcount Input tab.

  3. Click Delete to confirm the deletion. Refresh your screen to ensure the changes are applied.


Headcount FAQs

Here are answers to some common questions asked about the Headcount feature:

1. How do I manage superannuation?

I need to add superannuation as a benefit to calculate the superannuation. The superannuation rate increases in July this year but the budget reflects a calendar year. How can I apply the correct rate for a specified period?

Answer: Enter superannuation at the current rate in the Headcount tab, then add an adjustment in the Main tab under each occurrence of the superannuation that needs to be increased. When a Headcount row drives a General Leger row, it comes in as a sum line. You can add additional sum lines to adjust the amount that the Headcount is driving.

2. How do I revise the timing of the budgeted hires and remuneration adjustments?

I’m using the Headcount tab to drive the remuneration figures in the Main tab of my forecast but things aren’t going to plan. How do I deal with changes to headcount start dates and adjustments?

Answer: Make the required changes in the Headcount tab; all your changes will flow back to the Main tab. Watch this video for a demonstration.

3. Can I budget by headcount weekly in a monthly budget?

You can't budget headcount weekly in a monthly budget. When a budget is based on a database, you can only add entities that exist in the database, so if the employees to be added are in the database already but not showing in the budget due to no activity in the baseline period, they can be added, but there is no way to add entities that do not exist in the database.

To get around this, create a separate budget based on the Week period type for your headcount, then publish that budget, so it can be used in the main budget.

Last updated