Explore the budget workbook
Learn about the key elements of a budget workbook.
In Phocas, when you open a workbook via your homepage or other means, it opens in the Budgets & Forecasts module on the Main tab.

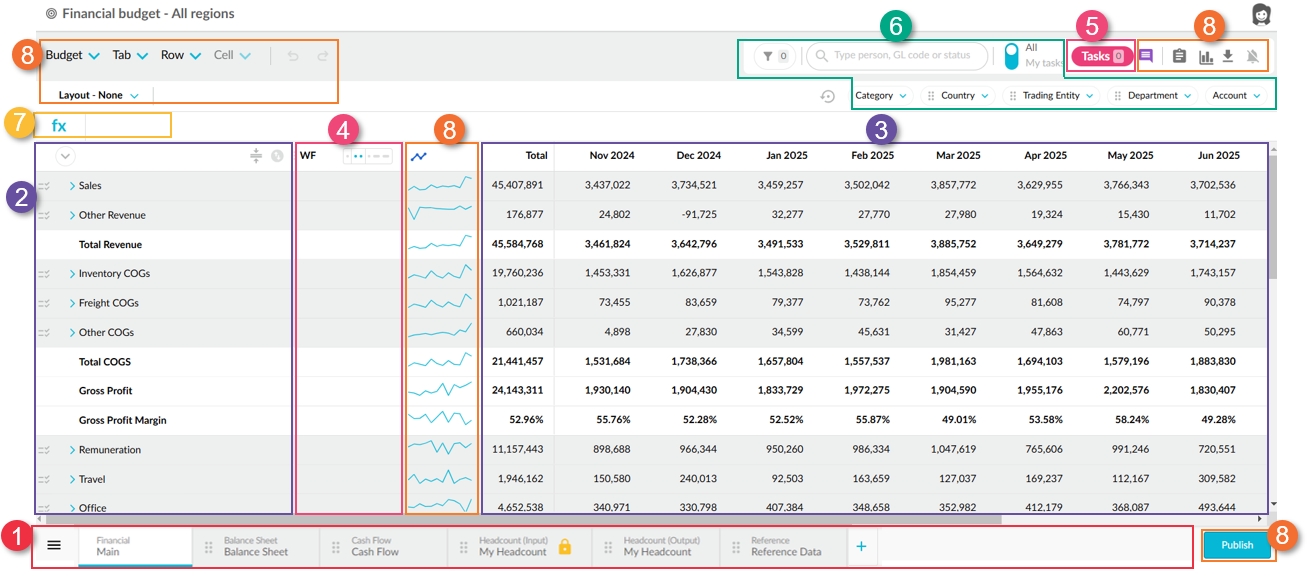
Worksheet tabs:
The Main worksheet tab always displays. In a financial budget workbook, the Main tab displays the Profit and Loss budget. In an operational budget workbook, the Main tab displays the applicable budget, such as the Sales or Purchasing budget. The structure and contents of each budget on the Main tab come from the budget setup.
Other worksheet tabs might be present. These tabs, added by the budget owner or administrator, contain data that supports the Main tab. They might even drive the values on the Main tab. Hover over a tab to see what type of information it displays. If you have a lot of tabs, a menu button displays on the left, so you can quickly jump to the tab you need.
Budget rows: The budget line items. The items that are displayed depend on the budget setup.
Click the Drag to resize button to increase the width of the first column and view the full name of the categories, dimensions and accounts, or decrease the width and get a better view of the other columns.
Hover over the Expand button on the top-left to display the expand options: Expand single, Collapse single, Expand all, or Collapse all. This is a quick way to view and hide the lower-level items in the worksheet. Other expand/collapse options are on the right: Pruned view and Expand all comparison rows. As access to the workbook is restricted, you might only see some of the rows in the worksheet.
Hover over certain areas of a budget row to display icons (buttons) you can click to perform actions such as spread totals, view comparison data, add working or sum lines, and view comments.
Budget data entry grid: View, enter, and edit budget values against the budget line items. You can only edit the yellow rows, as they have been assigned to you in the workflow.
Workflow column: View and update the workflow for each row.
Workflow task list: See at a glance the number of your assigned tasks in the workflow, and jump straight to those tasks.
Filters: Filter the items in the worksheet by a condition or filter one or more dimension levels, search for a specific item by keyword, or switch between viewing all tasks (all rows in the budget) or just your own tasks (rows to which you have been assigned).
FX (formula) bar: Enter and view formulas to assist with entering values.
Menus and other actions: On the top-left, you can use the Budget, Tab, Row and Cell menus to access a list of actions. Many of these actions are accessible in other ways, such as a right-click menu. The actions available to you depend on your permissions and the item you've selected in the worksheet. Other action buttons include:
On the top-left, you can undo or redo changes you make in the worksheet, and apply a layout.
On the top-right, you can view the audit log, view the data in a chart, export the data, and manage your workflow notifications.
Within the grid, you can collapse (or expand) the sparklines.
On the bottom-right, you can publish the workbook.
